Everyone wants a faster website. With Google using loading speed as one of the primary metrics for ranking in search results, the faster your website, the better. It also just makes for a better user experience. However, making sure that your site is running that quickly can be a lot of work. Thanks to WPMU DEV, making your website faster may take less effort and time than you may think because of their performance-optimization plugins WP Smush and Hummingbird. In this article we’ll show you what happened when we took a Divi portfolio site on shared hosting and added the optimizing powers of these plugins.
Getting Started with WPMU DEV
The first thing you should know is that these plugins are part of a premium suite that WPMU DEV offers. Anyone who is a member gets access to them. These are the versions that we have used for this case study. You can also download free versions that don’t have access to premium features from the WordPress.org plugin repository. The free version of Smush is here and Hummingbird is here.
To access your membership page, you need to navigate to WPMU DEV’s Members Hub. If you’re not a member, you can always sign up for a 7-day free trial to give these plugins (and the other benefits) a shot to see how they can help your own site.
When you click the Add Website button, you just need to put in your site’s URL and connect it via WordPress admin username/password. When you’ve done that, your site is in the WPMU DEV Hub. The WPMU DEV Hub plugin has now installed and activated itself on your site.
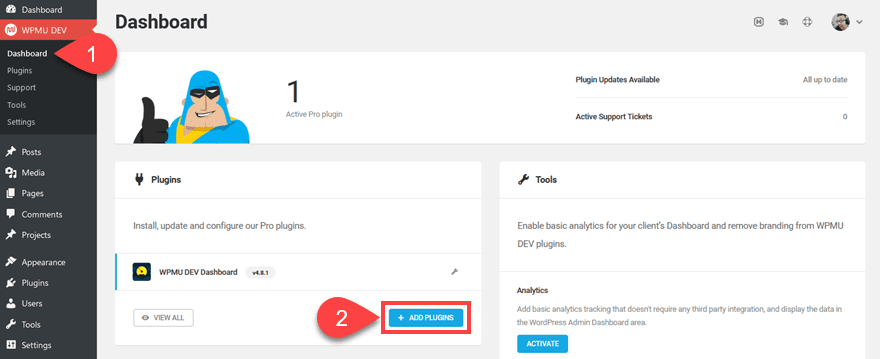
The new menu item WPMU DEV appears at the top of your dashboard now. You can manage every one of their premium plugins from this page. To get WP Smush and Hummingbird installed and activated, just press Add Plugins. At which point you can choose them from the list of all WPMU DEV’s Pro plugins.
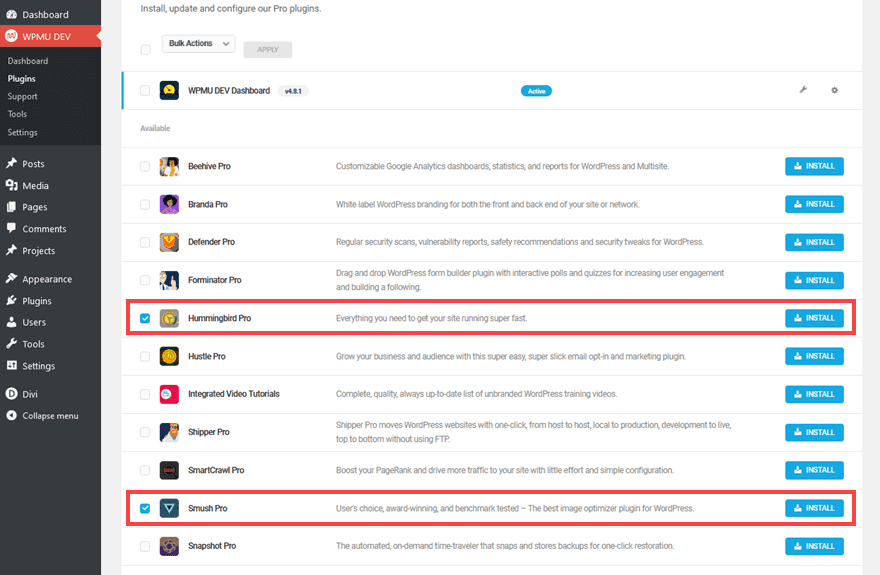
The plugins will now show up in the WPMU DEV dashboard.
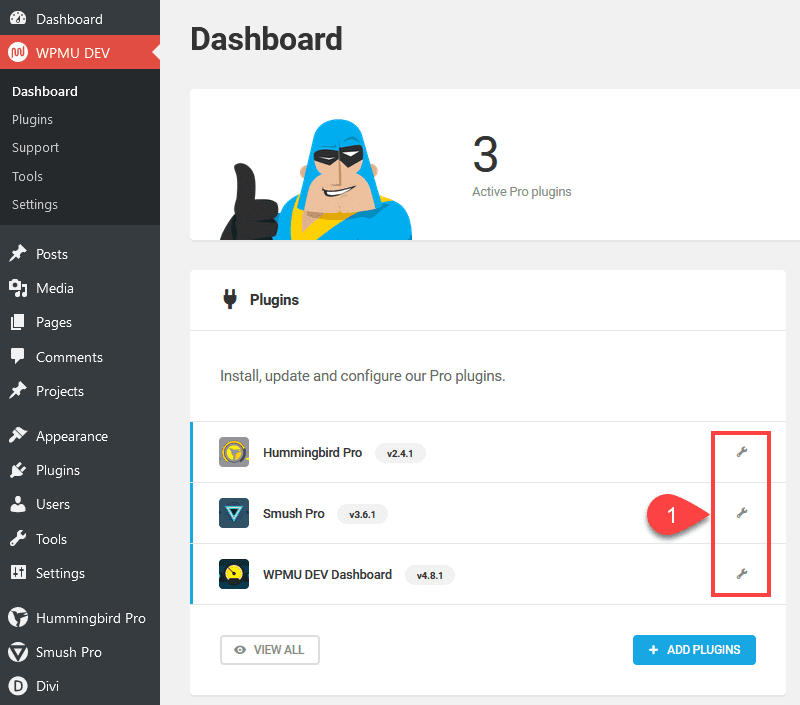
To alter any settings, you can either find them in the sidebar (just above the Divi link) or click on the wrench icons to be taken there immediately.
WP Smush and Hummingbird Pro with Divi
For this test, we set up a brand new website running only the Divi theme. In terms of hosting, the site has been set up on the SiteGround GrowBig hosting plan. The comparison page lists the server stats as follows:
- Simultaneous Server Processes: 20
- Simultaneous Connections from Single IP: 15
- CPU Seconds / Program and Script Executions: 2000/hour, 20000/day, 600000/month
- Average Process Execution Time per Day: 2 seconds
- Shared Service CPU Usage: No more than 20% for a period longer than 10 seconds
- Server Memory per Process: 768 MB
- Inodes: 300,000
- Minimum Cron Job Interval: 30mins
- Database queries: no more than 10% of server resources
We are also using an image-heavy portfolio page from one of our Divi layout packs. We loaded up the Makeup Artist Portfolio layout, which imported the images and content for the layout pack before we installed and activated either WP Smush Pro or Hummingbird Pro.

Before WP Smush and Hummingbird
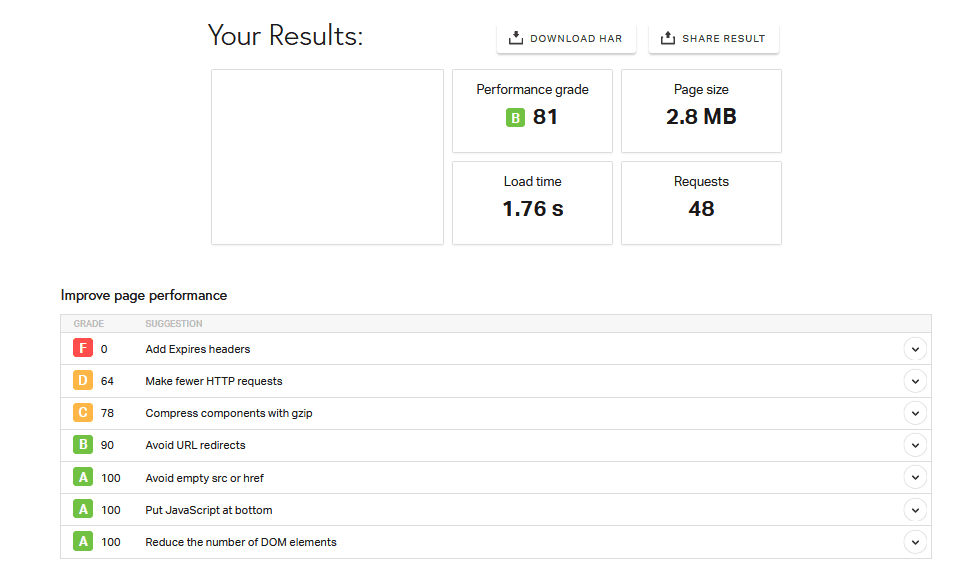
We loaded up the site, installed the plugins via the WPMU DEV Hub, and imported the layout pack from within the Divi Builder. The initial performance tests look like this.
Pingdom Tools
GTMetrix
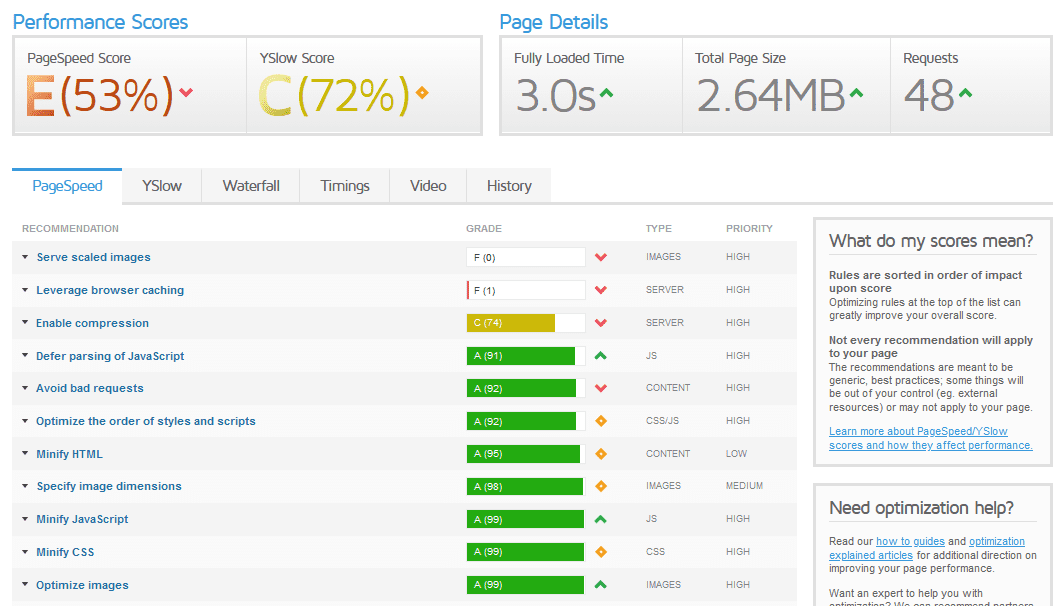
With those results, we can definitely see that we need the image compression, code minification, CDN, and caching capabilities of WP Smush and Hummingbird Pro. So let’s see what happens when we set them up.
Setting Up Hummingbird Pro
When you first head into the Hummingbird settings, you can go for a Quick Setup via modal. We suggest you start this process by clicking the Run Performance Test button. Even though you have the tests from above if you’ve run them yourself, this one’s personalized to the site and plugin and can give you guidelines on what to configure.
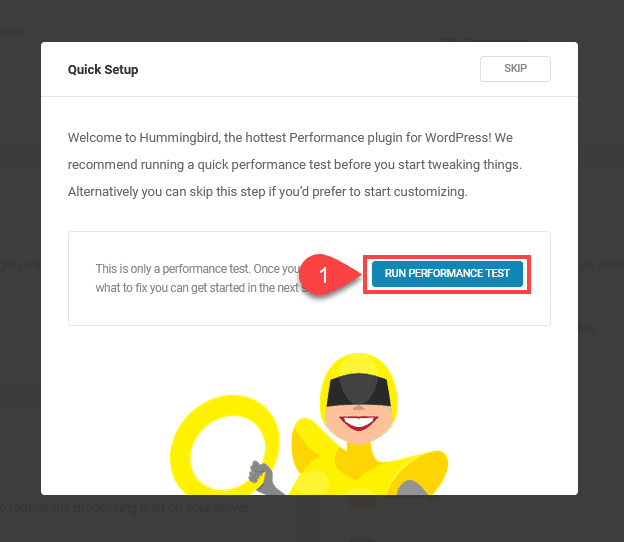
It shouldn’t take the plugin more than a minute or two to run the test (if that), and it will redirect you to your Hummingbird dashboard. This is also where your performance report is displayed.
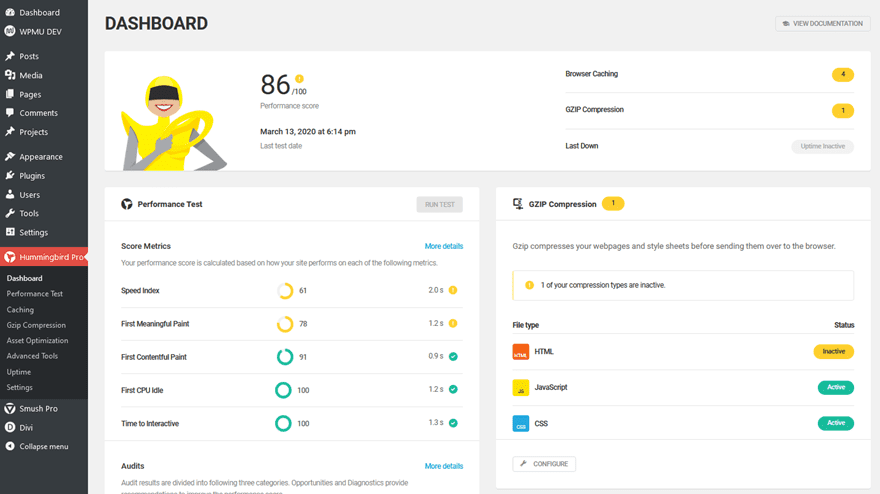
This is roughly the same information the other tests gave us, so we know things are consistent. We can not comfortably move through the different settings for each plugin and rectify as many of these as we can.
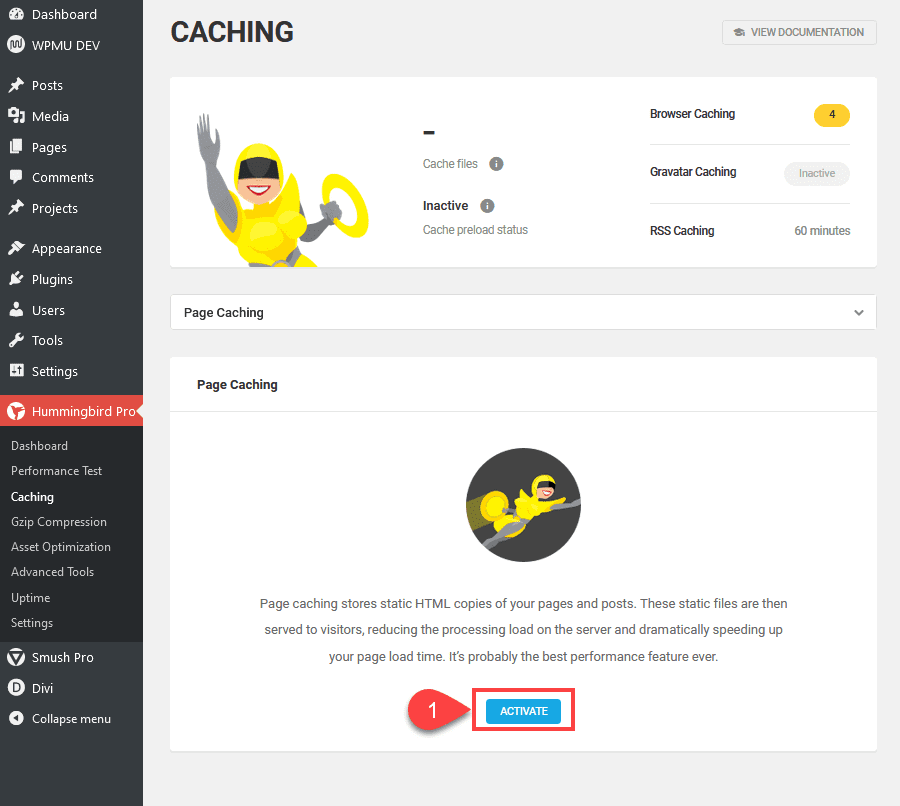
No website should be without a caching plugin. And Hummingbird Pro is a great one. (That’s not all it does, which is awesome, too.) Just navigate to Hummingbird Pro – Caching and click the Activate button to get things started.
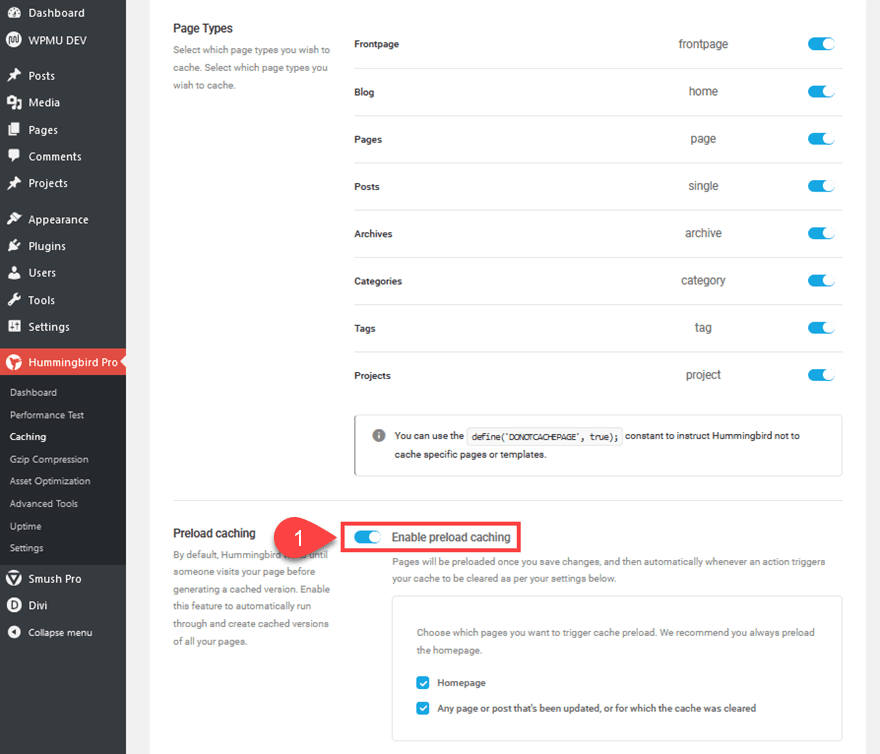
You’ll then be on the typical Caching page, where you have toggles for what you want cached. The only thing we want to adjust here is Enable Preload Caching, because this will keep everything cached ahead of time and not wait for a visitor to hit your site.
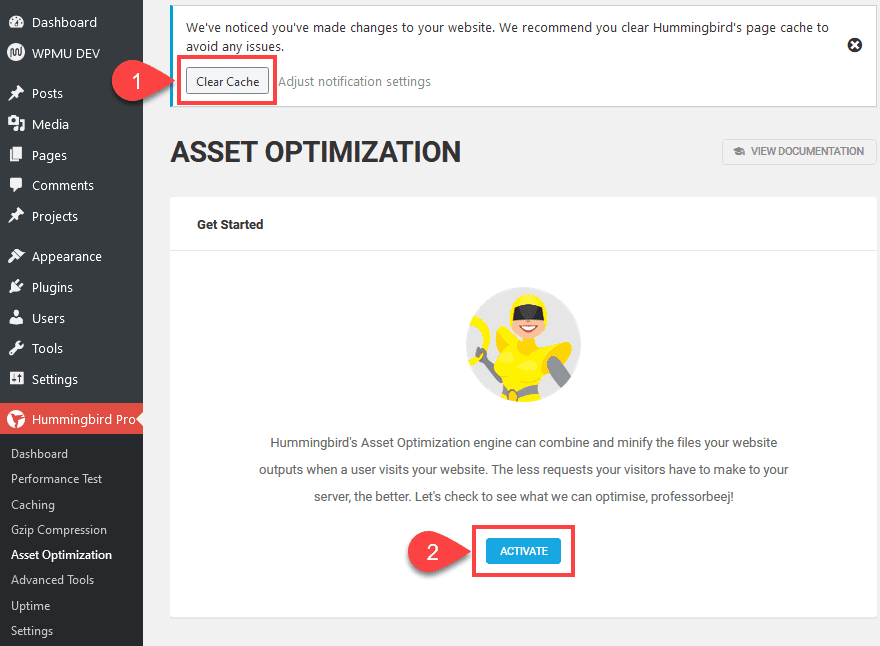
Next, click on Asset Optimization in the sidebar. On the next page, press the Activate button to get started. You also might occasionally get a notification at the top of your screen like the one below. If this happens, we suggest clearing your cache with the button, as you’re pre-loading and that should fix any issues other adjustments have caused.
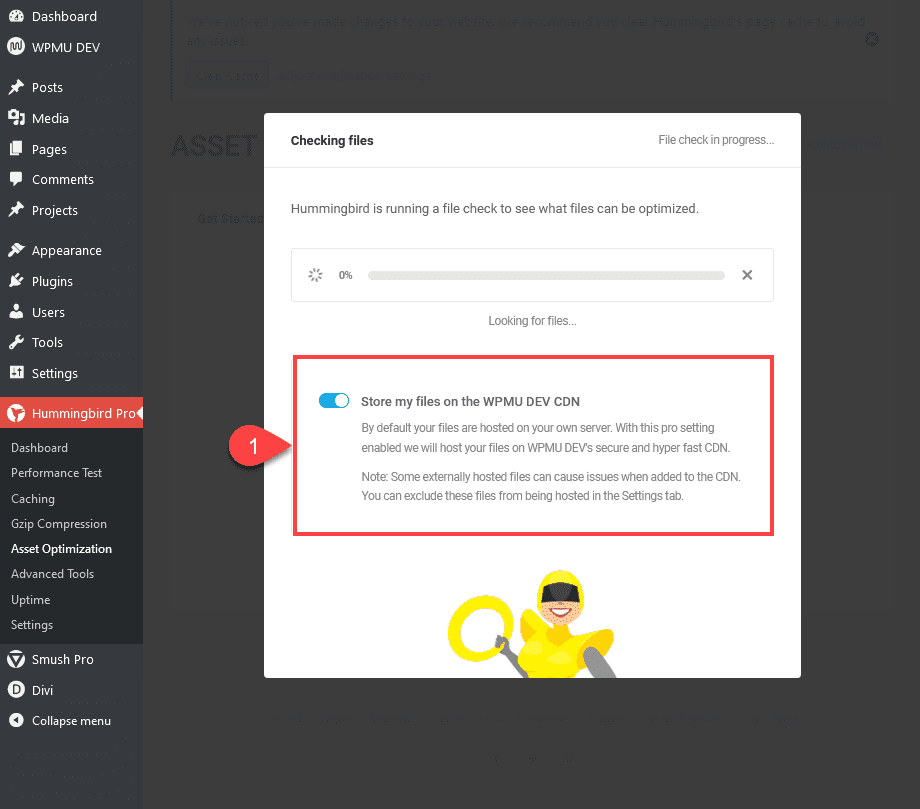
Once pressed, you will make a very important choice: do you want to use the WMPU DEV CDN for your media assets? We suggest that you use it. However, if you’re using Cloudflare or another CDN (or even the Jetpack image CDN), it’s best to only have one active at a time.
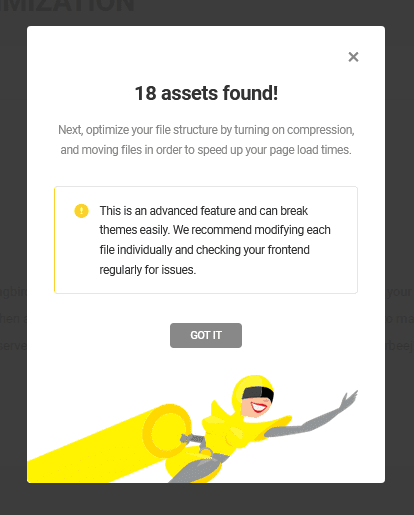
By choosing to use the CDN, Hummingbird Pro will search your site for any assets it can move to WPMU DEV’s servers. This is a new test site, so only 18 exist. Yours will likely be substantially larger than this example.
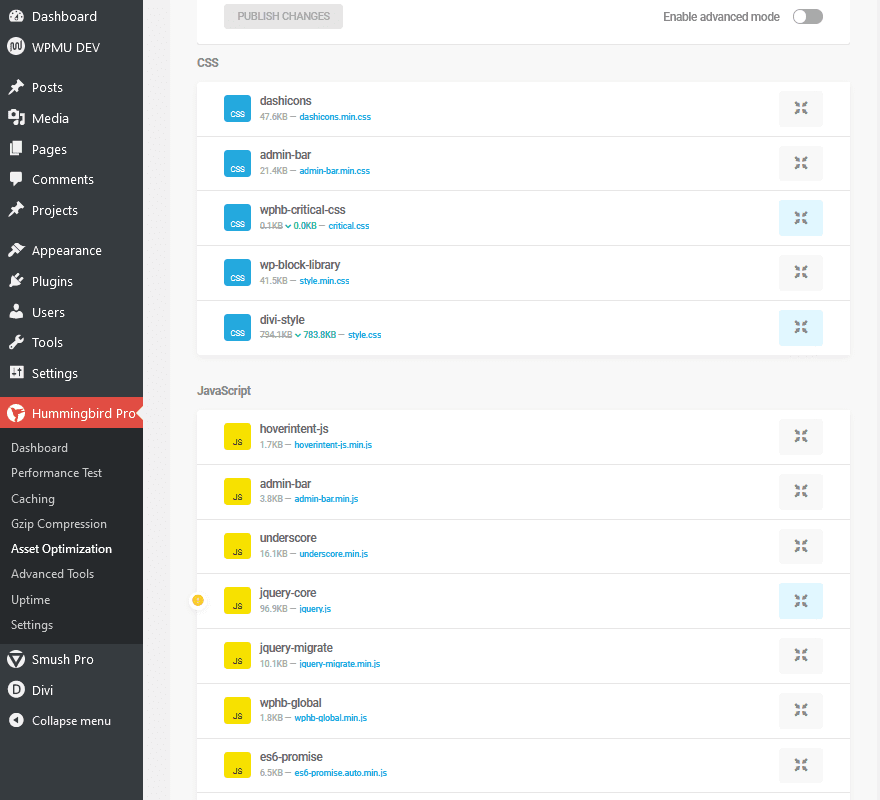
Afterward, you will see which assets are available for compression and which are automatically compressed. We chose to compress any files that were possible to compress.
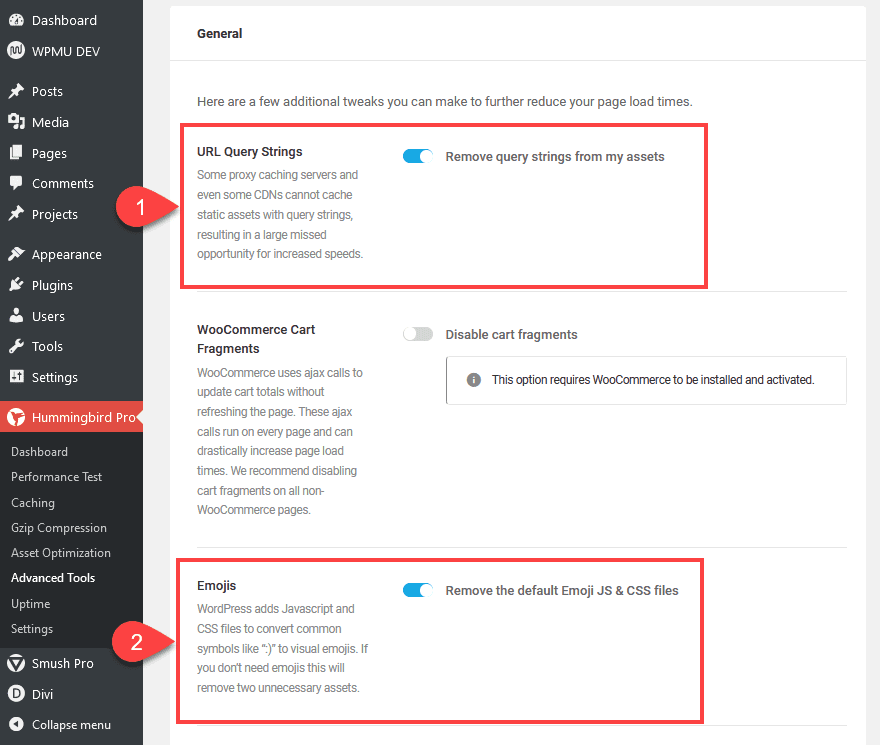
Afterward, click into Advanced Tools and enable Remove Query Strings From My Assets and Remove the Default Emoji JS & CSS Files. These add a lot of extra requests for your page for something you’re likely not using at all.
Save and enable these settings, and that’s it for Hummingbird Pro optimization setup. However, you can also turn on Uptime Monitoring, which we do recommend.
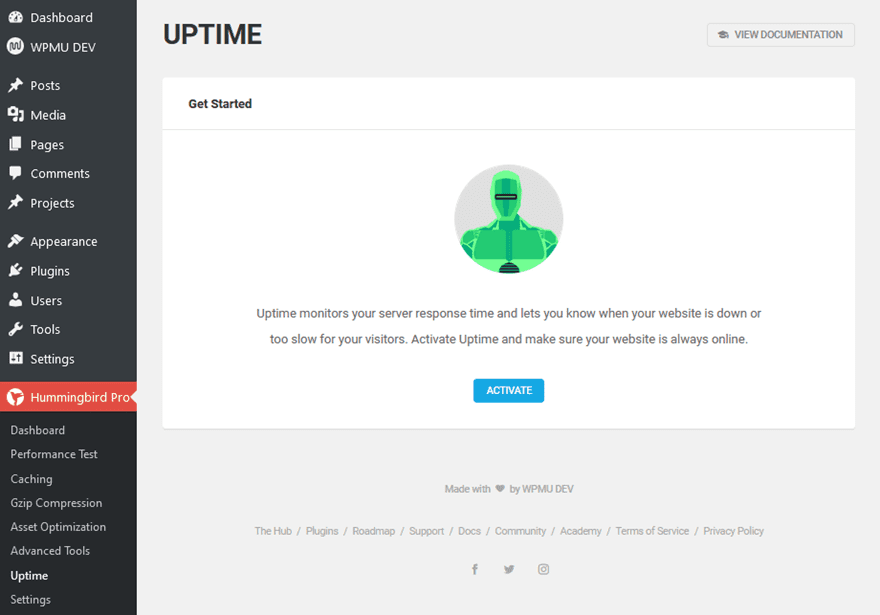
Click into Uptime and then press the Activate button. This doesn’t affect performance at all. However, knowing when something is wrong with your site is equally as important.
Setting Up WP Smush Pro
The first time you click into the Smush Pro item in your WP dashboard menu, you will see a modal. Smush Pro is an image optimization and compression plugin. As such, it’s fairly straightforward to get things working. Therefore, we think it’s best to press Begin Setup and get the ball rolling as soon as possible.

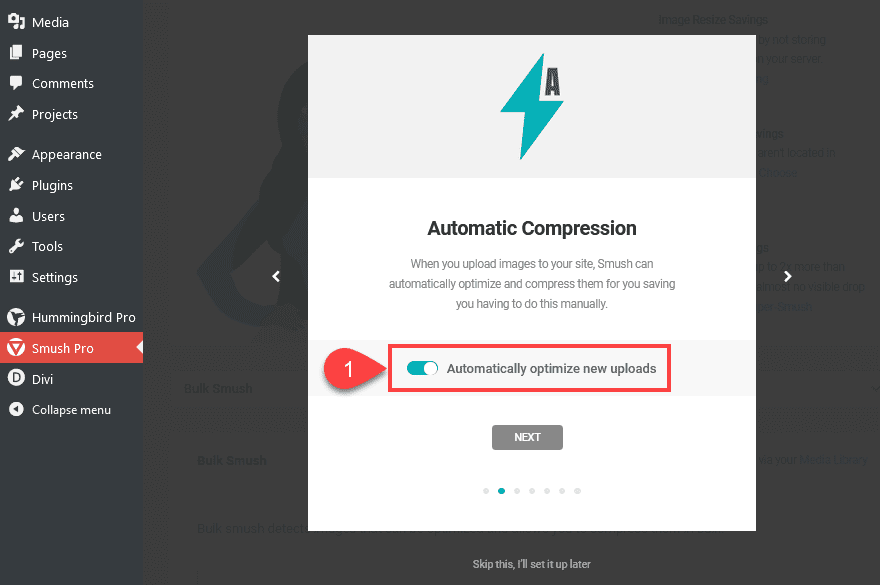
First, you want to enable Automatically Optimize New Uploads. This option means that you don’t have to manually (or bulk) compress images. The plugin does it automatically.
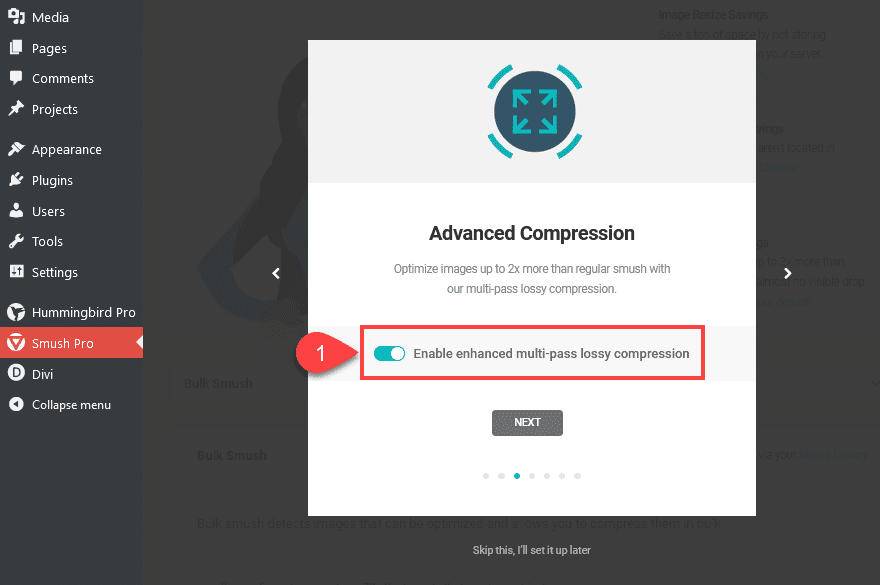
 After that, you probably want to turn on Enable Enhanced Multi-Pass Lossy Compression. Not all sites will want lossy compression for their images, but for run-of-the-mill sites, this option is fine.
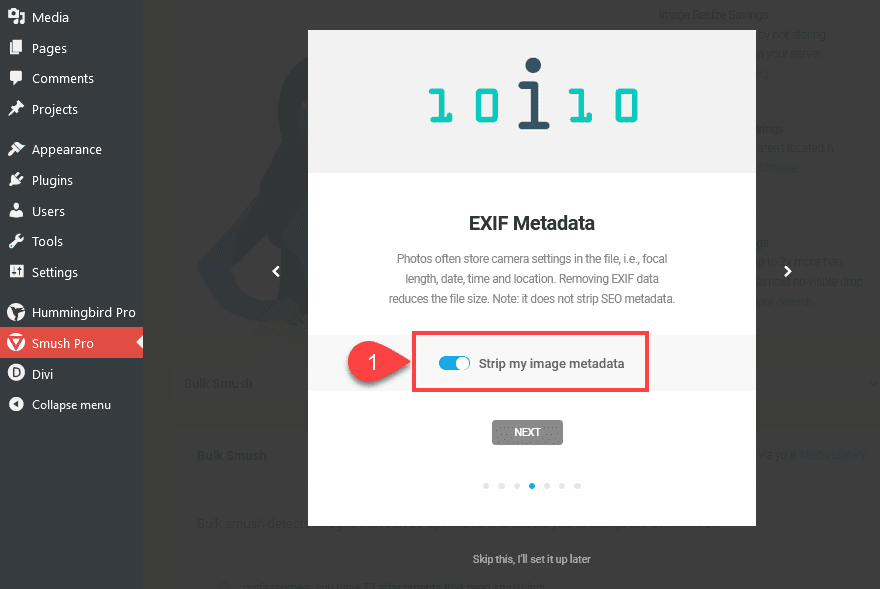
Next up is making sure you strip EXIF data from your pictures. Basically, this is the information that tells where the image came from and when. It’s not SEO data. So you don’t need it. Turn on Strip my Image Metadata and click Next.
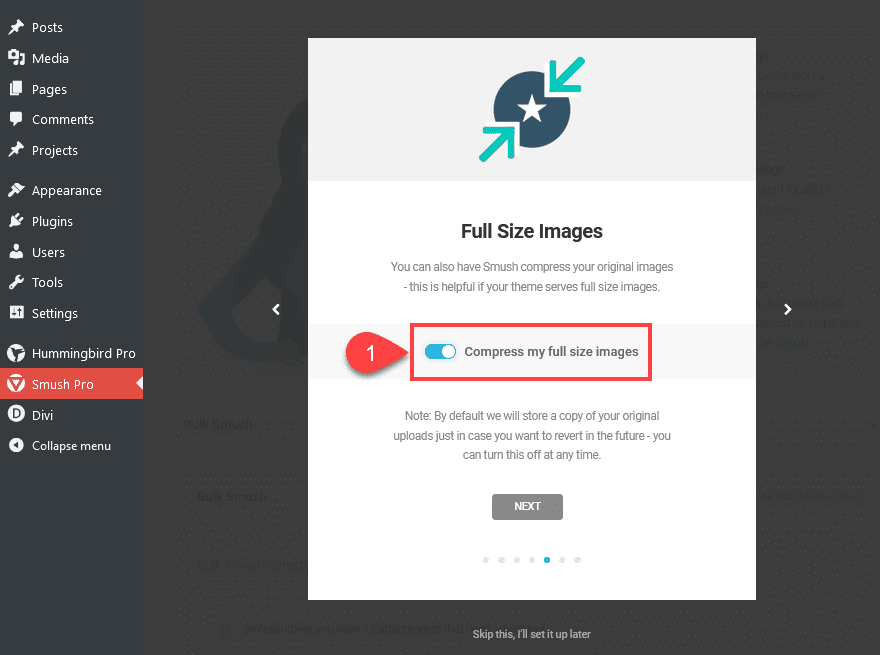
Finally, we have a decision to make regarding your full-size images. Do you want them compressed, too, or just variant sizes? We say that you do. So enable Compress My Full Size Images, and get ready to smush some pictures.
Now, this setup was just that: setup. You haven’t actually compressed anything. No images have been smushed yet. You see on the next screen how many media files you can smush and how much file-size savings you’re going to have.
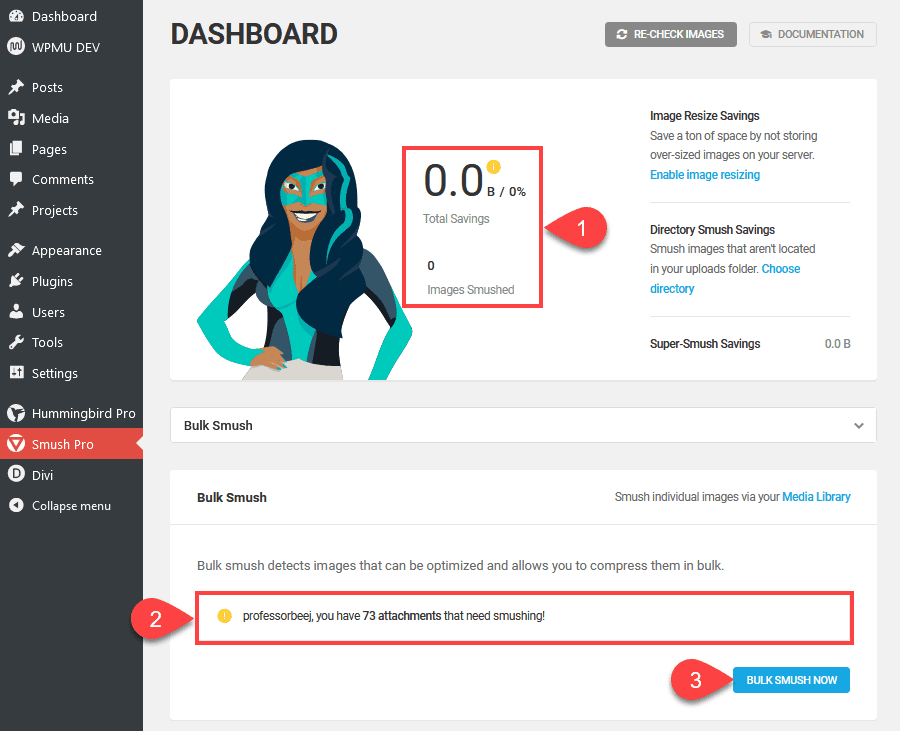
When you press the Bulk Smush Now, the plugin goes to work. You must keep the window open during this process, so if you have a large number of images to compress, this is the time to go make a sandwich or a cup of coffee. Or both.
When you come back, you will (hopefully) see a message telling you that everything has been smushed and a total amount of savings.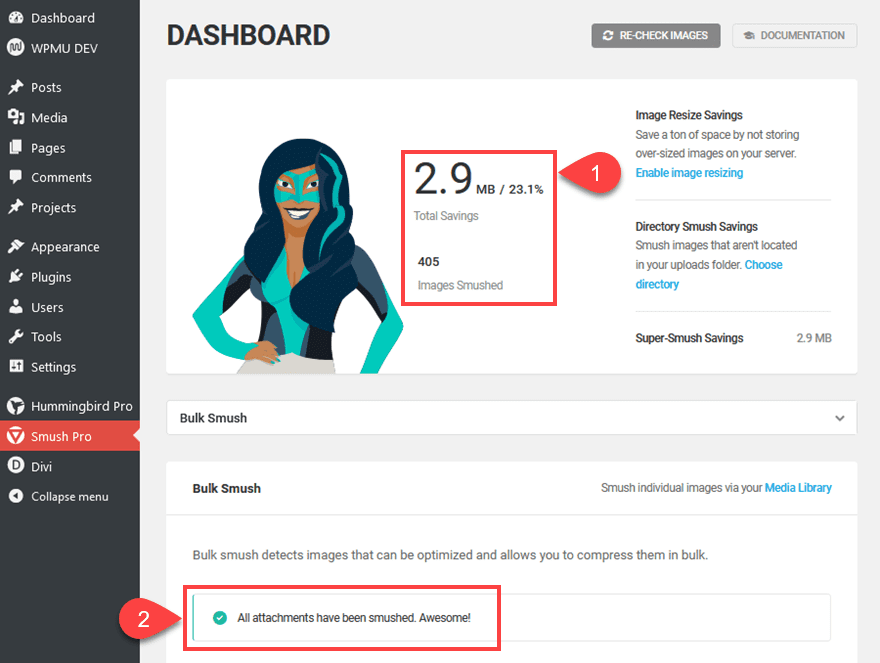
For us, one our single-page portfolio demo site, we saved 23% of data with 2.9mb. That’s a lot for a single page. If you continue scrolling, you will see all the options and Settings that you set up in the setup wizard. There is, however, an option we want to highlight that you want generally to keep disabled.

You probably don’t want to let WP Smush Pro Resize My Full Size Images. This is different from the compression that we enabled earlier. This adjusts the image resolution. As you can see in the image above, WordPress itself as of version 5.3 does this automatically. If you need images larger than it’s default (but smaller than what you upload), enable this. If not, keep it undone.
The same goes for Auto-convert PNGs to JPEGs (Lossy). While you will probably save a little space with this, the chance of breaking images on an existing site is incredibly high. Only enable this if you aren’t worried about crystal-clear images or having the URL path altered.

Other Smush Pro Options
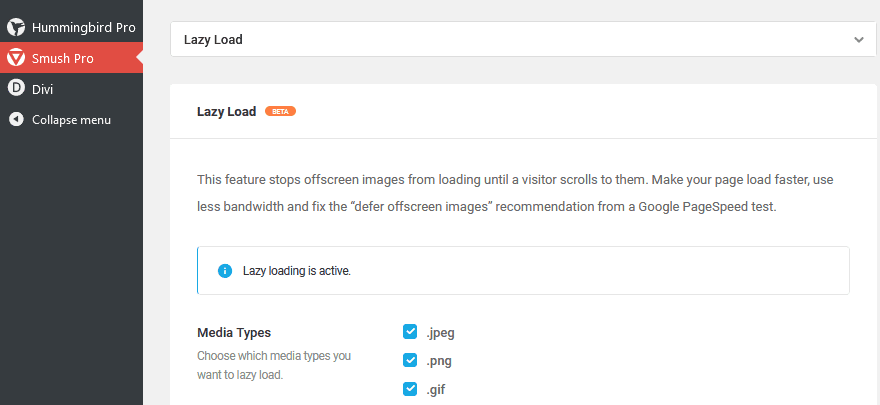
Lazy Loading is enabled by default for WP Smush Pro. We recommend you keep it on. Again, if you’re using Lazy Loading from another source, you want to only use 1. So choose where you want that to come from and disable the others.
The WPMU DEV CDN is also a major feature of WP Smush Pro’s power. By default, it’s inactive. This is separate from the Hummingbird CDN storage, so you will want to enable this as well. When you do, navigate to Smush Pro dashboard and then pick CDN in the menu to the left of the screen (or dropdown if you’re on a smaller viewport).
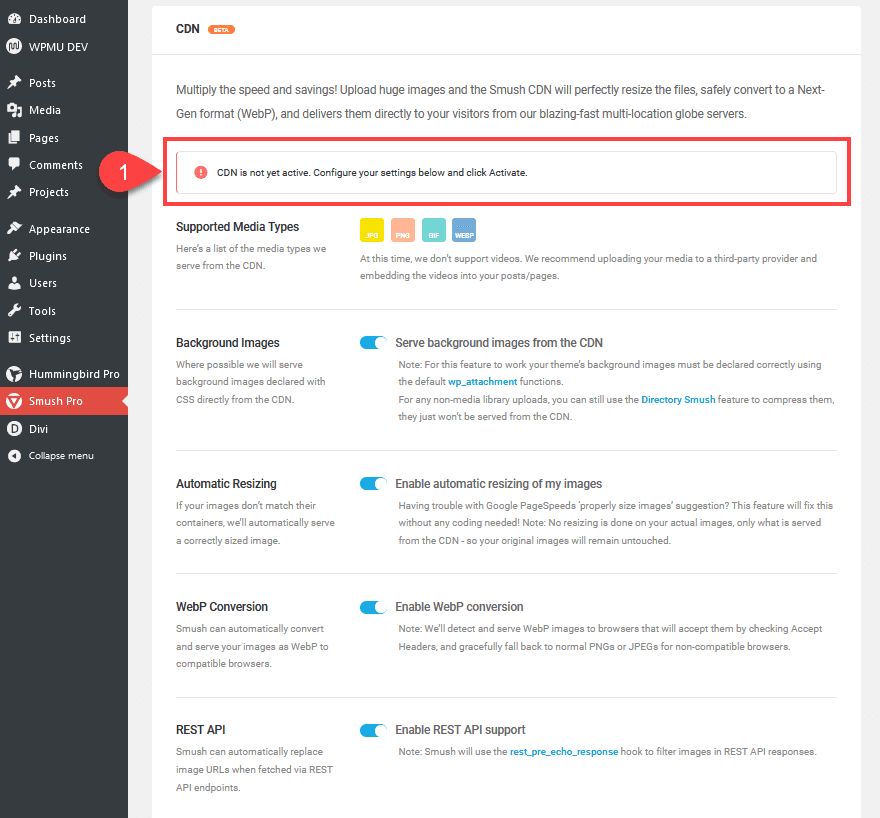
You will get a page of disabled options and a warning that reads CDN is not yet active. Configure your settings below and click Activate. We enabled all of the options because we do want background images served, we want any images we might have oversized to be brought down to the right fit for their container, going through the REST API can ease things up a little, and most importantly, enabling WebP conversion can make even smushed images much smaller. (Read about the WebP format here if you aren’t familiar with it.)
Once you click Save and Activate at the bottom of the screen, you’ll be given a message that either the CDN has been activated or that it will be activated within 30 minutes. We’ve had both.
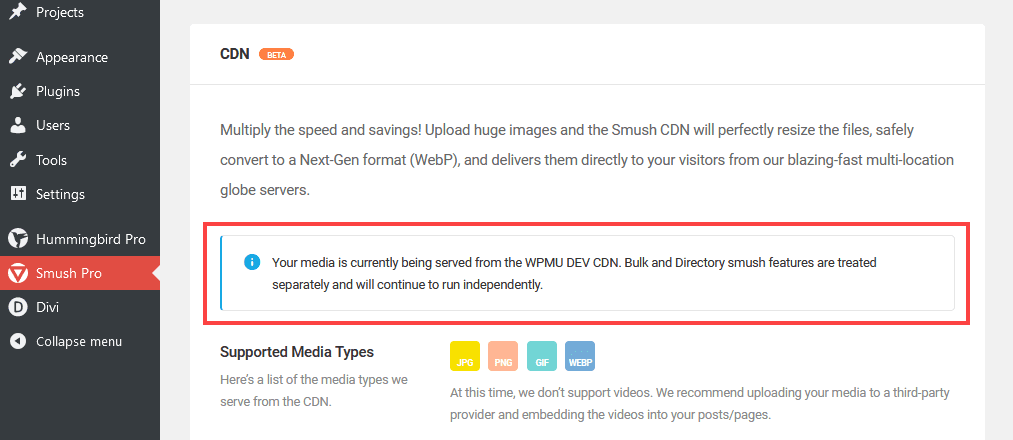
And then…nothing. You’re done! Well, in terms of beginning setup. You’ve managed to get both Hummingbird Pro and WP Smush Pro configured so that your site is just about as optimized as it can be.
With that said, let’s see how optimized we are, out of the gate.
After WP Smush and Hummingbird
With these changes made, we went back to both Pingdom Tools and GTMetrix.
Pingdom Tools
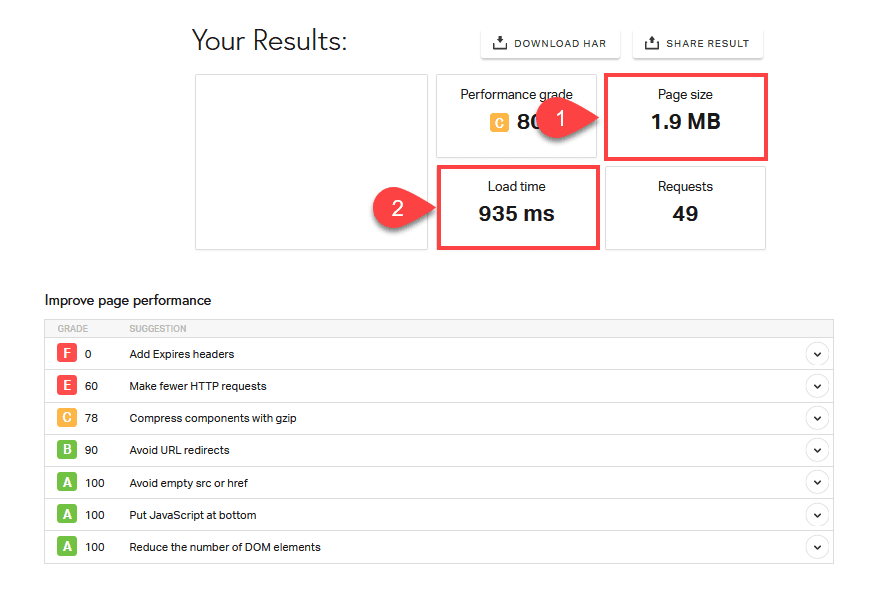
With Pingdom, we saw significant increases by installing and activating these plugins. We dropped the initial load time down to under 1 second at 935 milliseconds, and the total size of the page was reduced by almost 1/3 at just under 1 mb.
GTMetrix
Using GTMetrix, we saw similar results as with Pingdom.
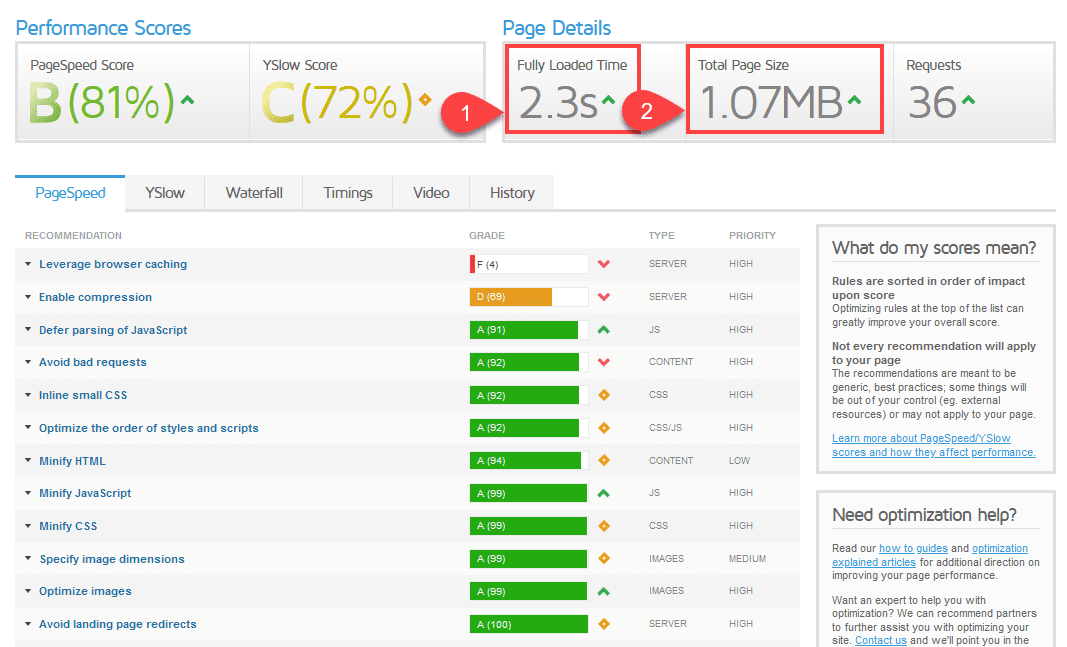 We saw a definite drop in load time at 0.7 seconds, down from 3.0 to 2.3. And the total page size dropped 1.57 mb (from 2.64 to 1.07 mb) thanks to the compression and caching. Again, we’re looking at nearly a second off of load time and a 40% reduction in page size.
Conclusion
All in all, we’re incredibly happy with the results we see. Installing and activating the plugins is easy and straightforward, and we’re seeing seconds drop from load times and page size drop nearly in half. That’s the kind of performance users want from a plugin, especially when you’re able to get a portfolio website loading in under 1 second. If you haven’t signed up for WPMU DEV, you should definitely give them a shot (free trial, remember?), and if you’re not a Divi user, there’s never been a better time. As you can see, Smush, Hummingbird, and Divi can definitely be the best of friends.
What tips and tricks do you have for WP Smush and Hummingbird to speed up your site?
Article featured image by WPMU DEV
Keep reading the article at Elegant Themes Blog. The article was originally written by B.J. Keeton on 2020-03-15 12:00:06.
The article was hand-picked and curated for you by the Editorial Team of WP Archives.

