Are you tired of spam entries in your contact form?
If your form isn’t protected, you’ll see spam registrations and submissions selling products and services. Apart from being annoying, the real problem is that genuine leads could get lost in the mess.
In this article, we’ll show you how to use anti-spam tools to stop contact form spam once and for all.
Why Are You Getting Spam Form Entries?
If you’re wondering “Why me? Why am I getting spam?” The simple answer is that you left your form unprotected.
Contact form spam is usually generated by bots that are programmed to crawl the internet and find unprotected forms.
They then fill it out with a preset message and submit the form. And you end up with a random form submission like this:
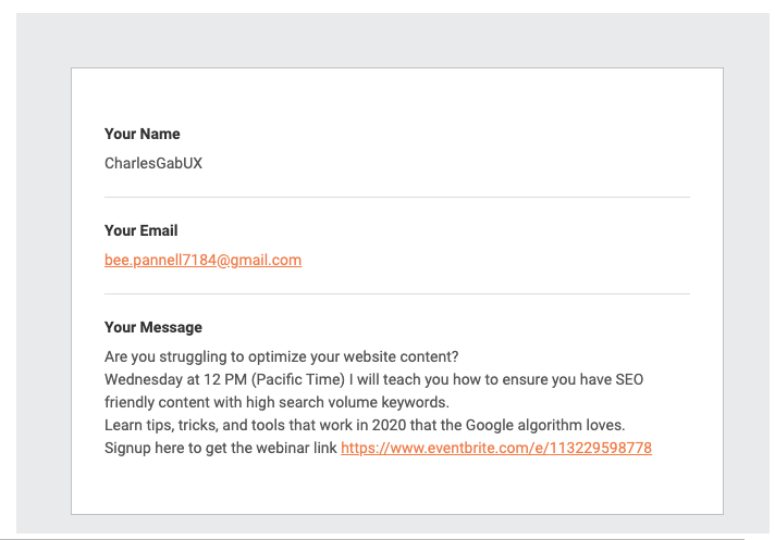
Spambots don’t look at the size or popularity of your site, so this kind of spam is a problem even for small and brand new websites.
Why Do You Need To Protect Your Contact Form?
Contact form spam is no doubt annoying, but there’s a bigger problem with unsecured forms and that’s the risk of being hacked.
These emails that you receive are most likely from phishing sites that try to steal your data. They can then misuse it for their own gain.
Some spambots even try to break into your site.
They use a tactic called brute force where they try to guess your username and password. If they’re successful, they use your site to spread more spam and malware to your other people, your contact list included.
Spambots also carry out injection attacks. How do they do this?
The information entered into the contact form is stored in your database. These bots come along and enter malicious code into your form so that when it’s submitted, it infects your database.
So contact form spam isn’t just a nuisance, it’s dangerous too!
Preventing Contact Form Spam
The best way to protect your contact form is to first choose a reliable form plugin that takes care of form security for you.
WPForms is the best form builder on the market and it comes with built-in spam protection. So it blocks spam automatically and even lets you take further preventive measures to stop spam.
With WPForms, you won’t need multiple tools to create your form and then protect it. It takes care of everything for you. Here’s what you can expect with WPForms:
- Create any kind of form using premade templates
- Easy drag and drop builder that’s great for beginners
- Comes with built-in honeypot and latest antispam defense methods
- Easily enable reCAPTCHA and custom CAPTCHA protection
- It has a free version and affordable paid plans
Creating a Contact Form with WPForms
To get started, you’ll want to install and activate WPForms on your site. You can then access WPForms from your WordPress dashboard.
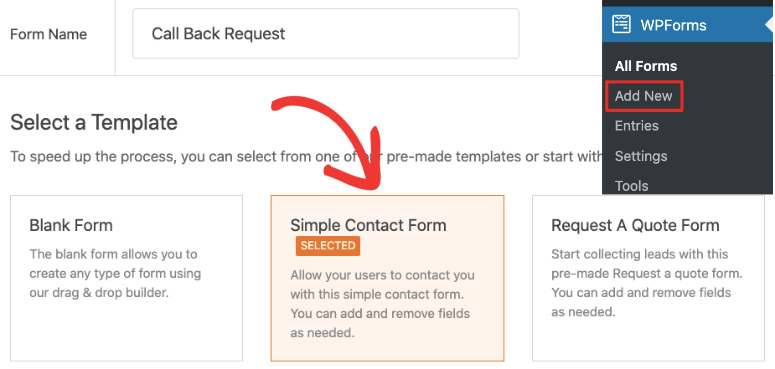
You’ll see that there are premade templates so it’s easy to create a contact form in under 5 minutes.
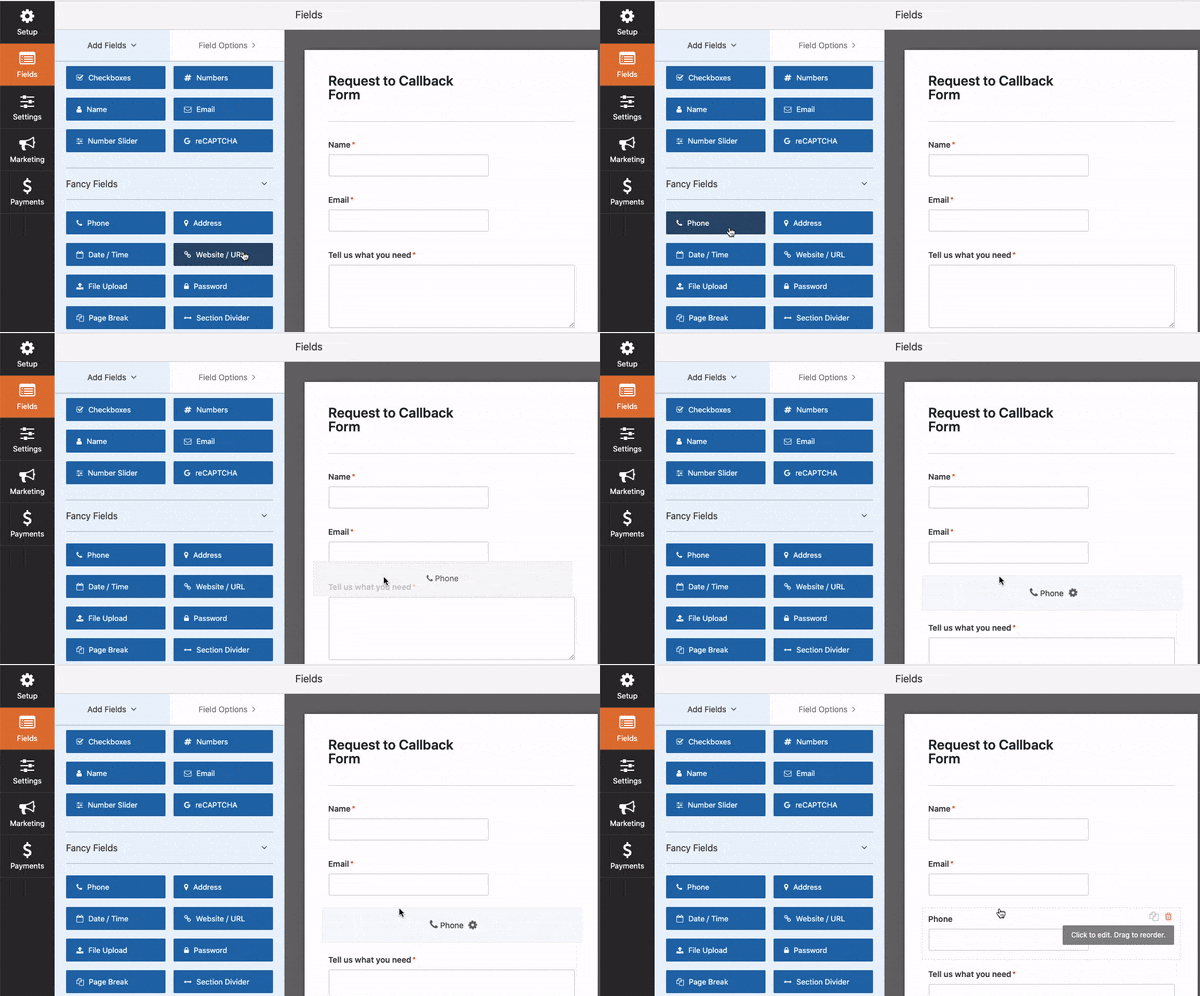
You can add, remove, and edit fields using its drag and drop form builder. And when you’re happy with it, simply save your form.
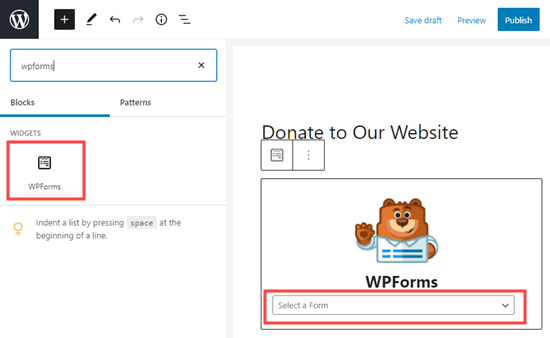
Then, you can embed the form on any page, post, or sidebar using the WPForms widget.
Now that you’ve created your contact form, let’s take a look at how you can protect your contact form with WPForms. Here’s a table of contents of what we’ll be covering.
1.WPForms Anti-Spam Token
WPForms automatically enables anti-spam protection on every form you create, whether you’re using the free version or the premium one.
It detects bots and prevents their form entry from being submitted. So right from the get-go, you won’t face spam entries.
Your visitors also don’t need to go through any test to prove they’re not a robot. So there’s zero inconvenience placed on you and your visitors as well.
You can check if the default anti-spam protection is enabled by navigating to the WPForms » Settings » General tab.
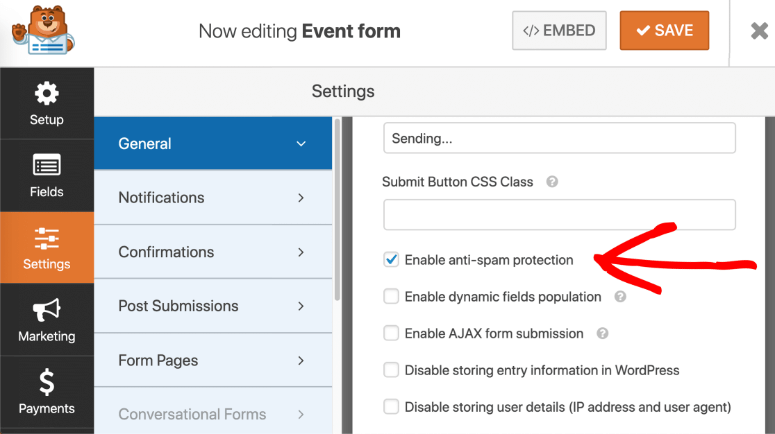
Here, you can scroll to the bottom of the page to see if the box next to ‘Enable anti-spam protection’ is checked.
If you’re using an older version of WPForms, you may see the ‘Anti-spam honeypot’ option. This is the old spam protection option in WPForms.
You can check this box, or better yet, upgrade to the latest version of WPForms to get the new anti-spam defense.
If you’ve just enabled anti-spam protection, make sure you save your form to store your changes.
Now your contact form is protected from spambots. If you want to go a step further and make your form bulletproof, read on for more spam defense methods.
2. Google reCAPTCHA
To add another layer of protection to your form, you can use Google’s reCAPTCHA. It either presents your visitors with puzzles or it analyzes their behavior on your site.
It can verify that a human is submitting the form and block automated spam entries.
The great thing about it is it’s free to use for up to a million users. Now, there are 3 versions of Google reCAPTCHA.
- Checkbox reCAPTCHA v2 – This presents visitors with a challenge to tick a checkbox that says ‘I am not a robot’ and submit it. The upside here is that it’s a visible form of security. So visitors may feel safe filling out your form knowing that it’s protected.
- Invisible reCAPTCHA v2 – This detects the user’s behavior and activity on your site. It doesn’t present any challenge or puzzle.
- reCAPTCHA v3 – This uses JavaScript to detect humans. It’s very effective at blocking bots but sometimes it prevents genuine users as well. So we recommend using this if you know how to troubleshoot.
You can enable all three versions of Google reCAPTCHA with WPForms. Let’s dive right into it.
Step 1: Choosing the reCAPTCHA Type
To get started with adding reCAPTCHA on your contact form, you’ll first need to select which type of CAPTCHA you want to use.
Head over to the WPForms » Settings tab where you’ll find the CAPTCHA option.
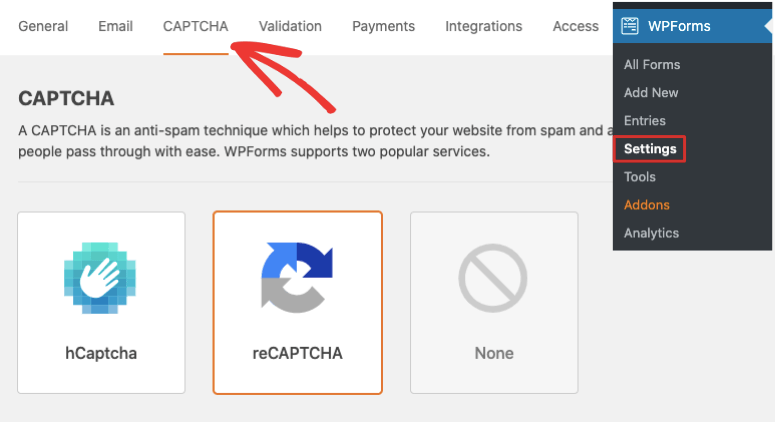
When you select it, it will open up a page with CAPTCHA icons to choose from. First, we’ll show you how to use reCAPTCHA so we’ll select the one in the center.
If you scroll down on the same page, you’ll see reCAPTCHA settings. Keep in mind that these settings apply to all forms you create with WPForms.
Now, you should see 3 the different reCAPTCHA options we mentioned earlier:

- Checkbox reCAPTCHA v2
- Invisible reCAPTCHA v2
- reCAPTCHA v3
Simply select the one you want to use on your site. Next, you’ll see two fields available to fill out your site key and secret key. We’ll show you how to create these keys next.
Step 2: Setting Up Google reCAPTCHA
To use Google reCAPTCHA, you’ll need to visit Google’s reCAPTCHA site to set it up.
Here, click on Admin Console from the top menu.
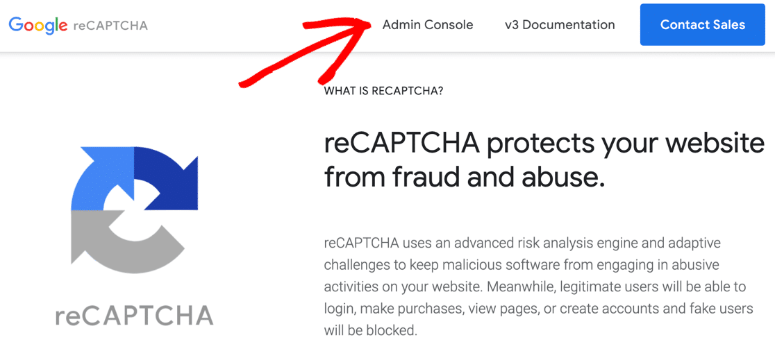
If you aren’t signed into your Google account, Google will ask you to do so now.
After that, you’ll be redirected to a new page to register your site for reCAPTCHA. First, enter the name of your website in the label field. If you have multiple domains, make sure you can recognize the name you enter as you’ll need it later.
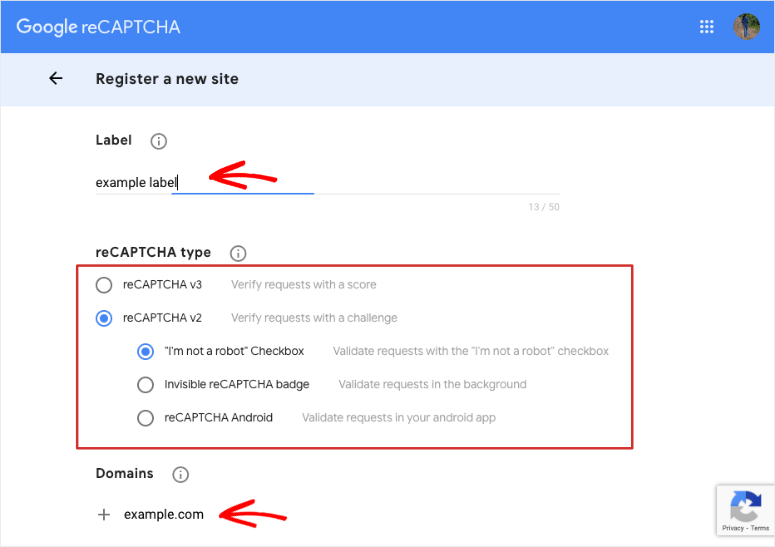
Then, choose between reCAPTCHA v2 or v3 using the radio buttons. If you choose v3, there’s nothing more you have to do here.
If you decide to use reCAPTCHA v2, then you’ll get two more options to choose from. You can select the ‘I’m not a robot’ checkbox or the invisible reCAPTCHA badge.
For this tutorial, we’ll use the checkbox method under reCAPTCHA v2. Although, the steps will remain pretty much the same for the other types as well.
Now, you’ll need to enter your website’s official domain such as ‘isitwp.com’. You don’t need to add ‘https://’
After this, you simply need to accept the terms of service and choose whether you want to receive alerts about reCAPTCHA.
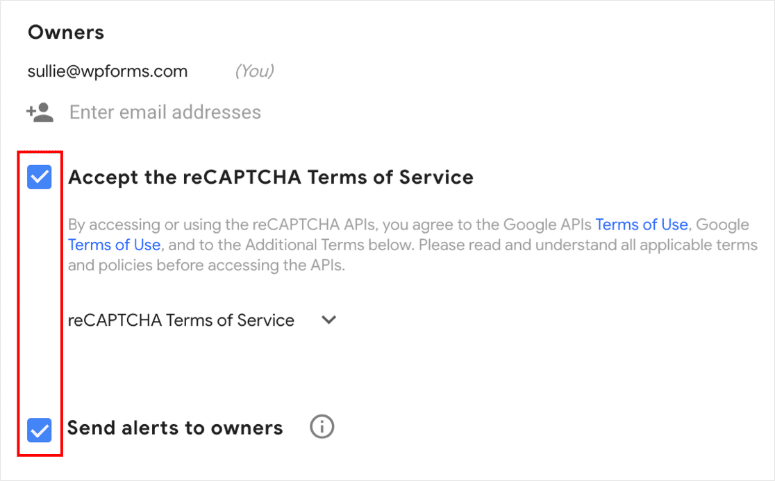
Once done, you can submit the form by clicking on the ‘Submit’ button at the bottom of the page.
Step 3: Getting Your reCAPTCHA Keys
After you submit your details, Google will automatically generate unique identification keys to link your form to your reCAPTCHA account. You should see a message containing your keys. You’ll get a site key and a secret key.
One thing to keep in mind here is that Google uses different keys for each type of CAPTCHA. So if you’re using reCAPTCHA v2 today and want to switch to v3 later, you’ll need to generate a new set of keys.
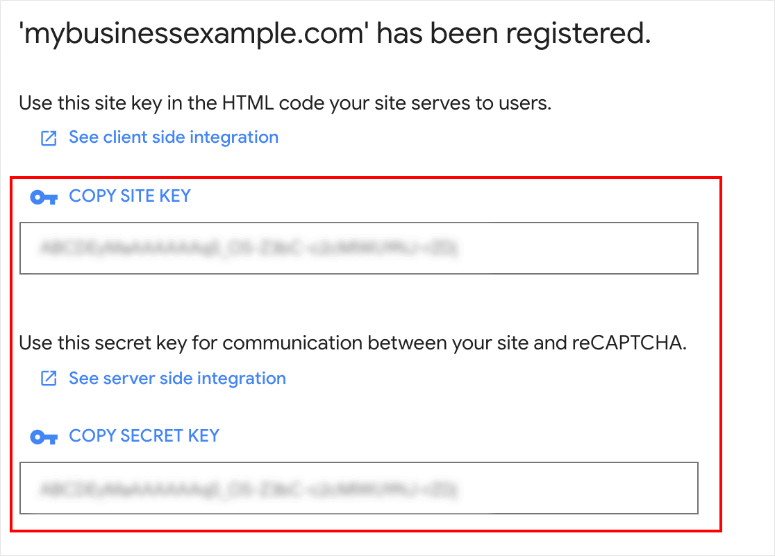
Copy these keys and head back to your WordPress site where you have the WPForms » Settings » CAPTCHA page open. You’ll see fields to fill out this information. Paste the keys here.
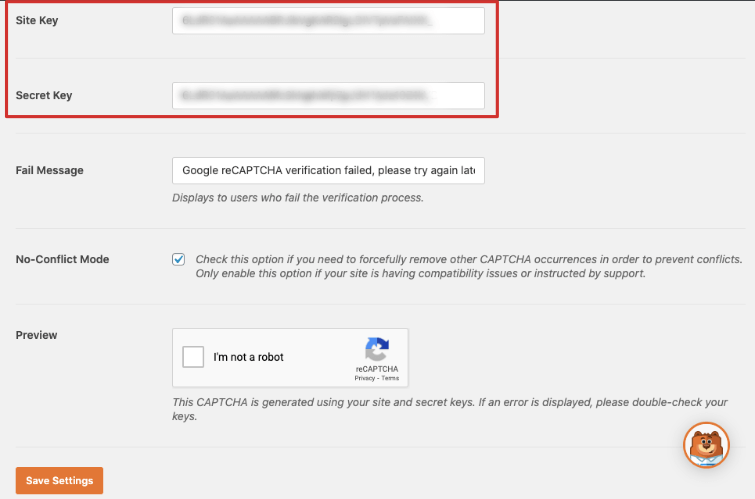
After this, you’ll see two more options:
- Fail Message – You can customize the message that’s displayed to a visitor if they fail the CAPTCHA test or are stopped from submitting a form.
- No-Conflict Mode – If another plugin tries to load reCAPTCHA mode, it could cause unwanted errors on your site. By checking this box, WPForms will force disable reCAPTCHAs coming from other plugins.
Once you’ve filled out everything, click on the Save Settings button to store your reCAPTCHA settings.
Step 4: Adding reCAPTCHA to Your Contact Form
Now that you’ve enabled reCAPTCHA, all that’s left to do is add it to your contact form. To do this, open WPForms » All Forms and select your contact form.
This will open up the form builder where you can edit the form. From the left menu, under Standard Fields, click on the CAPTCHA field.
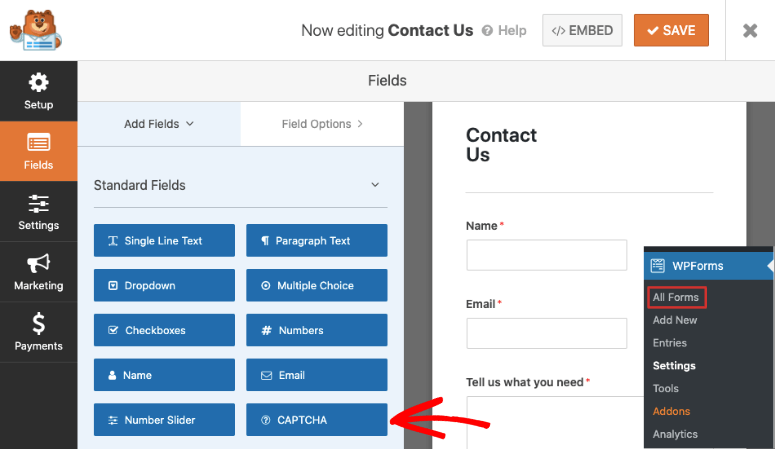
You don’t need to drag and drop it into your form like other fields. By clicking on it, reCAPTCHA will be enabled for this form and you’ll see a confirmation message like this:
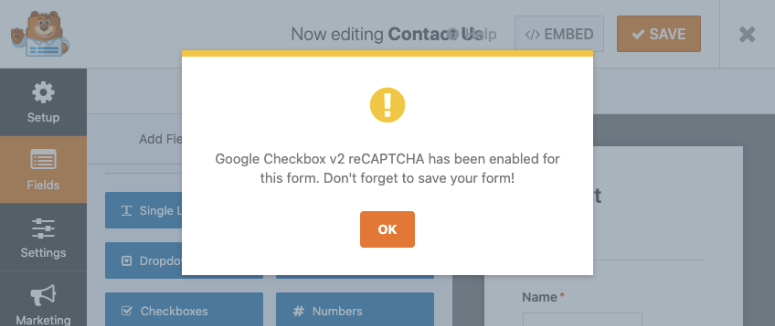
And with that, you’ve successfully added reCAPTCHA to your contact form. If you ever want to turn off this feature, you can edit the form and click on the same CAPTCHA field to disable it.
3. hCaptcha
If you want an alternative to reCAPTCHA, you can enable hCaptcha which will present visitors with a challenge.
If visitors don’t complete the challenge, the form won’t be submitted. So spambots will be stopped in their tracks.

How’s hCaptcha different from reCAPTCHA? Here are some of the major differences that can help determine which is a better fit:
- hCaptcha is free to use but if you want invisible CAPTCHA, you’ll need to sign up for a paid plan.
- Every time a visitor completes a challenge, you earn a small reward. So if you have a busy site, you could generate quite a bit of revenue. You can also donate the amount to charity.
- Compared to Google, hCaptcha doesn’t collect as much data from your site. So this may be a better option if you’re worried about data security.
- There’s an ‘Easy mode’ that you can enable to minimize the number of CAPTCHAs displayed to your visitors.
Ready to use hCaptcha? Let’s get started.
Step 1: Setting Up hCatpcha in WPForms
The first thing you’ll need to do is open the WPForms » Settings page to enable hCaptcha.
On this page, under the CAPTCHA tab, you’ll see the hCaptcha option.
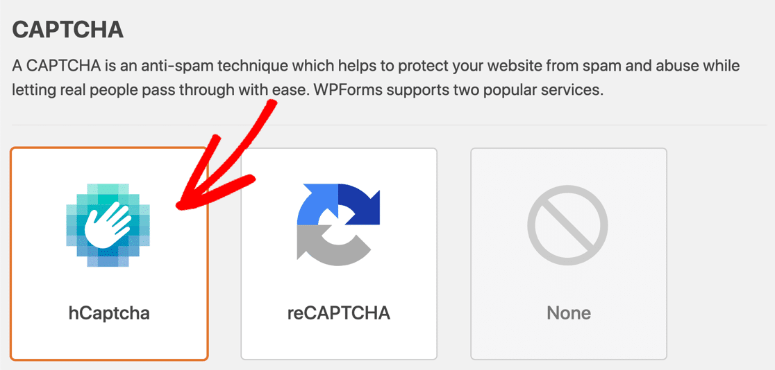
Now, you’re going to need your site key and secret key. To generate these keys, you’ll first need to create an hCaptcha account.
Step 2: Setting Up Your hCaptcha Account
To create your hCaptcha account, all you need to do is head over to the hCaptcha website and sign up for the free plan.
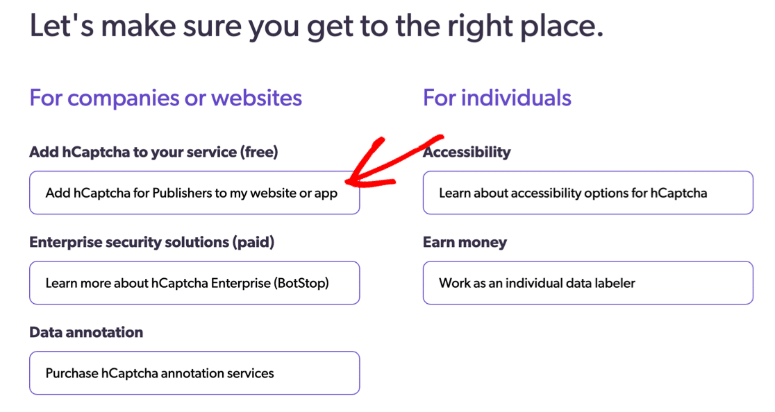
Once you’re logged in, you can add a new site from the hCaptcha dashboard.
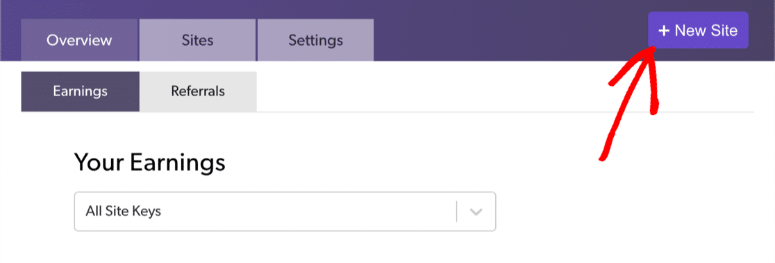
When you click on the ‘New Site’ button, you can enter your site name and save your changes. Then you’ll see an option to Add New Sitekey with a pencil icon.
If you click on the pencil icon, you can add your own site key name so that it’s easy to remember later.

After this, under the General Information section, you’ll need to add your domain.

Now, you’ll see a CAPTCHA difficulty slider that lets you choose how difficult you want the puzzle to be.

Here’s a quick breakdown of the different levels of difficulty:
- Easy – It will first try to validate the user without a challenge. If it shows a challenge, it will be the easiest ones that take a few seconds to solve.
- Moderate – This is the sweet spot that shows a challenge that’s not too easy nor too difficult to solve.
- Difficult – The challenges take longer to solve and require more effort from the visitor.
- Always On – This makes your form extremely secure but can also negatively affect user experience.
We recommend using Easy or Moderate mode, however, this is a business decision you need to take on your own.
You can always come back and adjust the difficulty level here.
The last option on this page is your audience’s interest. This means you can select themes that are similar to your industry or business line.

You can skip over this section if you want random challenges to be generated. Make sure you scroll back to the top and save your settings.
Step 3: Getting Your hCatpcha Keys
When you save your info, hCaptcha automatically redirects you to the Sites tab where you’ll see a list of your sites.
Click on the Settings button to get your sitekey.

Simply copy your site key here and paste it in the field in WPForms.

Next, you’ll also need your secret key. You’ll need to head back to the previous page and open the Settings tab.
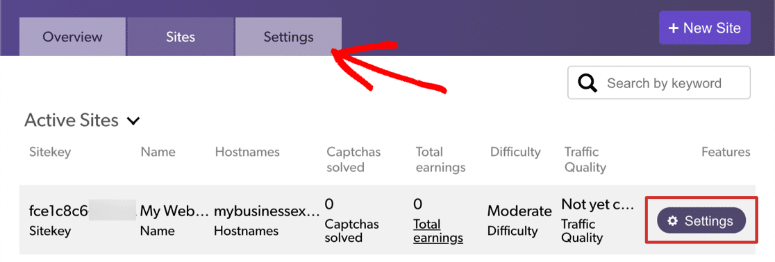
Here, you can click on the Settings button to get your secret key.

Copy your secret key and head back to your WordPress site and paste it in the WPForms » Settings » CAPTCHA page.

Now that we’re back on the WPForms page, you’ll see two more options:
Fail Message – You can customize the message that’s displayed to a visitor if they fail the CAPTCHA test or are stopped from submitting a form.
No-Conflict Mode – If another plugin tries to load reCAPTCHA mode, it could cause unwanted errors on your site. If you tick this checkbox, WPForms will force disable reCAPTCHAs coming from other plugins.
That’s it. Once you’ve filled out everything, click on the Save Settings button to store your hCaptcha settings.
Step 4: Adding hCaptcha to Your Contact Form
Now that you’ve enabled hCaptcha, all that’s left to do is add it to your contact form. To do this, open WPForms » All Forms and select your contact form.
This will open up the form builder where you can edit the form. From the left menu, under Standard Fields, click on the hCaptcha field.
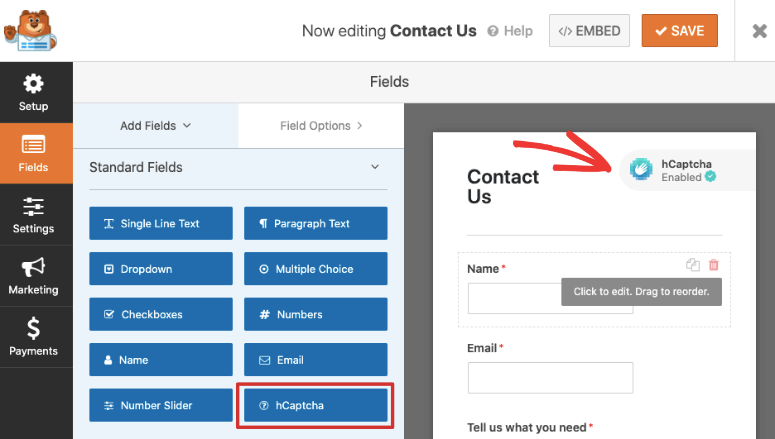
You don’t need to drag and drop it into your form like other fields. By clicking on it, hCaptcha will be enabled in your form. You’ll see the hCaptcha badge displayed on your form.
And with that, you’ve successfully added hCaptcha to your contact form. If you ever want to turn off this feature, you can edit the form and click on the same hCaptcha field to disable it.
4. Use the WPForms Custom CAPTCHA Addon
We understand that sometimes you may not want to use a 3rd party service due to privacy concerns. Or maybe you don’t want to add another brand’s badge to your form.
WPForms has got you covered here. It has a custom CAPTCHA addon that you can use to create your own CAPTCHA.
This addon is part of the Pro version so you’ll need to upgrade if you’re using the WPForms Lite version.
To activate this addon, head over to the WPForms » Addons page, find the Custom Captcha Addon, and simply install it.
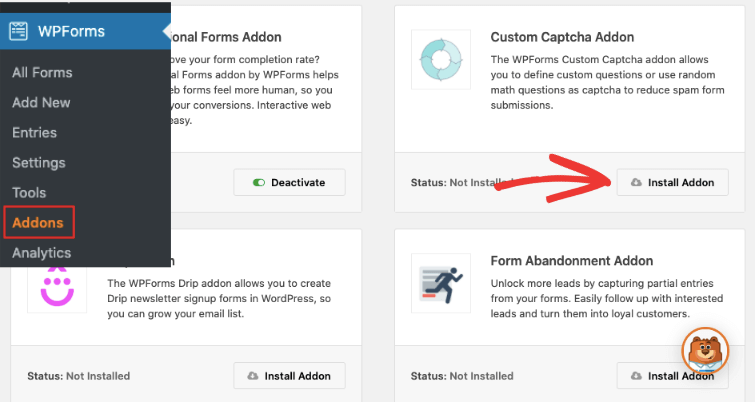
It will automatically activate. After that, you can go to the WPForms » All Forms page and open up your contact form.
Under Fancy Fields, you should see the Captcha option. You’ll need to drag and drop this into your form.
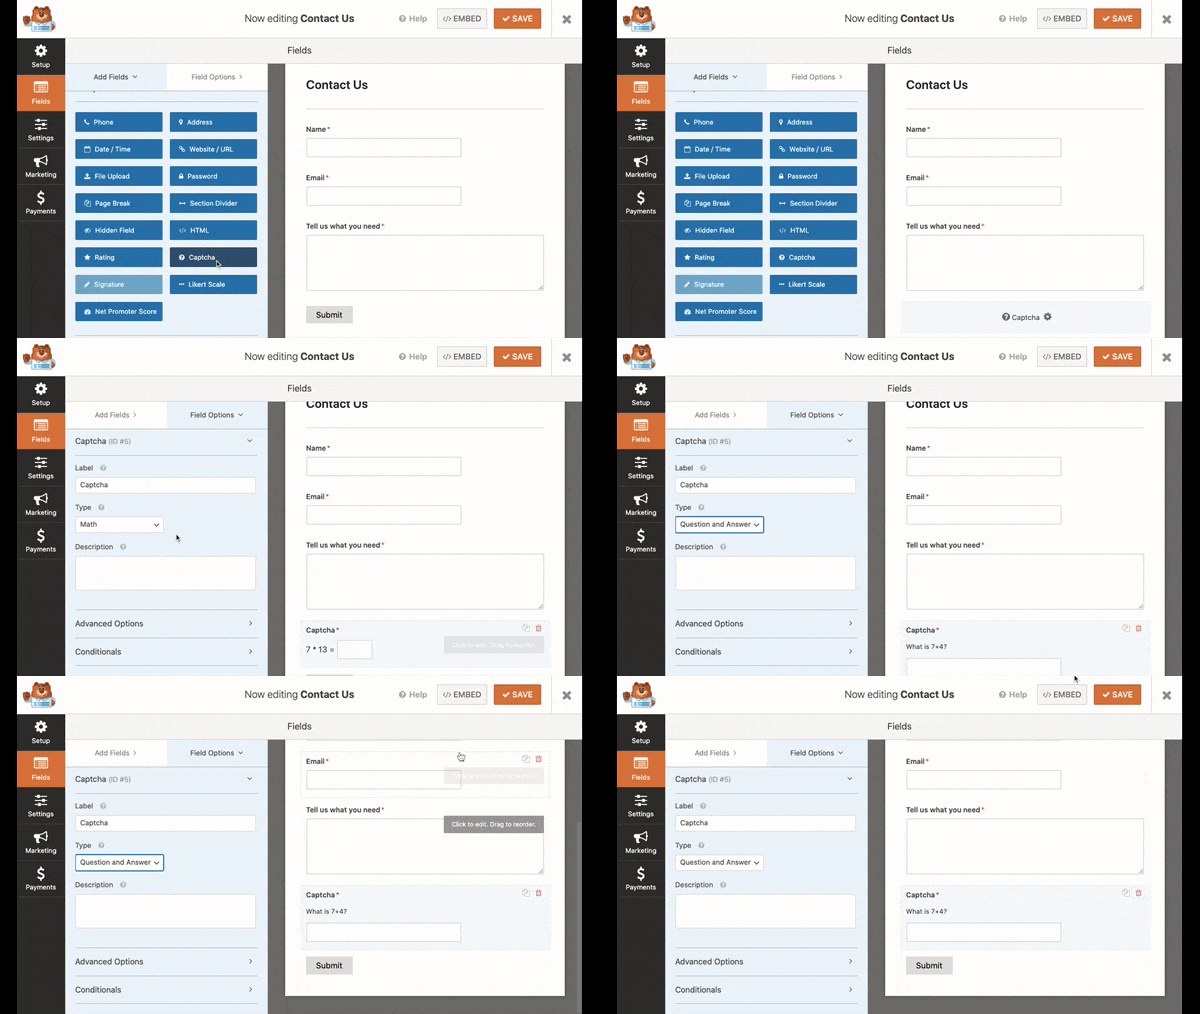
We feel the best place to add the Captcha field is above the ‘Submit’ button.
Now, when you select the Captcha field in your form preview, it should open up the Captcha field options in the left menu.
Here, you can change the type of Captcha to ‘Question and Answer’ or a ‘Math’ problem. It even lets you customize the question that’s asked. And you can add different questions so it’s harder to predict the answer.
Once you’re happy with the contact form, don’t forget to save it.
And there you have it! These methods will prevent bots from spamming your site through your contact form.
Now, there are times that you may receive spam from human visitors. This could be sales teams and scammers who manually fill out your form. To combat this, we’ll show you how to block specific email addresses.
5. Block or Allow Specific Email Addresses on Your Forms
If your visitors are spamming you through your contact form, none of the measures mentioned above will prevent it. They are designed to detect and block bots.
So WPForms has a built-in feature to block or allow email addresses so you can manually prevent someone from submitting your form.
To do this, navigate to WPForms » All Forms and edit your contact form. In the form editor page, you’ll see ‘Advanced Options’ in the menu on the left.
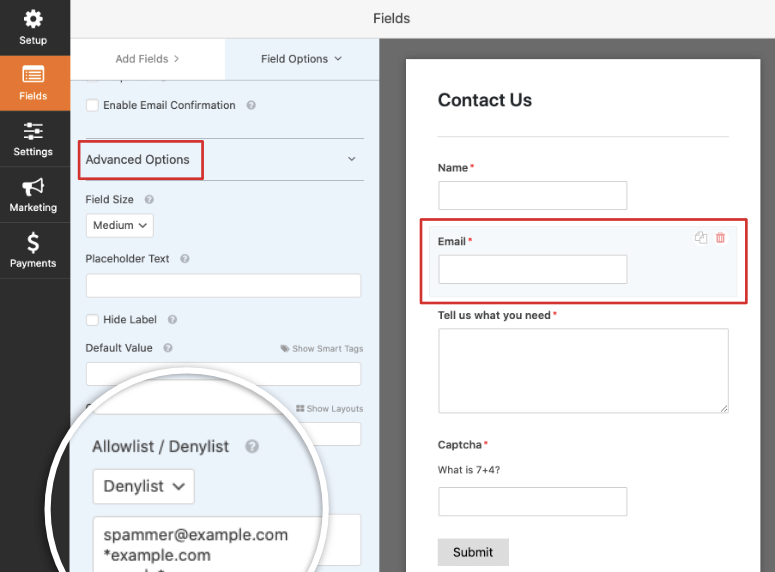
Here you’ll see a dropdown menu that lets you choose an allow list or denylist. When you select the denylist, a box will open where you can enter specific email addresses separated by commas.
Now WPForms has a really cool feature here. You can use an asterisk * to create partial matches. So for instances, you can enter examples like these:
- spamname* – blocks email addresses starting with ‘spamname’
- *@example.com – blocks email addresses from a specifc domain
- s*@example.com – blocks all email addresses starting with the letter ‘s’ from a specific domain
Once you’ve set up your denylist, save your form to store your changes.
You can test out the form on your site by entering the email address you just blocked. You’ll see a notification that this email is not allowed.

With that, you should have everything you need to stop contact form spam for good!
We also recommend taking a few steps to tighten up the security on your site (if you haven’t already):
We hope this article helped you stop contact form spam on your site. If you liked this post, you may also want to check out how to add live chat to your site to give you visitors more options to contact you.
Keep reading the article at IsItWP – Free WordPress Theme Detector. The article was originally written by Editorial Team on 2021-02-12 04:56:13.
The article was hand-picked and curated for you by the Editorial Team of WP Archives.

