Deploying your code onto your production, dev, or staging server is a recurring task that you should automate as much as possible.
In this article, I will demonstrate how you can deploy your code from the command-line, no matter if you’re on Mac, Linux, or Windows. It serves as the starting point to automate deployments and connect them to Git commits for example. Using Git is a prerequisite for this article.
For way too long, I have used manual file transfers via SFTP to upload the code I wrote locally to my development server at Cloudways. My workflow looked like this: I wrote a piece of code that added a certain function, opened FileZilla, logged into the development server, navigated to the correct folder, and uploaded the local code manually.
Why Should You Use Command-Line?
Just by writing this down, I see how inefficient and error-prone this approach was. It wasn’t automated. It wasn’t fast. It wasn’t safe. Especially if you’re working with a team on your code, this manual file transfer approach neither helps you speed up your development nor increases the stability of your software.
You’ll encounter situations where one developer accidentally uploads files that overwrite changes you have made, even if you’re working on the same Git or Mercurial repository. You’ll also find that developers might forget uploading their code for a day or two, causing delays in the entire project.
There’s nothing inherently bad about these challenges. We’re humans, and humans do make mistakes. It is neither a mindful act of sabotaging you nor your developer trying to overrule other devs in your team.
Errors like the ones outlined above are bound to happen if you rely on manual file transfers to deploy your code. That’s why you should strive to automate deployments as much as possible.
Automate Deployment Using Command-Line
To start implementing automated deployments from your command-line, you need to open a terminal on your local computer. The default terminals of Mac and Linux will do. For Windows users (like myself), I recommend using the Bash that comes with the Windows Subsystem for Linux (WSL).
Install PHPloy in Your Project Folder
You’re going to install a tool called PHPloy into your project folder (or you can install it globally on your computer). I’m using Composer in this example, so if you don’t have Composer installed yet, please follow the official documentation. Only continue reading if you have Composer up and running.
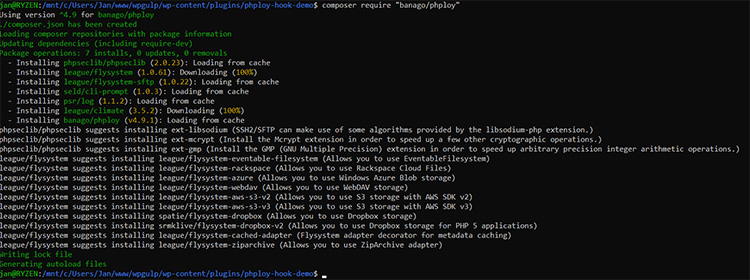
In this example, I’m installing PHPloy into a plugin folder for a WP plugin I’m currently working on. In the terminal I’m navigating to that folder and then running the following command:
composer require “banago/phploy”

As you can see in the screenshot, that command downloads a few libraries and gets PHPloy installed in the current directory. You can also use the “-g” flag in the install command to make PHPloy available throughout your entire system.
Initialize PHPloy
After PHPloy is installed, you can initialize it by running:
phploy --init

Remember, PHPloy requires the current folder to be a Git repository. If you’re invoking the PHPloy command outside of a Git repository, you’ll be presented with an error notice telling you that you’re not in a Git repository.
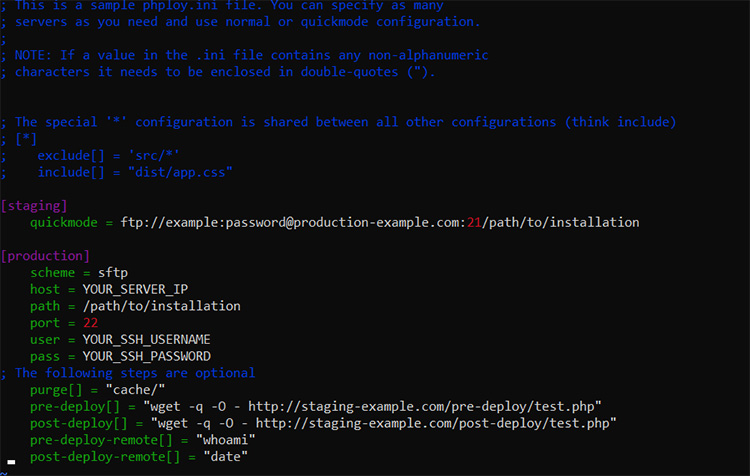
That initialization process creates a PHPloy.ini file, which is documented here. In that PHPloy.ini file, you’ll store the data of the servers to deploy to, as well as relate each server to the corresponding branch in your repository. That allows you to push the development branch to the development server, and the master branch to the production server.
If you open the example config file in a text editor, you’ll see clear instructions on how to configure the SFTP connection:

The purple sections in the screenshot represent your servers. In the sample config, you can configure a staging and a production server. Obviously, you would want to rename them to match your own servers. If you want to automate the deployment using a Continuous Deployment pipeline, you can later assign a branch to each server. This ensures that, for example, the staging branch only pushes code to the staging server.
One thing you need to have in mind is that the destination folder should exist before deploying your code with PHPloy. If it does not (e.g. you’re starting a new project), you need to use the “–force” flag when running PHPloy for the first time to create the folder on your server.
I highly recommend entering application-based SFTP credentials and to not use the server’s master credentials. It‘s just good practice to not use the master logins when they aren’t necessary.
And this is already it. You can now run PHPloy for the first time and test if the connection can be established. To do that, you’ll want to:
- Commit all pending changes to your Git repository.
- Run “phploy -l” to validate the files that would be uploaded.
- Run “phploy -s your_server_name” to trigger the deployment (replace your_server_name with the server name you want to deploy to)
- Log in to your server via SFTP and check if the files have been uploaded.
Here’s an example from another project I’m working on. If you see an output similar to this, your deployment was successful.

As I said earlier, this article serves as a starting point. You can integrate this approach with Continuous Deployment tools like Jenkins, which is what I’m doing at WP Mastery.
Start Growing with Cloudways Today!
We never compromise on performance, security, and support.
Jan Koch
Jan Koch run the WordPress agency WP Mastery and is a WP developer. He loves scaling WP agencies, using technology to automate processes, writing code for WordPress and contributes to the community by sharing his experience online.
Keep reading the article at The Official Cloudways Blog. The article was originally written by Jan Koch on 2020-01-29 05:52:57.
The article was hand-picked and curated for you by the Editorial Team of WP Archives.

