![]()
Do you want to set up WordPress conversion tracking?
Conversions are the key to the growth of any business. And, you should track lead conversions to analyze how well your marketing campaigns are performing.
Conversion tracking also helps in shaping the strategy of your business. It provides you the data your need to keep growing your business.
In this article, we’ll show you how to set up WordPress conversion tracking for your website. But first, let’s get clear on what conversion tracking actually means.
Since this is a long article, we created a table of contents for your assistance. This helps you jump to any section quickly.
Table of Contents
What Does Conversion Tracking Do?
Conversion tracking helps you find the marketing channels that are driving the most sales. This way, you can improve your marketing strategy to further increase your revenue.
On the other side, the conversion tracking data will also show resources where you invested your marketing efforts and not getting the results you want. With detailed tracking, you can find out your customers’ journey and understand their roadblocks.
You can then make changes to remove those hurdles and continue tracking conversions to see the results.
In other words, conversion tracking will provide the data of your success and shortcomings, so you can design your marketing campaigns to grow your business.
Why does any of this matter?
You can invest time and money to promote your brand, but if you don’t track the output of your efforts, then you won’t know if your investments are paying off.
You should know how many conversions you get in a specific period from a specific resource to measure your marketing success.
Now that you know why this is so important, let’s take a look at some of the best tools to set up WordPress conversion tracking.
WordPress Conversion Tracking Tools
Google Analytics is the most popular and free tool to track your website traffic and conversions. It provides complete data on your traffic sources, user activity, and custom reports.
It lets you set up conversion tracking for your marketing campaigns, Google Ads, Facebook Ads, and so on. Wondering how you can do it all with Google Analytics?
Let’s enable WordPress conversion tracking step by step!
Enabling WordPress Conversion Tracking in Google Analytics
To enable conversion tracking, you need to add Google Analytics code to your website.
We recommend using MonsterInsights, the best Google Analytics plugin with advanced tools to add complete and detailed analytics to your WordPress dashboard.

Start by installing and activating the MonsterInsights plugin. For more details, you should check out our guide on how to install a WordPress plugin.
Upon activation, you need to visit the Insights » Settings page from your WordPress admin dashboard and enter your license key.
For WordPress conversion tracking, you’ll need the MonsterInsights Pro plan. Find the license key on your MonsterInsights account.
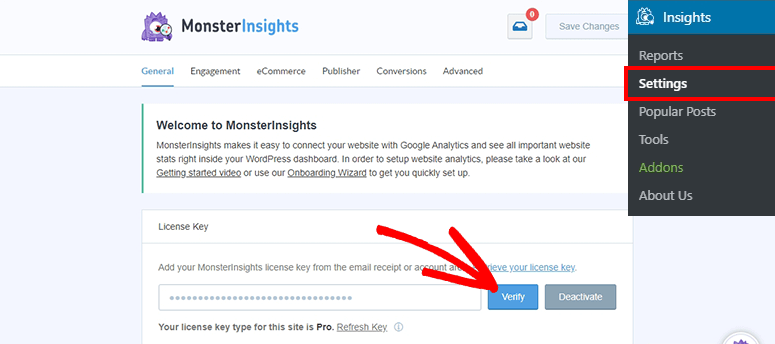
Click on the Verify button to continue.
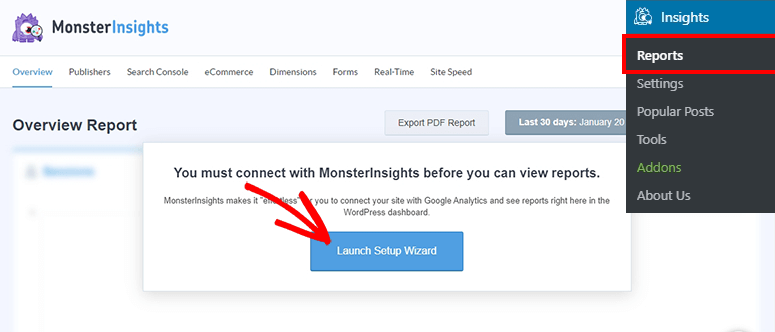
After successful verification, you need to go to the Insights » Reports page in the WordPress admin area. It’ll display a popup where you need to click on the Launch Setup Wizard button.
On the next screen, you need to add your business details and store the settings to connect your WordPress website to Google Analytics in just a few minutes.
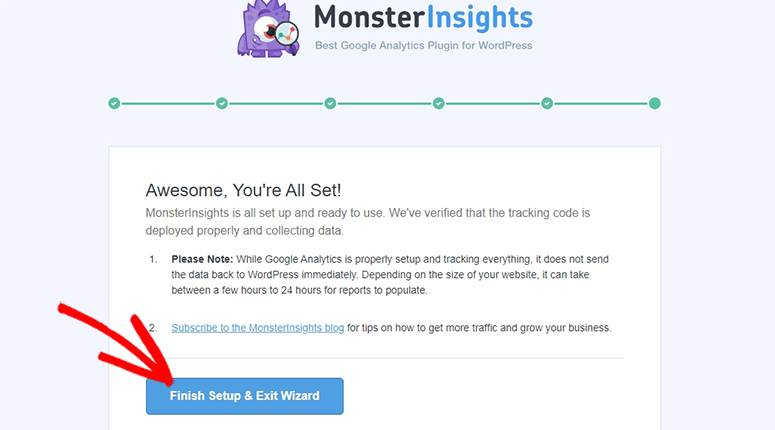
For more details, you should check out our complete guide on how to add Google Analytics to WordPress.
Set Up eCommerce Conversion Tracking
If you’re running an online store, you can track your products’ sales status and users’ activity on your eCommerce shop. Google Analytics offers eCommerce conversion tracking to find your best selling products, least selling products, and revenue-generating products.
It works for WooCommerce out of the box. You need to enable enhanced eCommerce conversion tracking for your online store in Google Analytics manually.
Step 1. Enable Enhanced Ecommerce Reporting in Google Analytics
To enable enhanced eCommerce tracking, you need to visit Google Analytics and choose your website. Then, click on the Admin option from the bottom left corner of your screen.
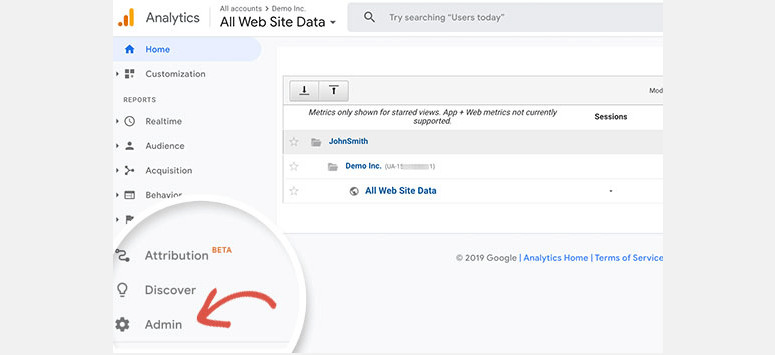
It’ll display several analytics options in columns. In the View column, you need to click on the Ecommerce Settings option.
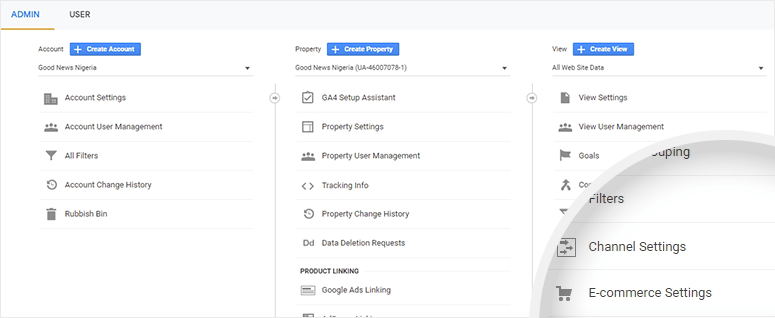
Next, you should turn on Enable Ecommerce and Enable Enhanced Ecommerce Reporting options.
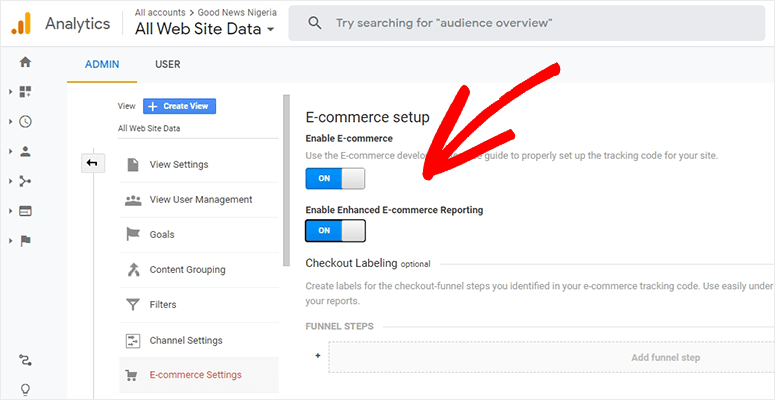
These settings will enable eCommerce reports for your website.
Step 2. Install eCommerce Addon in MonsterInsights and Enable Enhanced eCommerce
After enabling your Google Analytics account settings, you need to go back to your WordPress admin dashboard and visit the Insights » Addons page.
From there, you’ll install and activate the eCommerce addon.

This addon works seamlessly with popular WordPress eCommerce plugins, including WooCommerce, MemberPress, Easy Digital Downloads, and so on.
Upon activation, go to the Insights » Settings page and click on the eCommerce tab from the top navigation menu.
Now slide the Use Enhanced eCommerce option to turn it on.
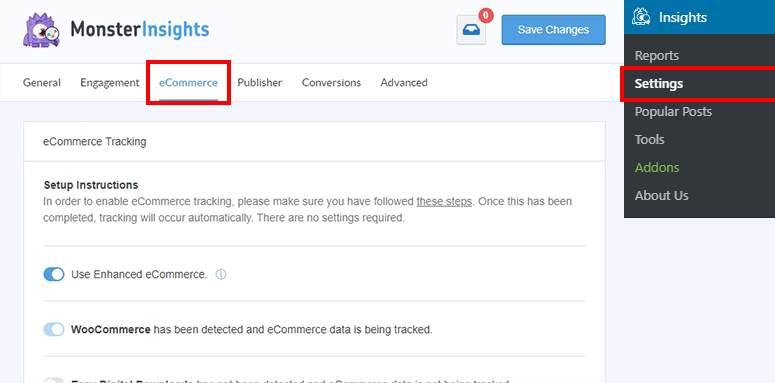
This is the fastest, easiest, and most advanced method to enable eCommerce conversion tracking on your website.
Step 3. View Ecommerce Conversion Reports
To view the eCommerce conversion tracking reports, visit the Insights » Reports page and click on the eCommerce tab from the top navigation menu.
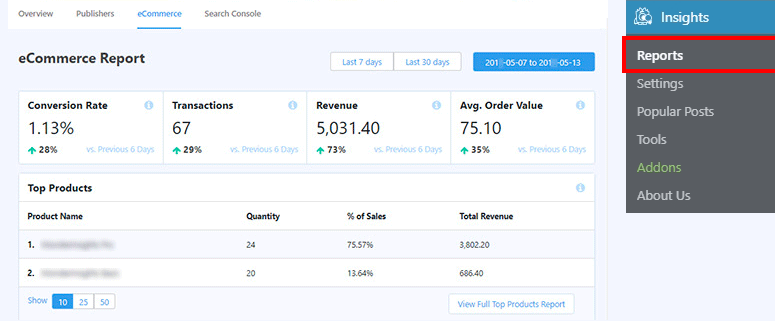
The top section displays a summary of your conversion, including conversion rate, total transactions, revenue, and average order value. It also shows the percentage growth for the past week.
After that, the report lists all the top products with quantity, sales percentage, and revenue generated from each product. With this information, you’ll always know your top-selling products.
If you scroll down further, the report displays top conversion sources along with total visits, percentage share, and revenue generated from each source. Using this information, you can focus on the top converting sources and create better content.
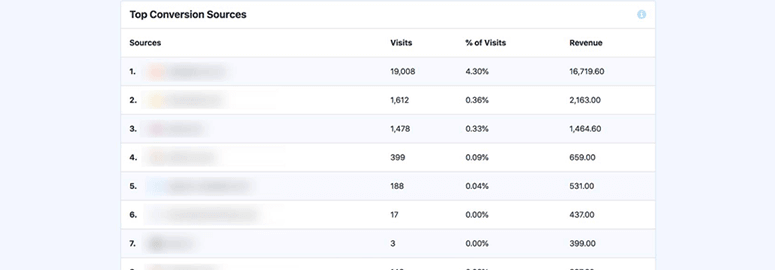
This includes a detailed analysis of users’ activity reports when customers added and removed products from the cart.
Step 4. Viewing Ecommerce Conversion Reports in Google Analytics
If you want to see more detailed eCommerce conversion tracking reports, visit your Google Analytics account and go to Conversions » Ecommerce from the left navigation menu.
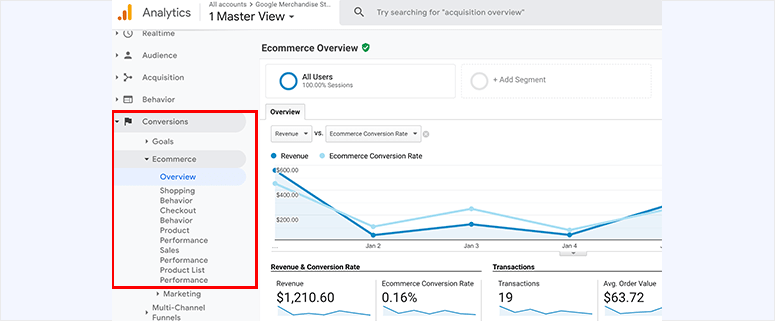
It’ll display an overview of your revenue, eCommerce conversion rate, transactions, and average order value. It’s the same as the MonsterInsights report, but you can go visit Ecommerce » Shopping Behavior or Ecommerce » Checkout Behavior to see detailed reports on the user journey to the checkout page.
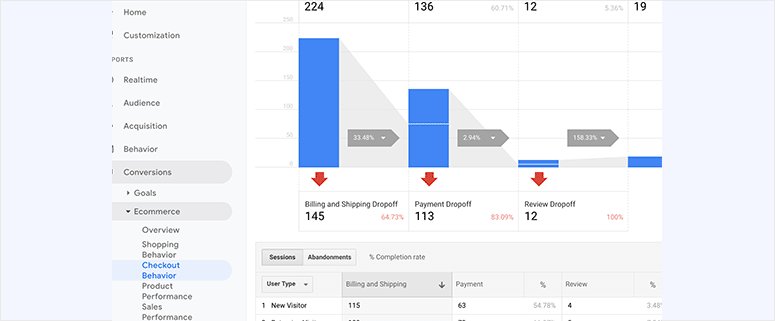
This also helps understand why the customer didn’t complete the purchase.
Set Up WordPress Form Conversion Tracking
If you’re running a business website and using a contact form or any other kind of form to capture new leads, you need to enable form conversion tracking on your WordPress website.
Luckily, MonsterInsights has a Forms addon that you can use to track form conversions. This addon is compatible with popular WordPress form plugins, including WPForms, Contact Form 7, Formidable Forms, and so on.
First, you need to visit the Insights » Addons page to install and activate the Forms addon.
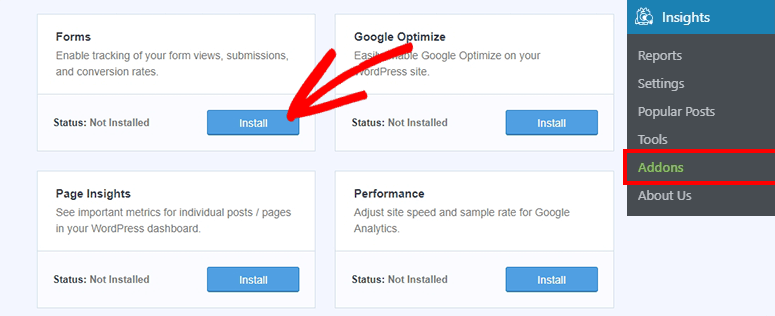
After the activation, go to the Insights » Settings page and click on the Conversion tab from the top navigation menu.
![]()
On this page, you need to turn on the Enable Form Conversion Tracking option.
View Your WordPress Form Conversion Reports
To view your form conversion reports, you need to visit Insights » Reports in the WordPress admin dashboard.
Click on the Forms tab from the top navigation menu.
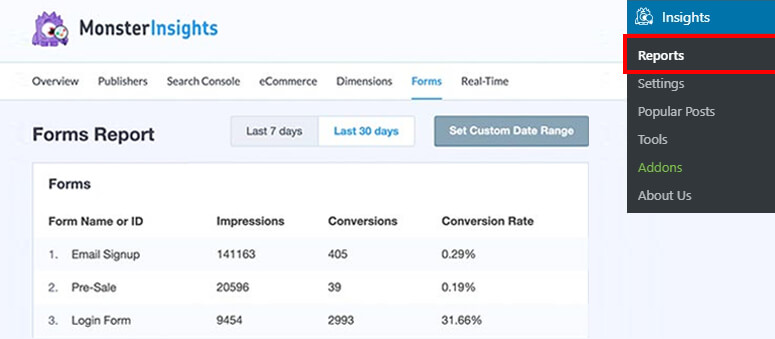
It’ll display all your forms in a list parallel to where you can find total impressions, conversions, and conversion rate reports.
You should also check out our complete guide on how to set up Google Analytics eCommerce tracking for WooCommerce for more details.
Set Up Google Ads Conversion Tracking
Google Ads are also a great source to drive traffic to your WordPress website. You can run Google Ads to generate leads and track conversions in Google Analytics.
The process to set up Google Ads conversion tracking is difficult, but we’ll make sure to explain in simple steps.
Step 1. Connect Google Ads to Your Google Analytics Account
First, you need to log in to your Google Analytics account and click on the Admin option from the bottom left corner. In the Property column, you need to visit the Google Ads Linking option.
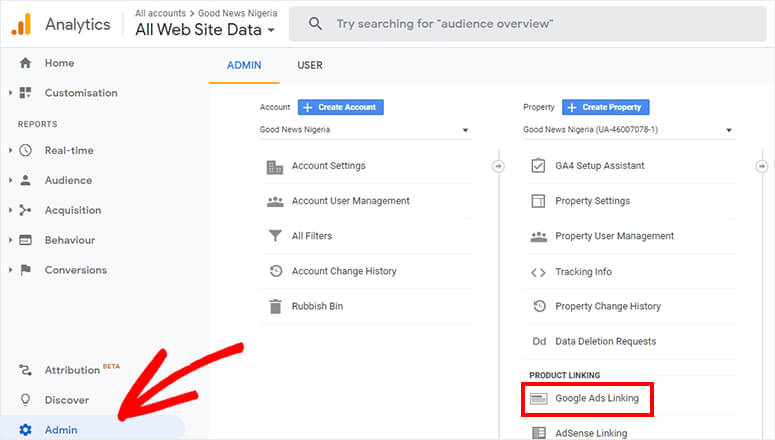
On the next screen, select your Google Ads account and make sure that your Google account can access the Ads account.
You need to enter a title for the link group and switch to the All Website Data section. Then check the Share my Analytics data with linked Google Ads accounts setting.
Once enabled, click on the Link Account button to continue. This will start tracking Google Ads conversions.
Step 2. Enabling Conversion Tracking for eCommerce Ads
For any business, it’s important to track your return on investments (ROI). And, running Google Ads is an investment that you do to promote your business, so you should also track the returns.
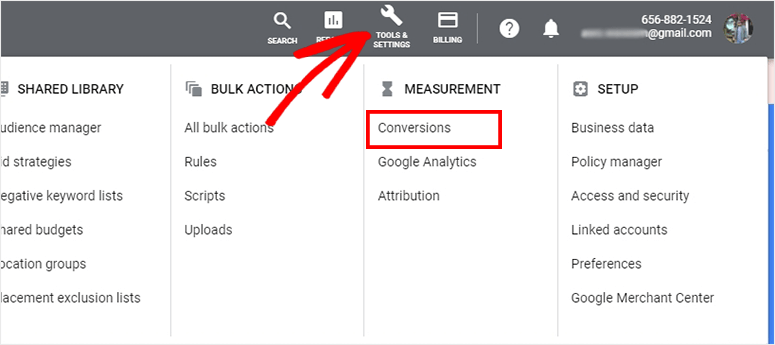
Log in to your Google Ads account and visit the Tools & Settings » Measurement » Conversions page.
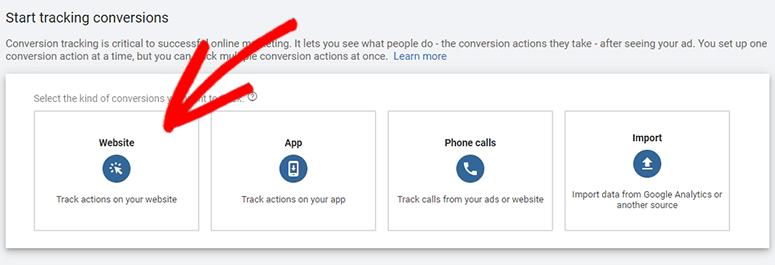
On the next page, select Website to start tracking conversions.
Now you need to create a conversion action for your eCommerce store. This includes purchases, add to cart, sign ups, and more.
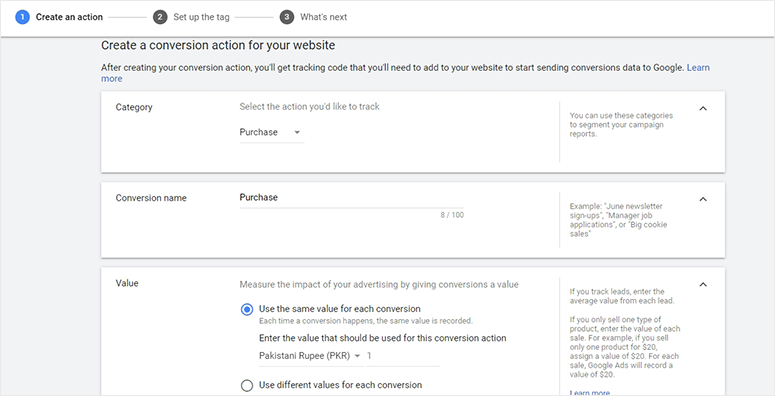
What you select here will be considered as a conversion. And it lets you add value for each conversion. You can also set different values for each conversion if needed.
After you’re done with all the settings, click on the Create and Continue button.
Next, you need to add the tracking code to your WordPress website. Click on the Install the tag yourself option and select The global site tag isn’t installed on all your HTML pages option.
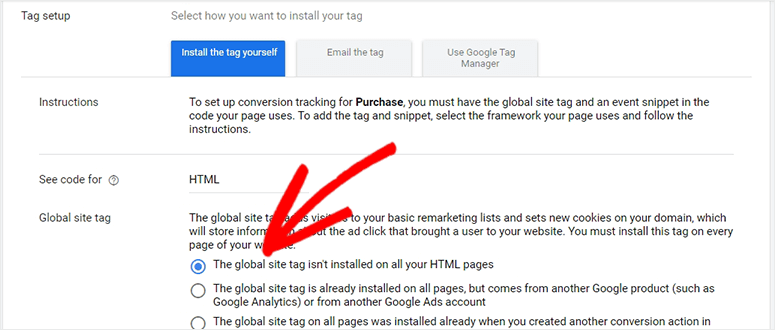
It’ll show the tracking code that you need to copy from here.
Now go back to your WordPress admin dashboard. You need to install and activate Insert Headers and Footers plugin. For more details, you should check out our guide on how to install a WordPress plugin.
Once activated, go to the Settings » Insert Headers and Footers page. In the Scripts in Header box, you need to paste the tracking code that you copied above.
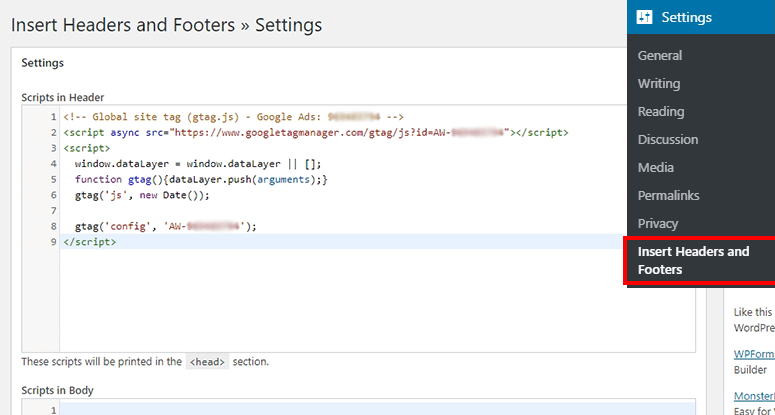
Click on the Save button to enable Google Ads conversion tracking in WordPress.
View Google Ads Conversion Tracking Report
These reports will be available in your Google Analytics account. Visit Acquisition » Campaigns » Paid Keywords reports in Google Analytics.
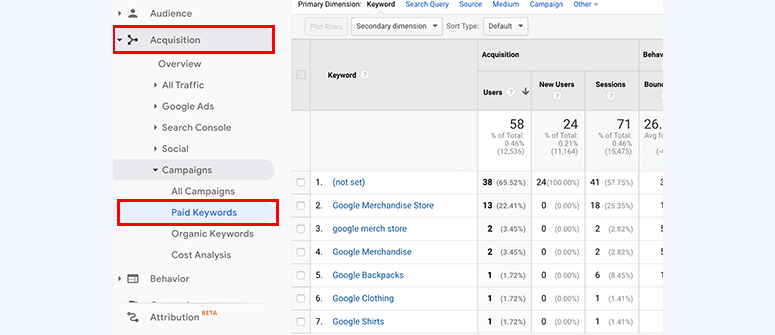
It’ll display complete reports of your Google Ads.
Set Up UTM Parameters for Conversion Tracking
UTM parameters are the code that you add at the end of your URLs to track the campaign source in Google Analytics. For example, a URL with UTM parameters will look like this:
https://example.com/?utm_source=ads&utm_medium=cpc&utm_content=b
In the URL above, you’ll see that everything after the “?” helps you track the link more accurately.
With UTM parameters added to your URL, you can share it anywhere and track your traffic sources easily.
To create URLs with UTM parameters, you need to visit the Insights » Tools page in your WordPress admin area. In the URL Builder section, enter your URL and then enter your URL parameters.
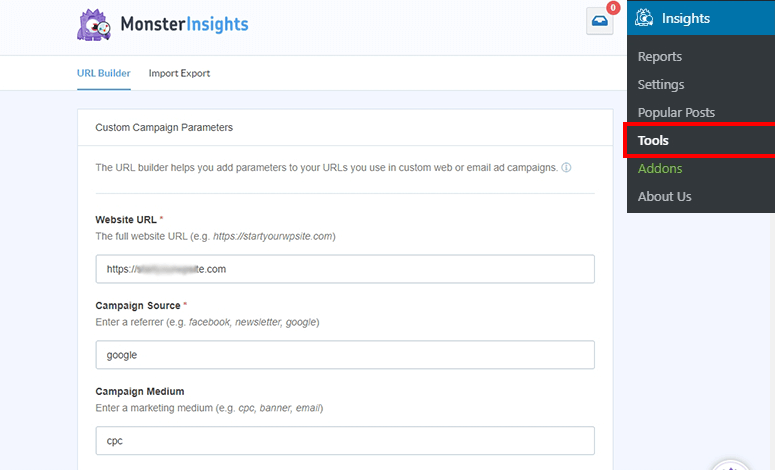
Once added, it’ll display the URL with UTM parameters to use in your marketing and ad campaigns.
View UTM Parameters Conversion Reports
These reports are available in your Google Analytics account. You need to visit the Acquisition » Campaigns » All Campaigns section.
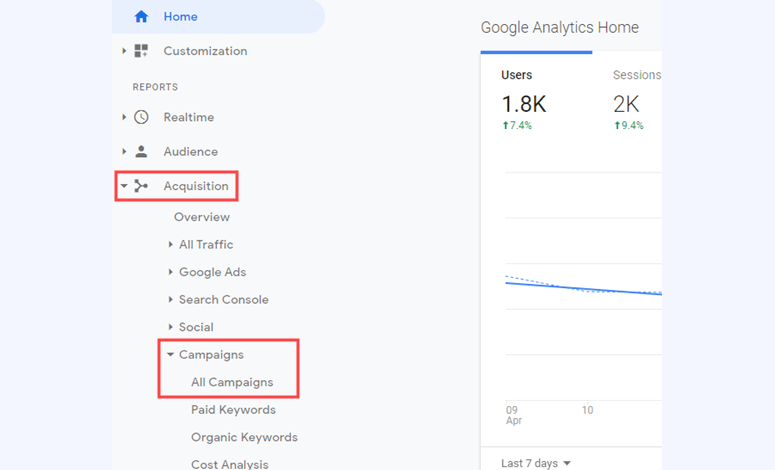
It’ll display all your campaigns, including UTM parameters.
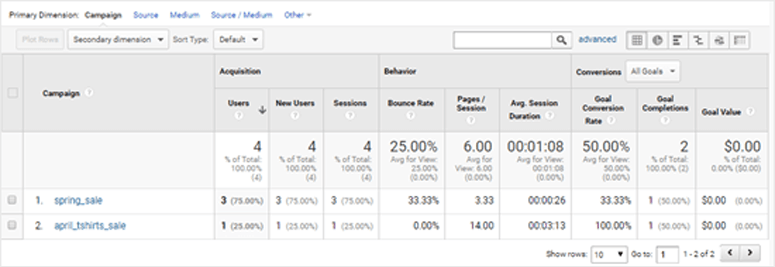
Click on any campaign to see the complete report.
Set Up Facebook Conversion Tracking in WordPress
If you’re running Facebook ads to get new leads, you should set up conversion tracking to determine your ads’ performance. It’ll require you to install a Facebook pixel to your WordPress website.
Start by visiting the Facebook Ads Manager website and click on the Events Manager tab from the top navigation menu.
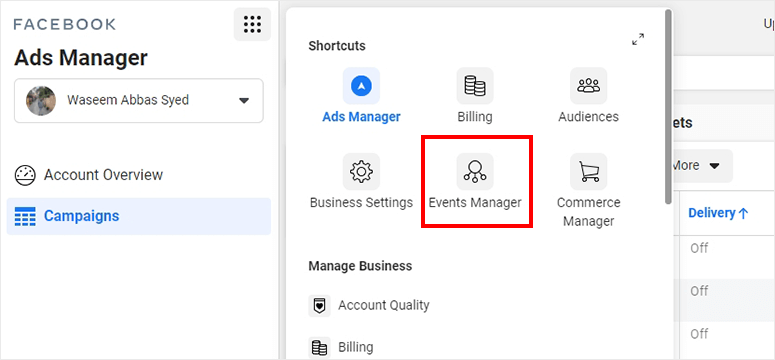
From the left side of the screen, you need to click on the Add New Data Source option and choose Facebook Pixel.
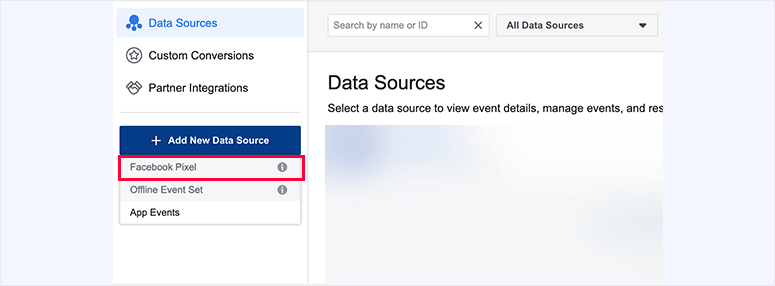
On the next screen, you need to click on the Set up Pixel button.
![]()
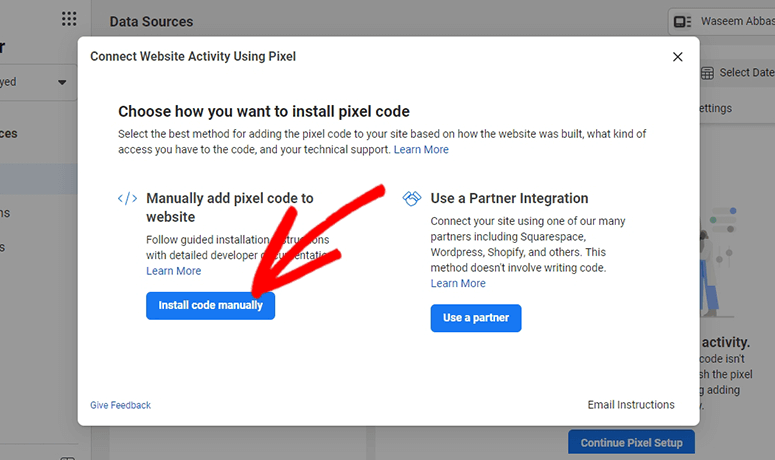
It’ll open a popup with multiple options to connect your website to Facebook Pixel. Select the manually add pixel code to the website method and click on the Install Code Manually button.
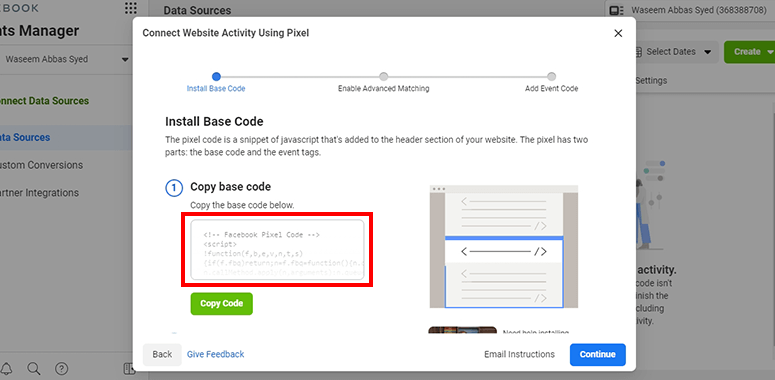
Once you click on it, a code snippet will appear on your screen that you need to copy from here.
Now go back to your WordPress admin area. If you haven’t already, you need to install and activate the Insert Headers and Footers plugin.
Once activated, you should visit the Settings » Insert Headers and Footers page. In the Scripts in Header box, you need to paste the code snippet you copied from the Facebook Pixel page.
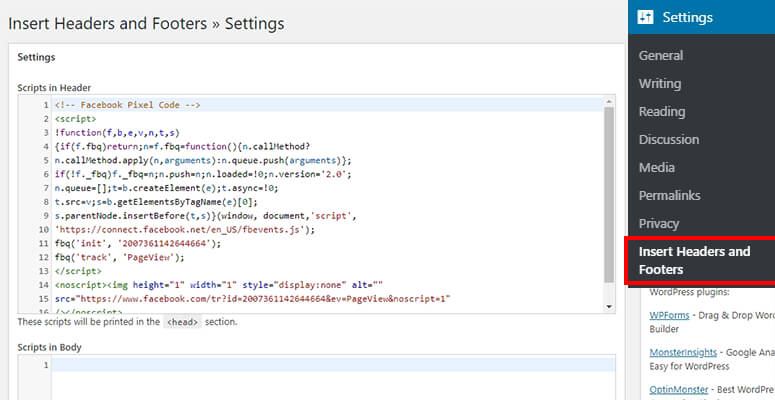
Click on the Save button to continue.
After adding the code, go back to the Facebook Pixel setup page. Click on the Open Event Setup Tool button and it’ll display the event code.
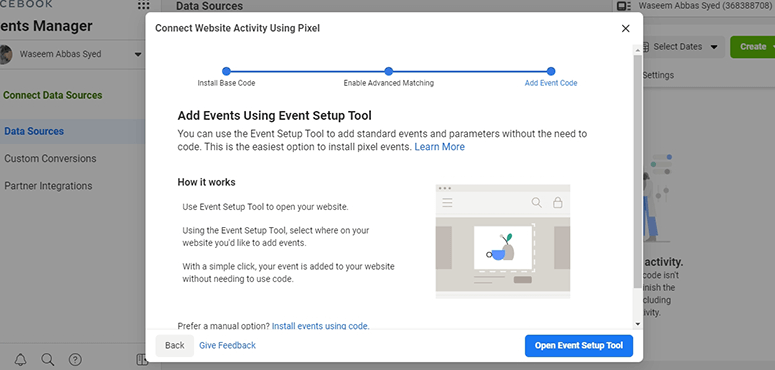
Next, you’ll see your website in a new browser tab. Select the events that you want to track with Facebook.
View Facebook Ads Conversion Tracking Reports
To view Facebook ad reports, you should visit the Facebook Analytics page and choose Facebook Pixel to see the conversion tracking reports.
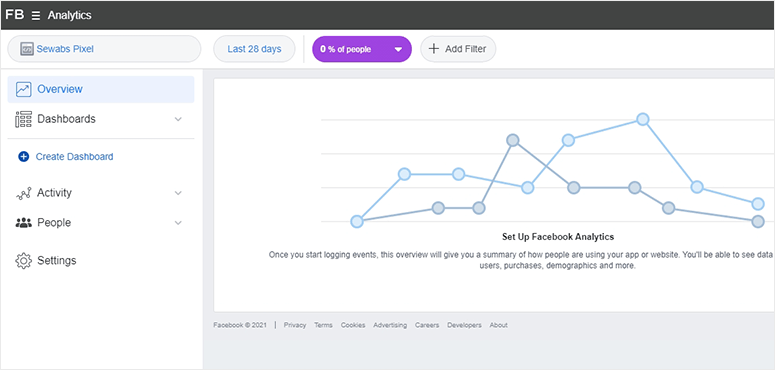
It’ll display complete reports on active users in the last 24 hours. Click on the View Full Report link to see a more detailed report on Facebook conversions.
Set Up Twitter Conversion Tracking in WordPress
Twitter sponsored ads are popular to make your brand name in the market. If you’re running Twitter Ads, you also need to enable conversion tracking to see the results of your campaigns.
First, you need to log in to your Twitter Ads account. From there, click on the Tools » Conversion Tracking option.
![]()
On the next page, click on the Generate website tag for the conversion tracking button.
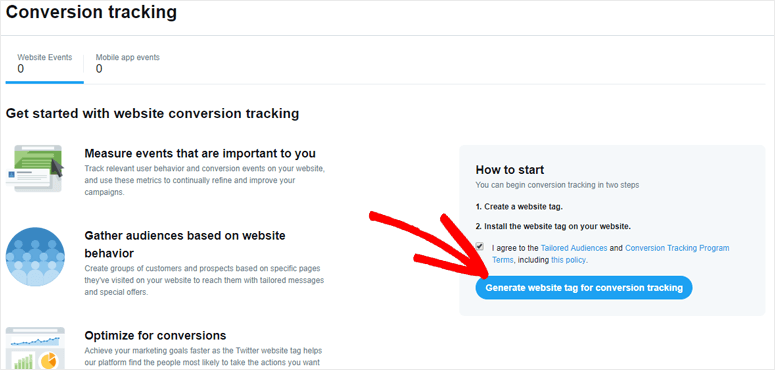
It’ll display the Website tag code that you need to copy from here.
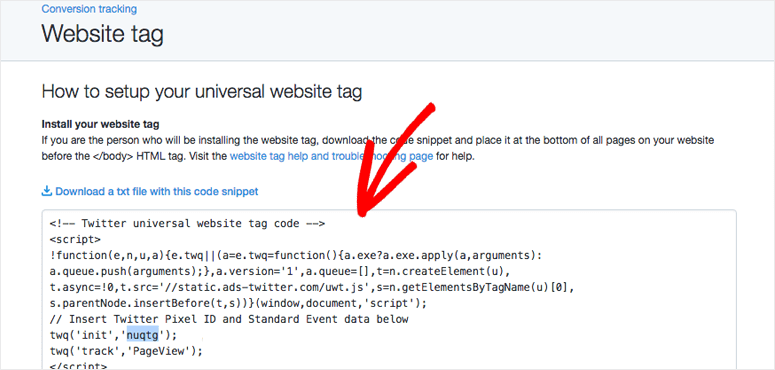
Next, you need to go back to your WordPress admin account. We hope you have the Insert Headers and Footers plugin installed already.
Go to the Settings » Insert Headers and Footers page. In the Scripts in Body box, you need to paste the code that you copied from the Twitter ads page.
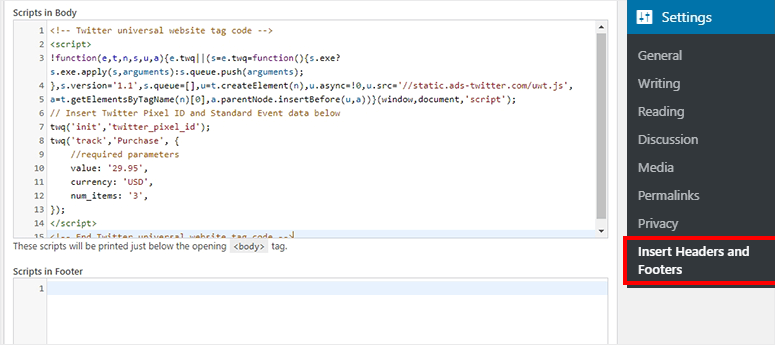
Click on the Save button.
You can now visit the Twitter ads account to see the conversion tracking reports.
That’s all for now. We hope this article has helped you learn how to set up WordPress conversion tracking on your website.
You may also want to check out our guide on how to set up download tracking in WordPress to find out how many times your files are downloaded and from where the traffic is coming to your website.
Keep reading the article at IsItWP – Free WordPress Theme Detector. The article was originally written by Editorial Team on 2021-03-12 04:19:50.
The article was hand-picked and curated for you by the Editorial Team of WP Archives.

