If you want to encourage people to buy products from your WooCommerce store, you want to make the checkout process as frictionless as possible. For example, Amazon adds a Buy Now button in addition to the add to cart button so that shoppers can immediately purchase a product.
With the WooCommerce Direct Checkout plugin, you can add that same functionality to your WooCommerce store. That is, you can add a button that takes shoppers straight to the WooCommerce checkout page, completely skipping the shopping cart page.
If it works for Amazon, it will probably work for your WooCommerce store!
Plus, you can also modify your checkout process in tons of other ways, like merging the cart and checkout pages together to create a single unified checkout process.
In our WooCommerce Direct Checkout review, we’ll share more about this plugin’s features and then give you a hands-on look at how WooCommerce Direct Checkout works on a real WooCommerce store.
WooCommerce Direct Checkout Review: The Feature List
WooCommerce Direct Checkout helps you modify your store’s checkout in broad ways.
You can adjust the checkout behavior for three different areas:
- Single product pages
- Shop archive
- Checkout page
On your single product pages, you can add a dedicated “Buy Now” button that takes shoppers straight to checkout. You can also add Ajax add to cart behavior for the normal add to cart button and choose default product attributes for variable products.
You can either add this button in addition to the regular add to cart button or just use a single “Buy Now” button that takes people straight to the checkout page (great for single product stores).
On the shop archive page, you can change the add to cart button text and also add a modal product quick view feature.
Finally, you can also modify how the checkout page itself functions. For example, you can add shopping cart functionality to your checkout so that users can adjust their orders from the checkout page. You can also otherwise modify your checkout process, like removing some fields.
If you want even more control over the fields on your WooCommerce checkout, check out our WooCommerce Checkout Manager review. This is a plugin from the same developer that lets you add, remove, or modify WooCommerce checkout fields. The two work perfectly together.
Below, I’ll show you a front-end example and then I’ll take you through all of the backend settings.
How WooCommerce Direct Checkout Works for Shoppers
WooCommerce Direct Checkout lets you modify your checkout in a lot of different ways, which I’ll show you in a second. However, first off, I want to give you a quick look at what the “Buy Now” feature looks like. This is the feature that basically mimics how Amazon does things.
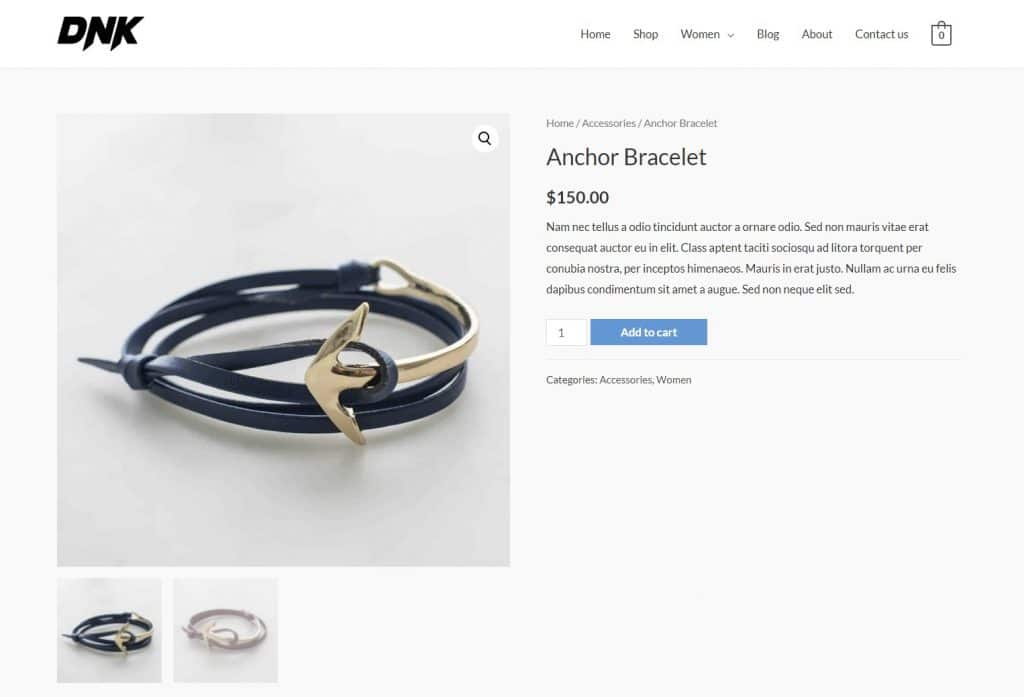
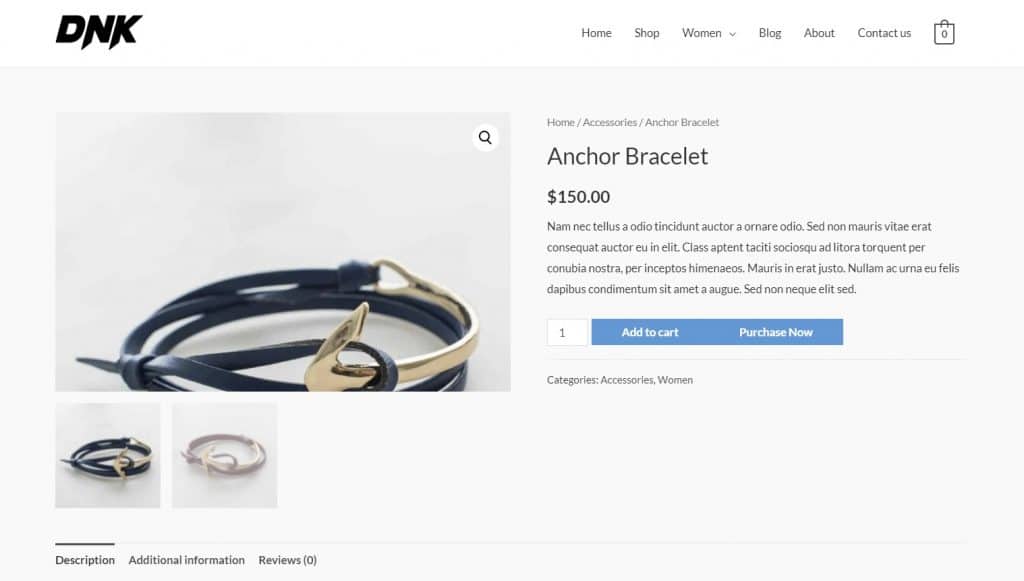
Here’s my normal single product page without the plugin installed:
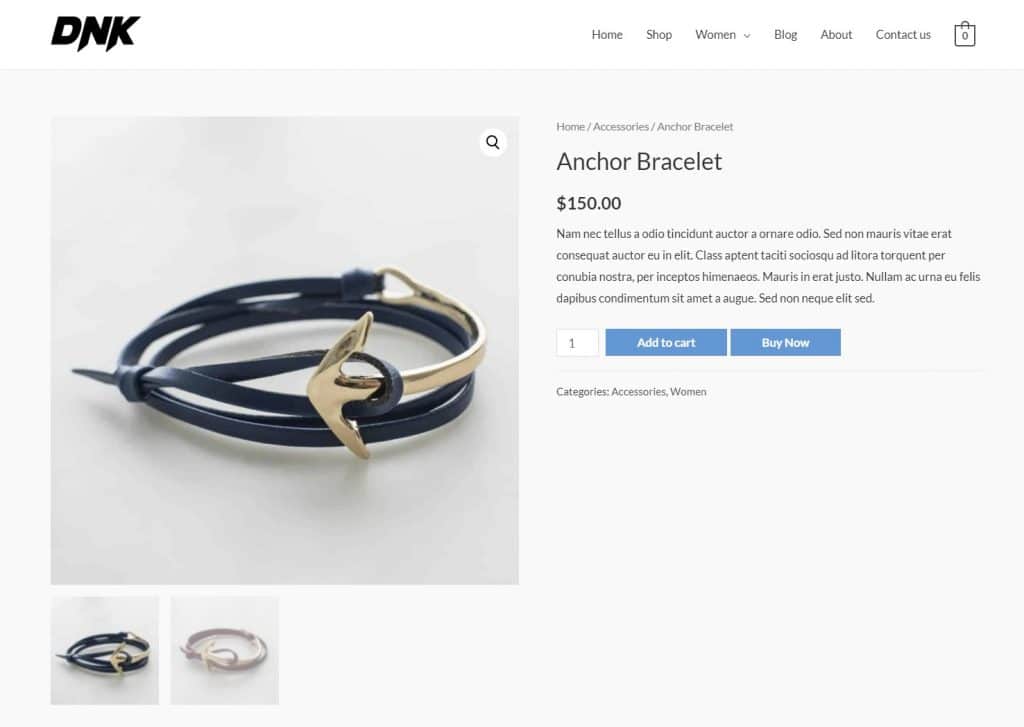
And then here’s what it looks like after setting up WooCommerce Direct Checkout:
If shoppers click the Add to cart button, it will follow your theme‘s normal add to cart functionality (though WooCommerce Direct Checkout can help you alter this with an Ajax add to cart feature).
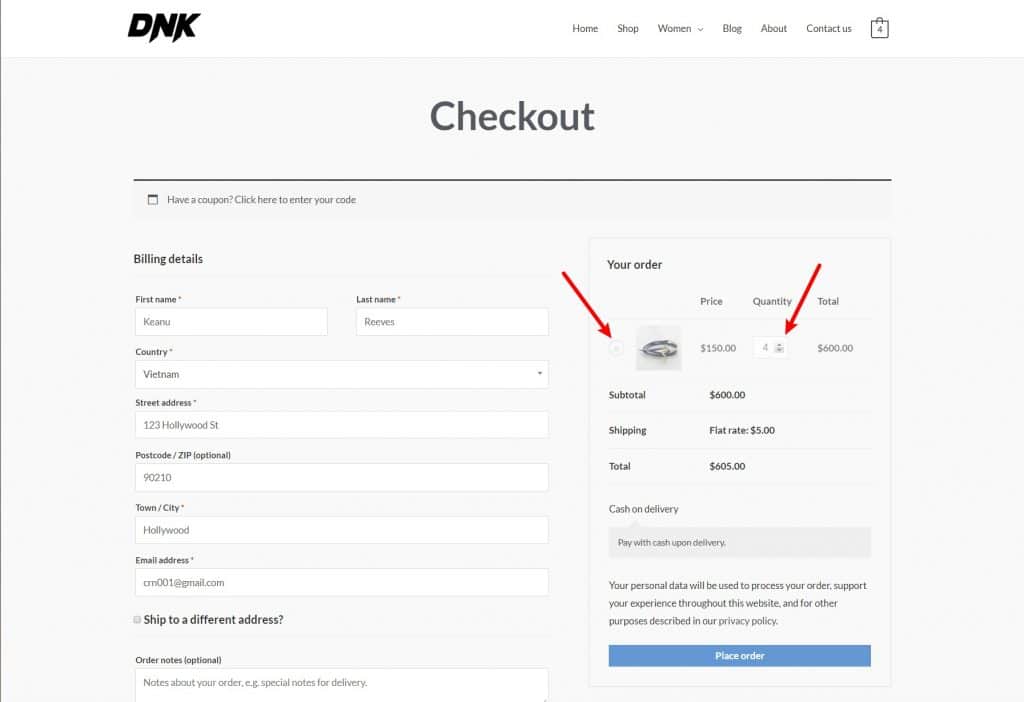
On the other hand, if they click Buy Now, they’ll go straight to the checkout page. If you want, you can also have WooCommerce Direct Checkout add shopping cart functionality to the checkout page.
Here’s an example of what that might look like. Note how, instead of just showing a static order summary like WooCommerce normally does, shoppers can actually adjust the quantity or remove items from the checkout page:
Note – when I first installed the plugin, I got this weird merged button effect, which happened on multiple WooCommerce themes:
To fix it, I added some custom CSS to give it a left margin. So you might need to do the same for your theme.
Hands-On With WooCommerce Direct Checkout
Once you install and activate the WooCommerce Direct Checkout plugin, you’ll get a new Direct Checkout tab in the WooCommerce settings area. Here, you can configure everything about how the plugin functions.
It’s pretty easy to use, but there are still some neat twists that let you control how your direct checkout functions on different parts of your store. Let’s go through the settings…
General Tab
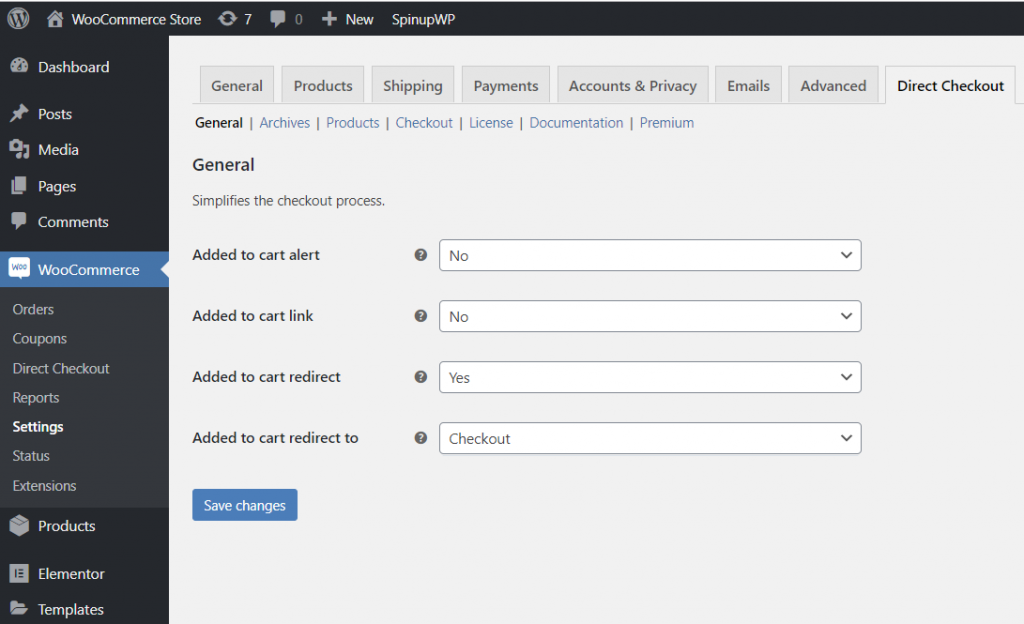
In the General tab, you can configure a few important sitewide features like:
- Replacing the “view cart” link with a link to the checkout.
- Adding an “add to cart” redirect. This lets you change the functionality of the regular add to cart button. For example, you could just create a single button that takes visitors straight to checkout (rather than offering two choices like Amazon).
Archives Tab
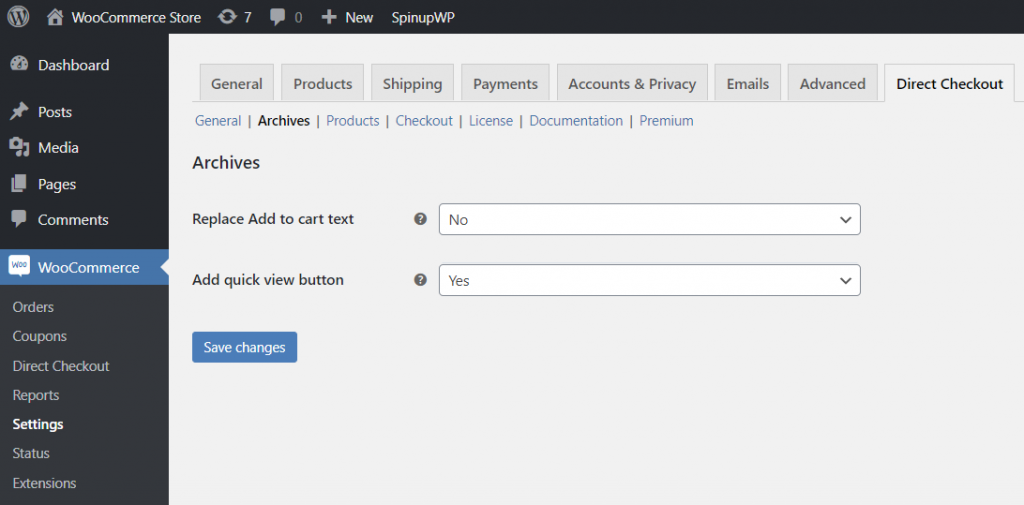
The Archives tab lets you control behavior on the shop archive page. You can:
- Change the text of the add to cart button (if your theme displays one – not all themes do).
- Enable product quick view.
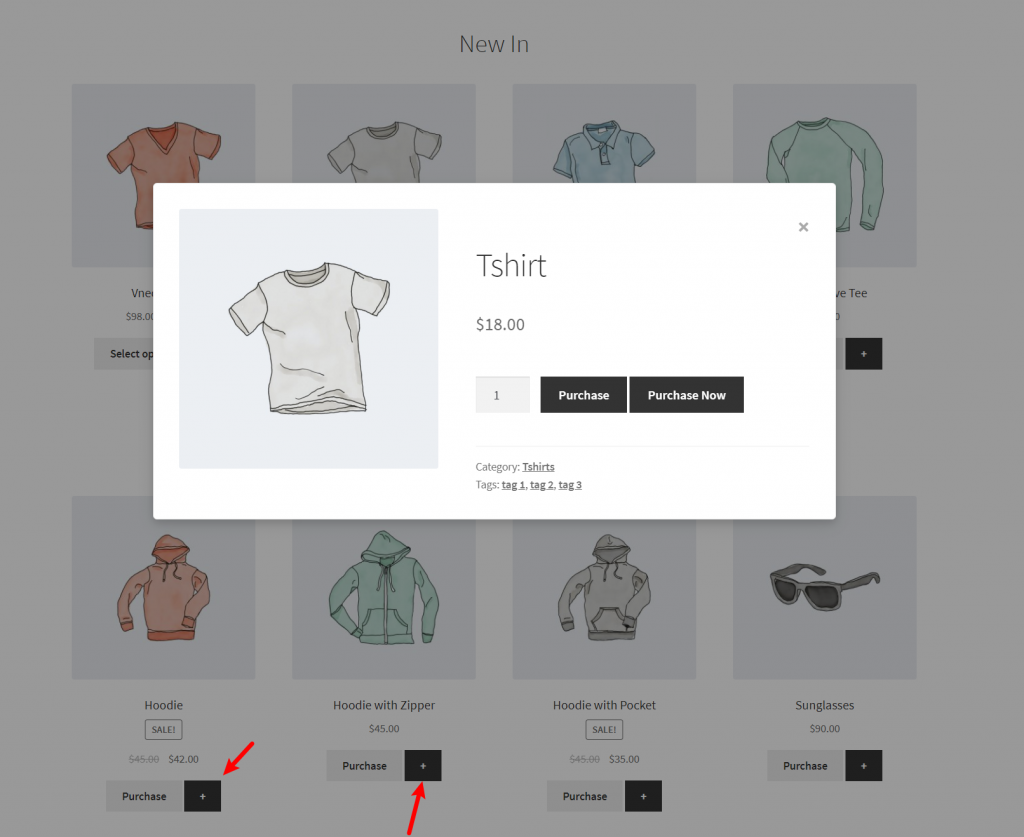
The product quick view seems to only appear if your theme also displays an add to cart button on the shop archive page, which my test theme doesn’t. Here’s an example of what it looks like with the Storefront theme – you can see how WooCommerce Direct Checkout adds a plus icon next to the add to cart/buy now button that lets shoppers open the product quick view:
Products Tab
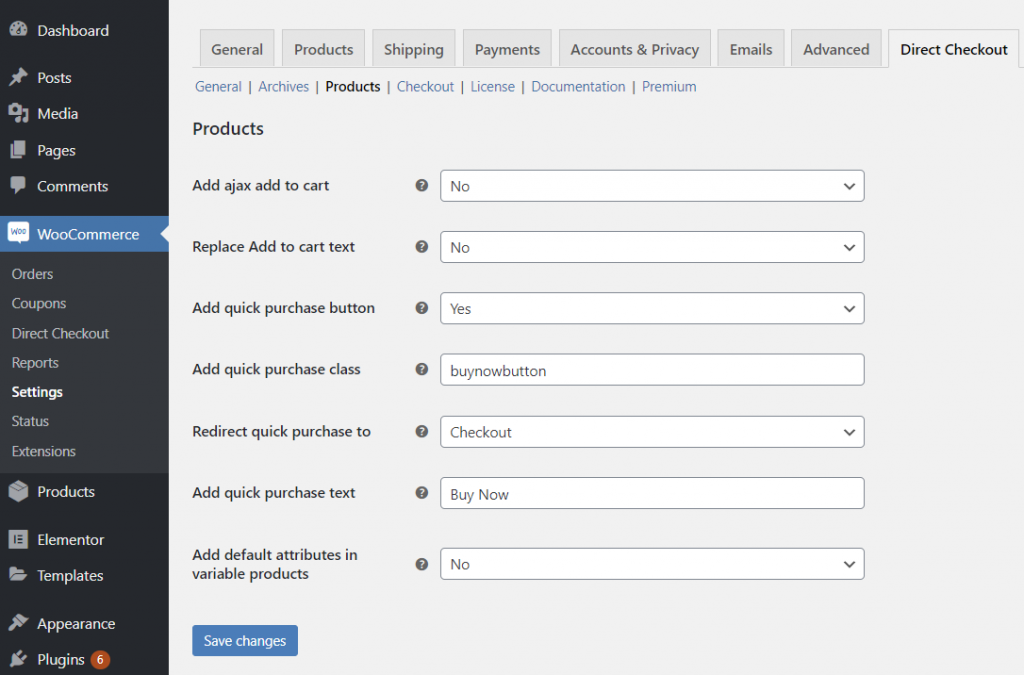
The Products tab lets you control the single product pages. You can:
- Enable Ajax add to cart functionality.
- Replace the add to cart button text (I imagine this is most helpful if you change the add to cart behavior in the General tab).
- Add a separate quick purchase button.
- Add the default attributes for variable products to avoid a non-working add to cart button.
Checkout Tab
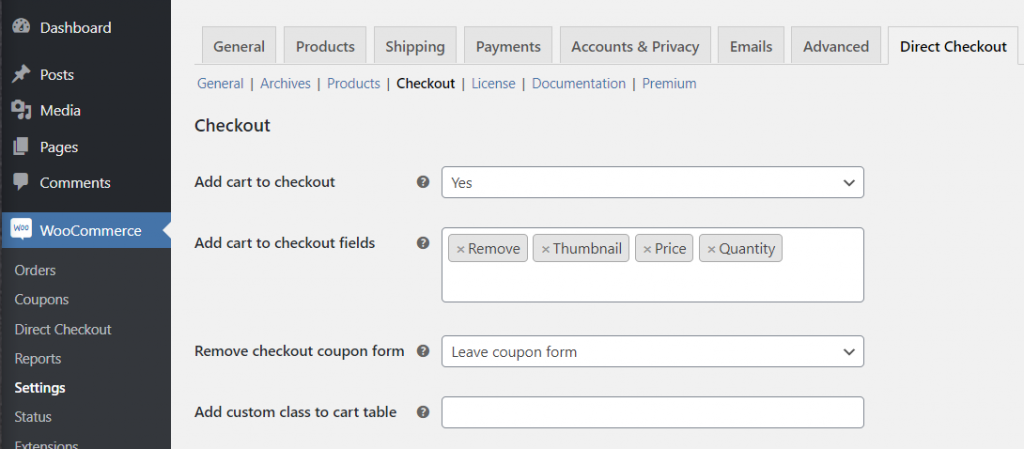
Finally, the Checkout tab lets you control the checkout process itself.
Again, one of the most notable things you can do here is add shopping cart functionality to the checkout page, which is what I showed you earlier.
You can also choose which cart fields to make editable. For example, you can opt not to let shoppers remove items from the checkout:
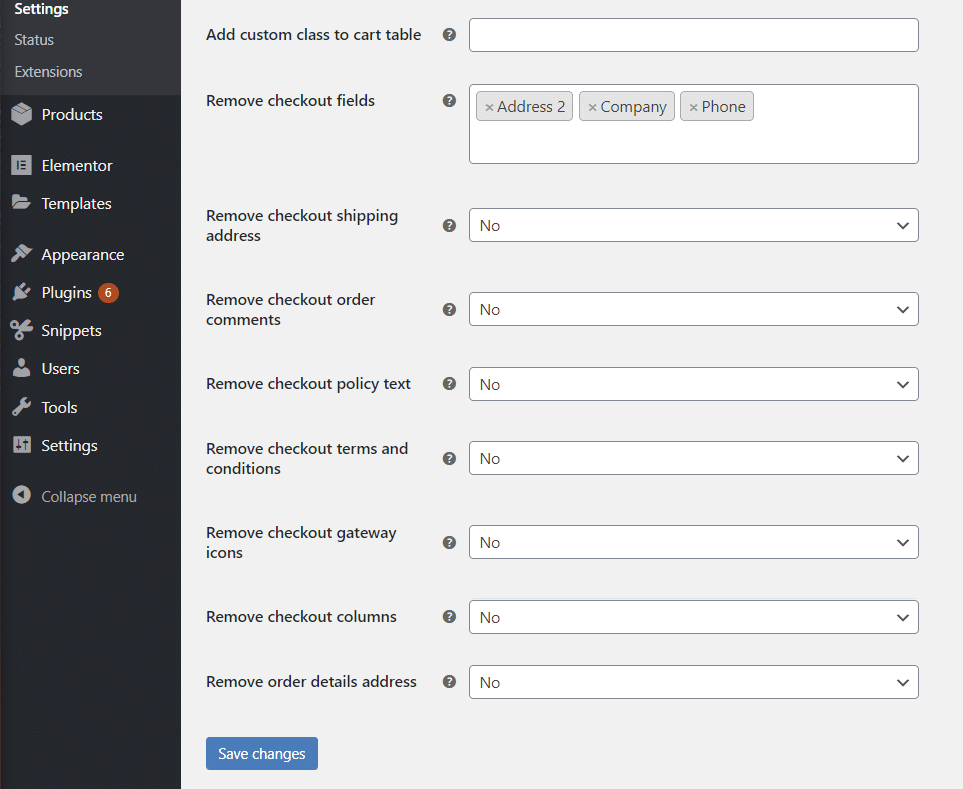
Below that, you can also remove a number of checkout fields and features. For example, you can hide specific fields or arrange all the checkout information in a single column:
And again, if you want even more control over WooCommerce checkout fields, check out our review of the WooCommerce Checkout Manager plugin from the same developer.
WooCommerce Direct Checkout Pricing
WooCommerce Direct Checkout comes in both a free version and a premium version with more functionality.
The free version is good for a taste of the plugin, but it lacks three features:
- Separate quick purchase button (like Amazon).
- Unified checkout page with cart functionality.
- Ajax add to cart alert.
If you want access to those features, the premium version is quite affordable and all plans come with lifetime updates, which is a good value:
- 1 site – $15
- 5 sites – $30
- Unlimited sites – $60
You also get 6 months of support with your purchase.
Final Thoughts on WooCommerce Direct Checkout
If you want to simplify your store’s checkout process, WooCommerce Direct Checkout makes a great option.
It gives you several different ways to change the checkout process including:
- Changing your existing add to cart button to send users straight to checkout.
- Adding a separate quick buy button alongside the regular add to cart button, much like how Amazon does things.
- Unifying the cart and checkout pages.
- Removing certain parts of the checkout page.
You also get other helpful features, like product quick view.
To learn more and get started, click the buttons below:
Get Pro Get Free Version
Keep reading the article at Learn WordPress with WPLift. The article was originally written by Colin Newcomer on 2020-01-16 10:29:21.
The article was hand-picked and curated for you by the Editorial Team of WP Archives.

