The “500 internal server error” can be a frustrating one to come across because it doesn’t actually tell you what went wrong.
Also known as the “http error 500,” it could be caused by several factors, such as conflicts between WordPress plugins or themes, reaching the PHP memory limit, a corrupt .htaccess file, server misconfiguration, or incorrect file and directory permissions, among other reasons.
In this article, I’ll help you pinpoint the exact cause of the error on your WordPress site and guide you through fixing it.
Common causes of the 500 internal server error
Basic definitions:
- “HTTP” refers to the protocol used for communication between the client (your browser) and the web server.
- “500” is the status code indicating an internal server error.
Therefore, the “HTTP 500 internal server error” as a whole indicates that something unexpected went wrong during the communication between the browser and the web server and that the problem originates from the server side. However, there’s probably nothing wrong with your server, so don’t worry.
As for the real cause of the error, it could have occurred because of any of the following issues:
- Poorly coded plugins or themes can cause conflicts with other plugins and themes, triggering the error;
- PHP memory limit exhaustion causes resource-intensive operations to terminate prematurely;
- Corrupted .htaccess file, a core WordPress file, due to incorrect configurations or syntax errors can disrupt the server’s ability to process requests properly, leading to a 500 error;
- Changed file permissions can cause the server to encounter issues accessing the necessary files or directories to fulfill a request, thus triggering the error;
- On rare occasions, browser incompatibility can cause the website to open normally on one browser and to throw errors on another.
Now that we have the common causes out of the way, let’s look at the best ways to get rid of this error:
How to fix the 500 internal server error on your site
Dealing with the internal server error on your website is a recipe for a bad day for sure, but hopefully we’ll get it fixed in no time together!
Here’s how to get rid of the error if you’ve encountered it on your own website (running WordPress):
1. Clear your browser cache
Caching is the process of storing website data in the user’s browser for faster access. By taking the most frequently accessed site data and putting it in the cache, subsequent visits to the website can bypass certain time-consuming processes, such as retrieving data from the server or rendering complex page elements. This results in quicker page load speed and better user experience.
The greatest downside of caching is that it can end up displaying outdated content to visitors. So, the 500 error displayed on the website that you are browsing may be a cached version of the site. The error could have been a temporary glitch and might have been automatically removed.
This is why clearing your browser cache is the easiest and also very often the most effective step to “fixing” the 500 internal server error. I’m saying fixing there in quotes since you’re not actually fixing it – you’re just refreshing your own browser so that you can access the website without the error.
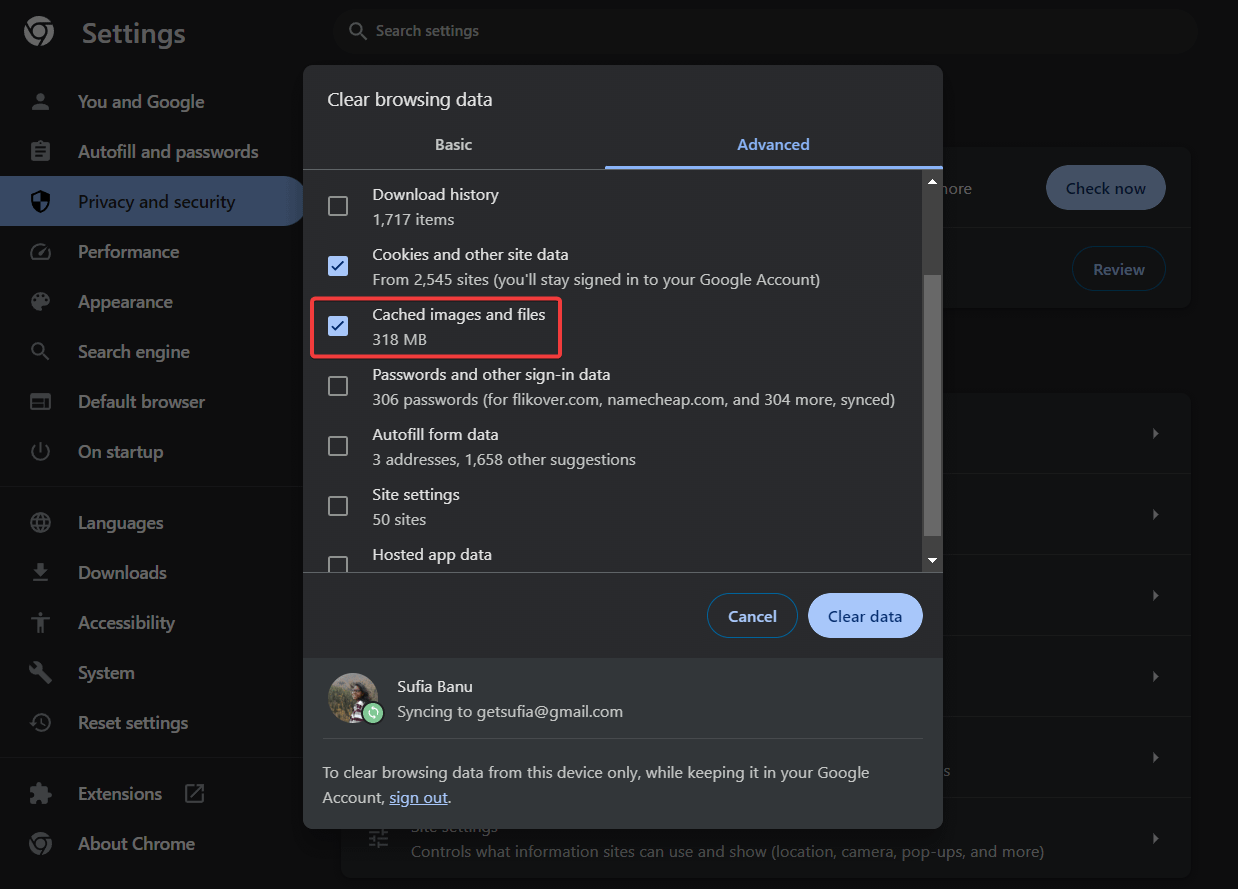
Here’s how to clear your cache in the most popular web browsers.
2. Check the debug log
The debug log is an in-built WordPress tool that contains detailed information about errors and warnings that occur on a WordPress website.
The debug log of your website should contain details about the “HTTP 500 internal server error” and could point you to the source of the error. Knowing the cause is half the battle won.
By default, the WordPress debug log is turned off to prevent displaying potentially sensitive information to visitors. You will need to turn it on first.
With the internal server error being displayed on your website, you are unlikely to have access to your WordPress dashboard. Therefore, you will need to go to the backend of your website to insert a piece of code in the wp-config.php file and enable the debug log.
You can do this by connecting to your site via FTP or through your hosting account. To use FTP, read this guide. Below, I’m going to show you how to use the tools available on your hosting account.
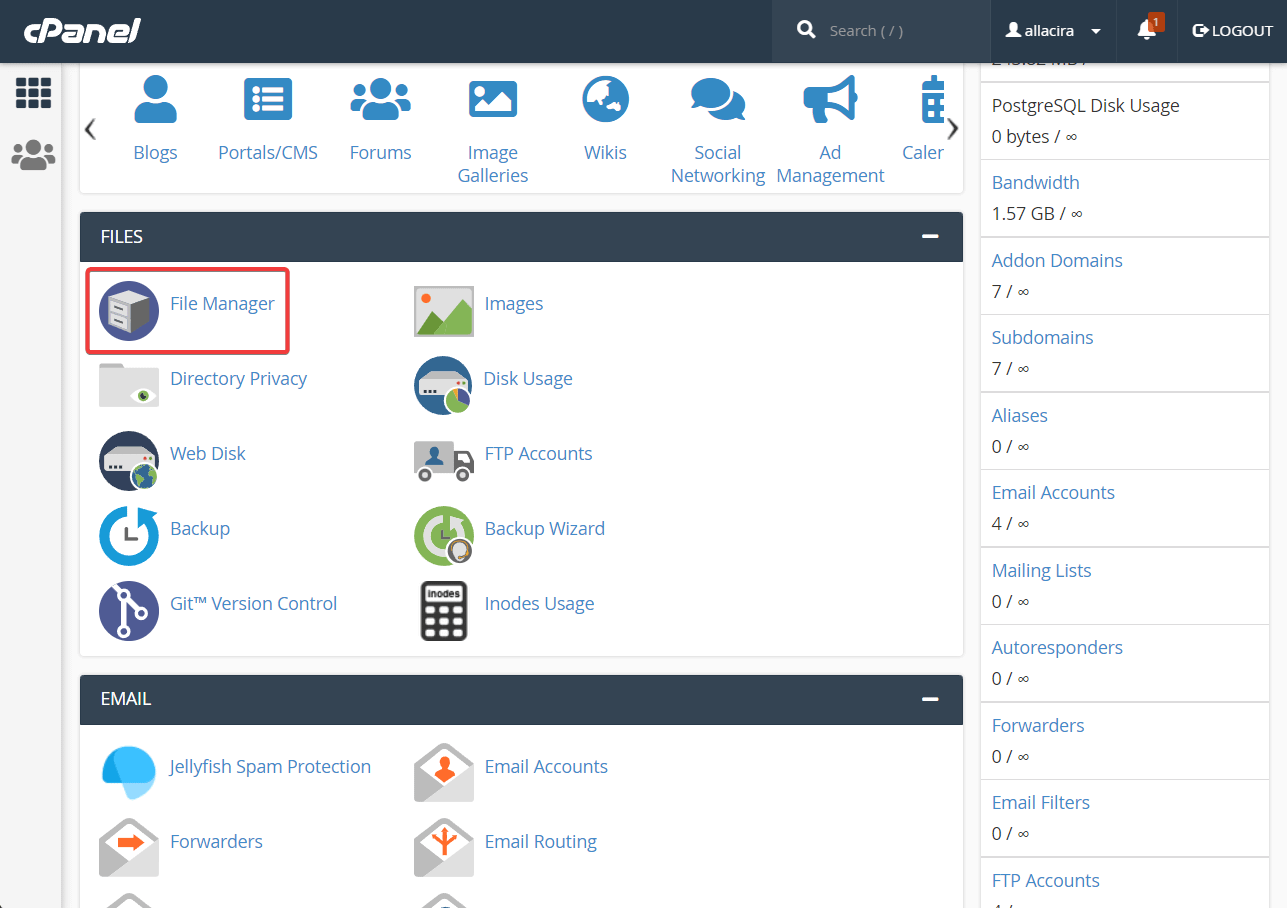
Log in to your hosting profile/account and look for a link to cPanel – it’s a hosting management panel that most web hosts use. Once there, go to the File Manager:

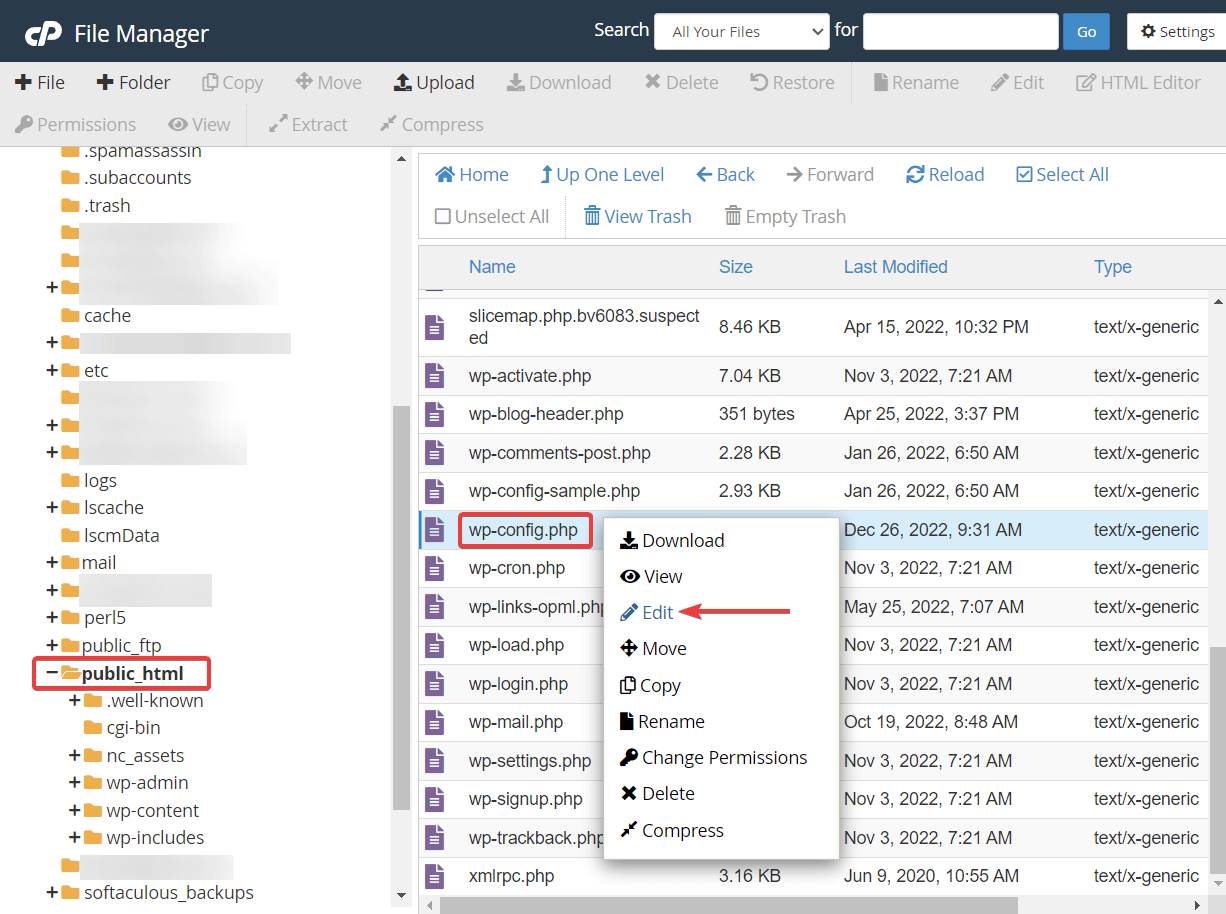
Inside the File Manager, select the public_html folder and then locate the wp-config .php file.
Right-click on the file and select the Edit option. The file will open on a different page.

Scroll down to the end of the config file and paste the following code right before this line: /* That's all, stop editing! Happy blogging. */:
define( 'WP_DEBUG', true);
define( 'WP_DEBUG_LOG', true);
Save the changes and exit the file.
Next, go to public_html → wp-content → debug.log.
Open the file by right-clicking and selecting the Open option.
Look for the 500 internal server error record and read through the details of the error.
If you’ve found the real cause, then jump to the relevant solution in the sections below. If not, then start implementing the following solutions one by one anyway.
3. Deactivate plugins
Open your hosting account and go to cPanel → File Manager → public_html → wp-content → plugins.
Right-click on the plugins folder, select Rename, and rename the folder to “plugins-off.” It will deactivate all plugins.

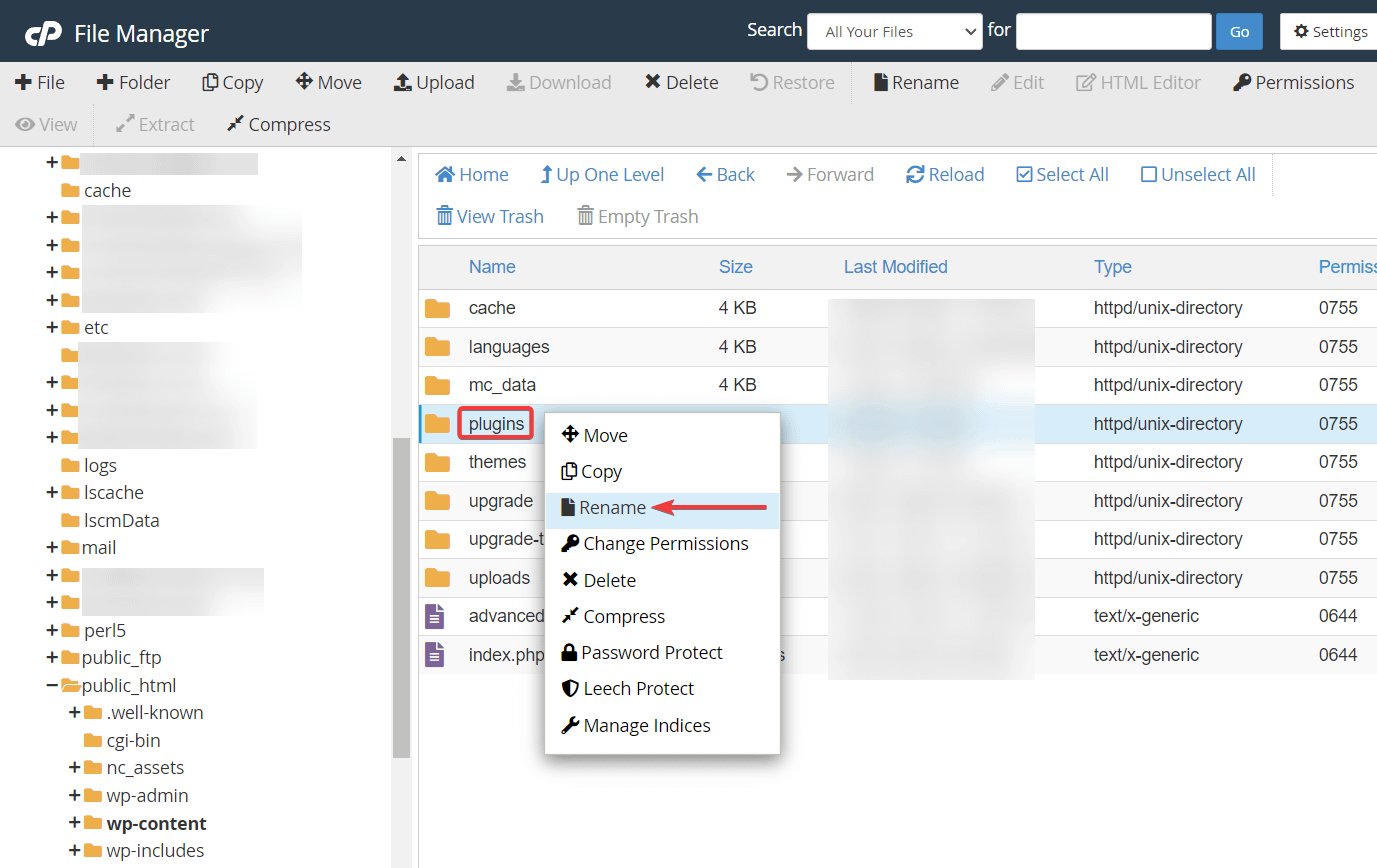
Deactivation will help check whether a plugin conflict was causing the error. If you don’t see an error on your website any longer, then it confirms the plugin conflict theory.
Next, revert to the original name of the folder to reactivate all your plugins. This will cause the error to return. Don’t worry.
Open the plugins folder and start deactivating the plugins one by one – change each plugin folder’s name individually. Each time you deactivate a plugin, check whether the error is gone. At some point, the error will be removed and you will know that the plugin you just deactivated was causing it.
Remove that plugin by right-clicking on the plugin folder and selecting the Delete option.
4. Deactivate your theme
To deactivate your current theme, you need to switch to a different one. I suggest switching to the default WordPress theme that you should have present on your site already – it’s probably just sitting there deactivated.
To do this, connect to the database using phpMyAdmin (or whichever tool your host uses) from the hosting control panel. Once you’re in, select the WordPress database and find the wp_options (it might have a different prefix) table in the menu to the right.


Open the table and click on Search in the navigation menu at the top of the screen. Type “template” into the Value field that corresponds to the option_name column and click on Go.

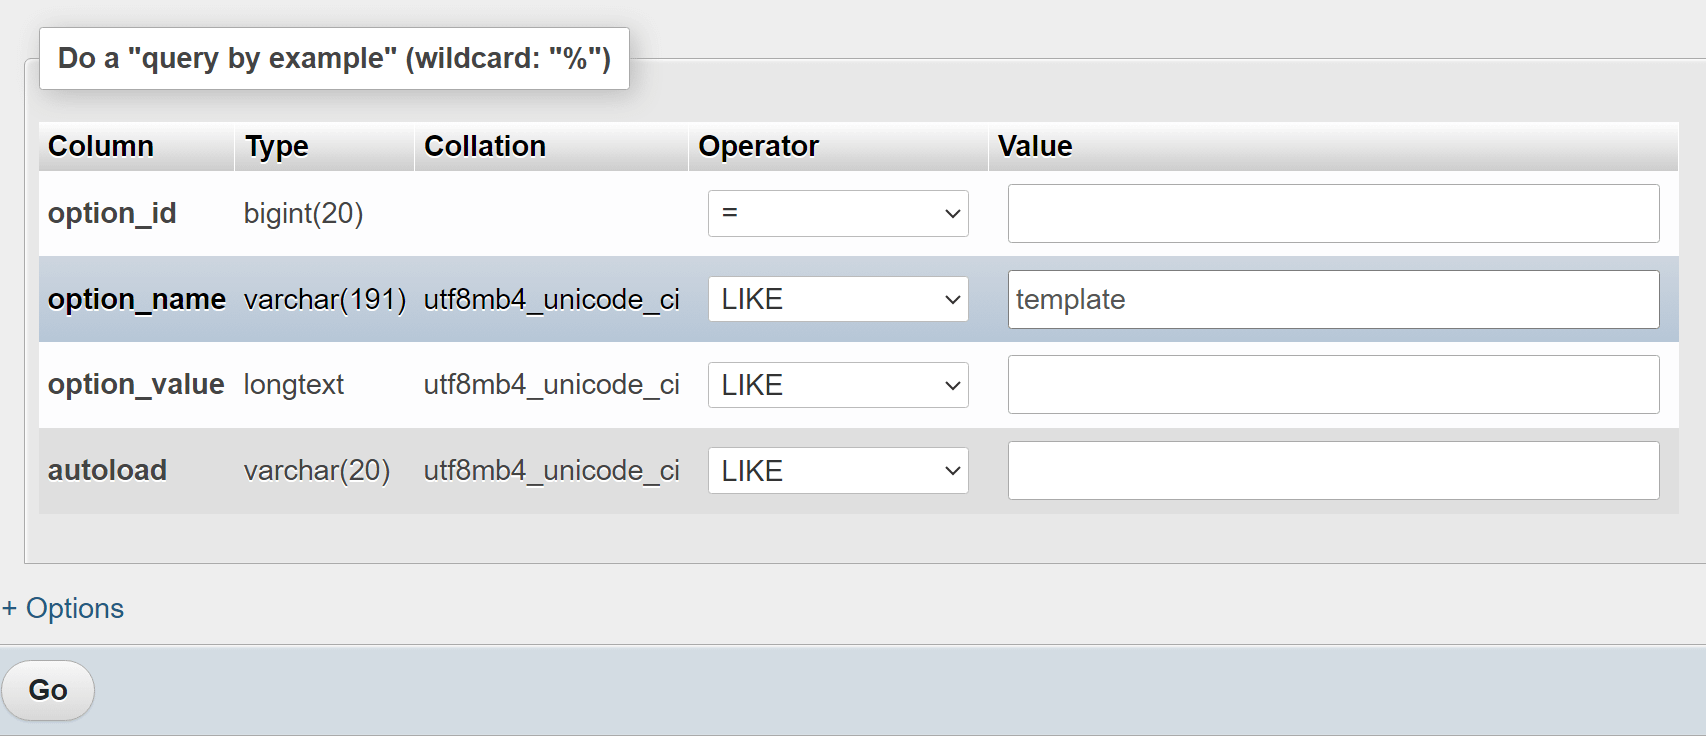
This will return a single entry from the wp_options table. That entry tells WordPress which theme to use; the theme is twentytwenty in our example.


Double-click on the name of the theme under option_value and you can change it to something else. This needs to be a theme that’s installed on the website or you’ll run into further errors.
Some safe bets for most sites are default theme options, such as twentytwentythree or twentytwentytwo. When you’re done, check your website to see if the 500 internal server error persists.
5. Re-upload core files
Head over to wordpress.org and download the latest version of WordPress on your local computer. Next, unzip the file (this is IMPORTANT).
Go back to your hosting account and again into cPanel → File Manager → public_html. Click on Upload to upload the new WordPress folder.

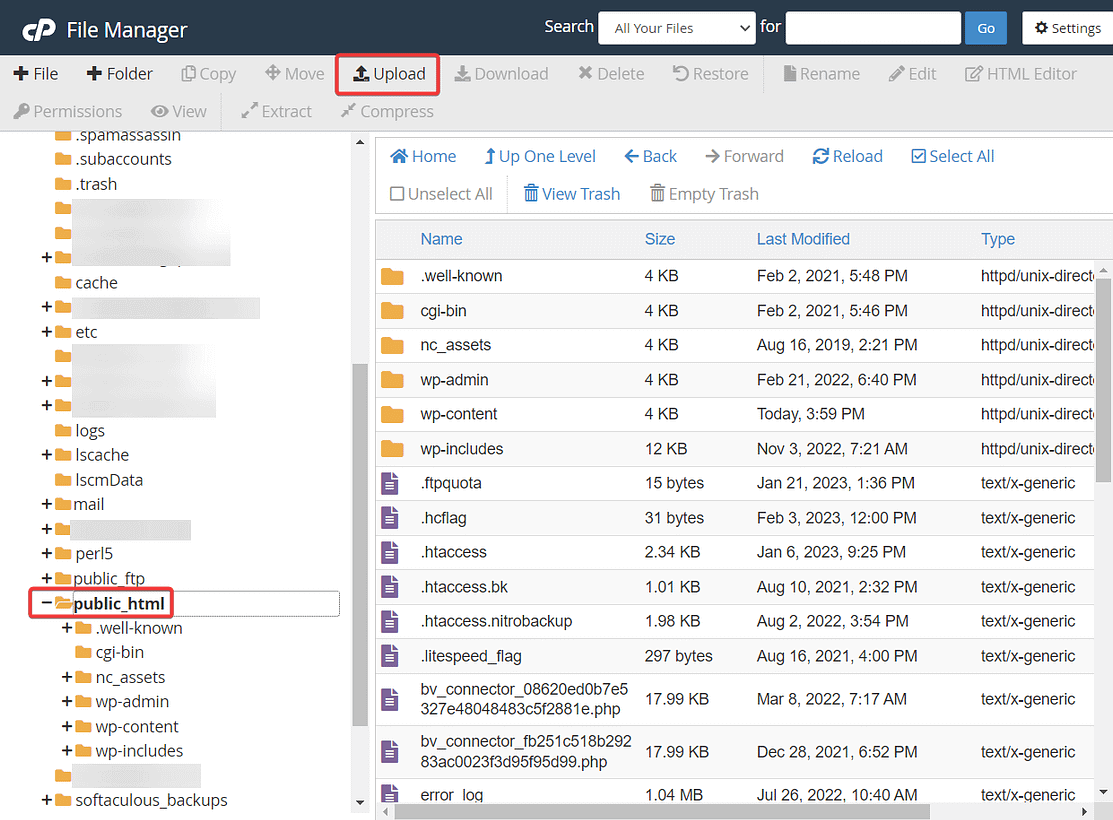
You’ll get informed that you’re about to overwrite the files. This is okay – it’s exactly what we want. Grant the permission and let the new files upload.
It will take a few seconds for the process to be complete. Check if the 500 error is gone.
6. Regenerate .htaccess file
To regenerate the .htaccess file, go to public_html → .htaccess. Right-click on the file and hit the Download button to download the existing file to your local computer as a backup.
Right-click again and hit the Delete button to delete the file.
Click the +File icon in the toolbar at the top of your screen. Type in “.htaccess“ into the New File Name input field.

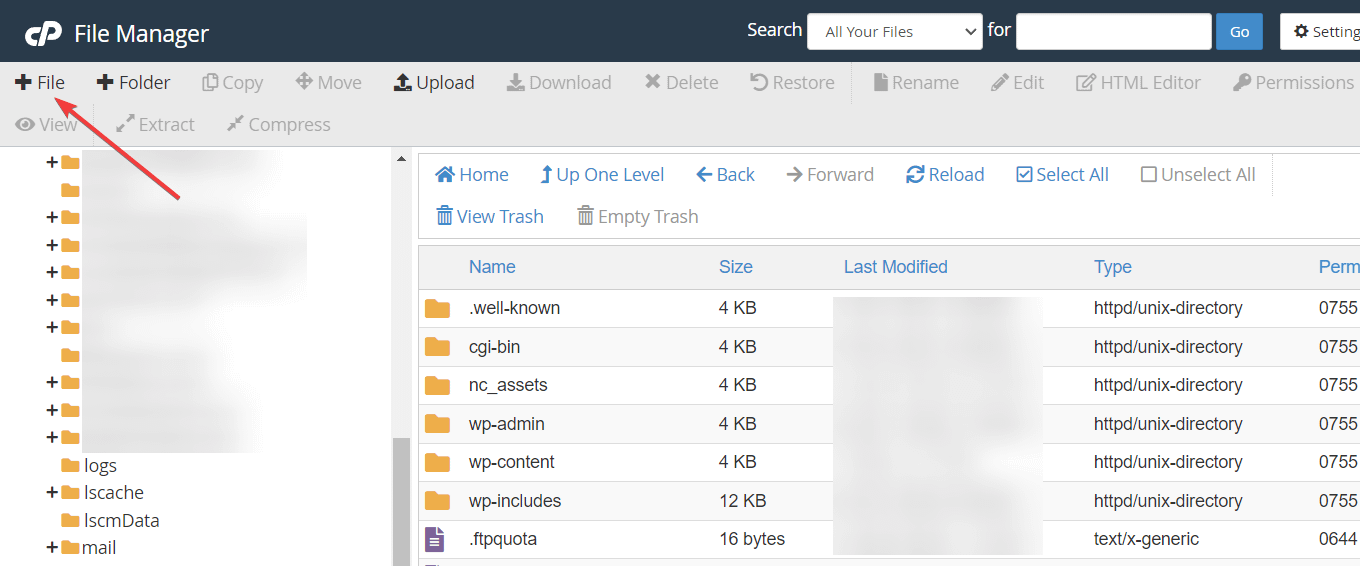
Click Create New File. Right-click the newly created file to Edit it. Add the following code:
# BEGIN WordPress
RewriteEngine On
RewriteRule .* - [E=HTTP_AUTHORIZATION:%{HTTP:Authorization}]
RewriteBase /
RewriteRule ^index.php$ - [L]
RewriteCond %{REQUEST_FILENAME} !-f
RewriteCond %{REQUEST_FILENAME} !-d
RewriteRule . /index.php [L]
# END WordPress
The code above comes from the official template for the .htaccess file that WordPress uses.
Save the file before you close the window.
7. Increase PHP memory limit
PHP is a programming language that allows your WordPress site to run. All operations that result in content showing on your site are PHP operations (I’m simplifying a bit).
Those PHP operations usually take some time and memory to execute. However, if your server hasn’t allocated enough resources to those operations, you might see a 500 internal server error.
Increasing the memory limit is a neat way to fix the error in many cases.
You can do this from your hosting panel. Navigate back to cPanel to do what’s required.
In cPanel, look for an option called PHP Version or PHP Selector. This name may slightly differ from host to host. For instance, on Namecheap, the option you should be looking for is called Select PHP Version.

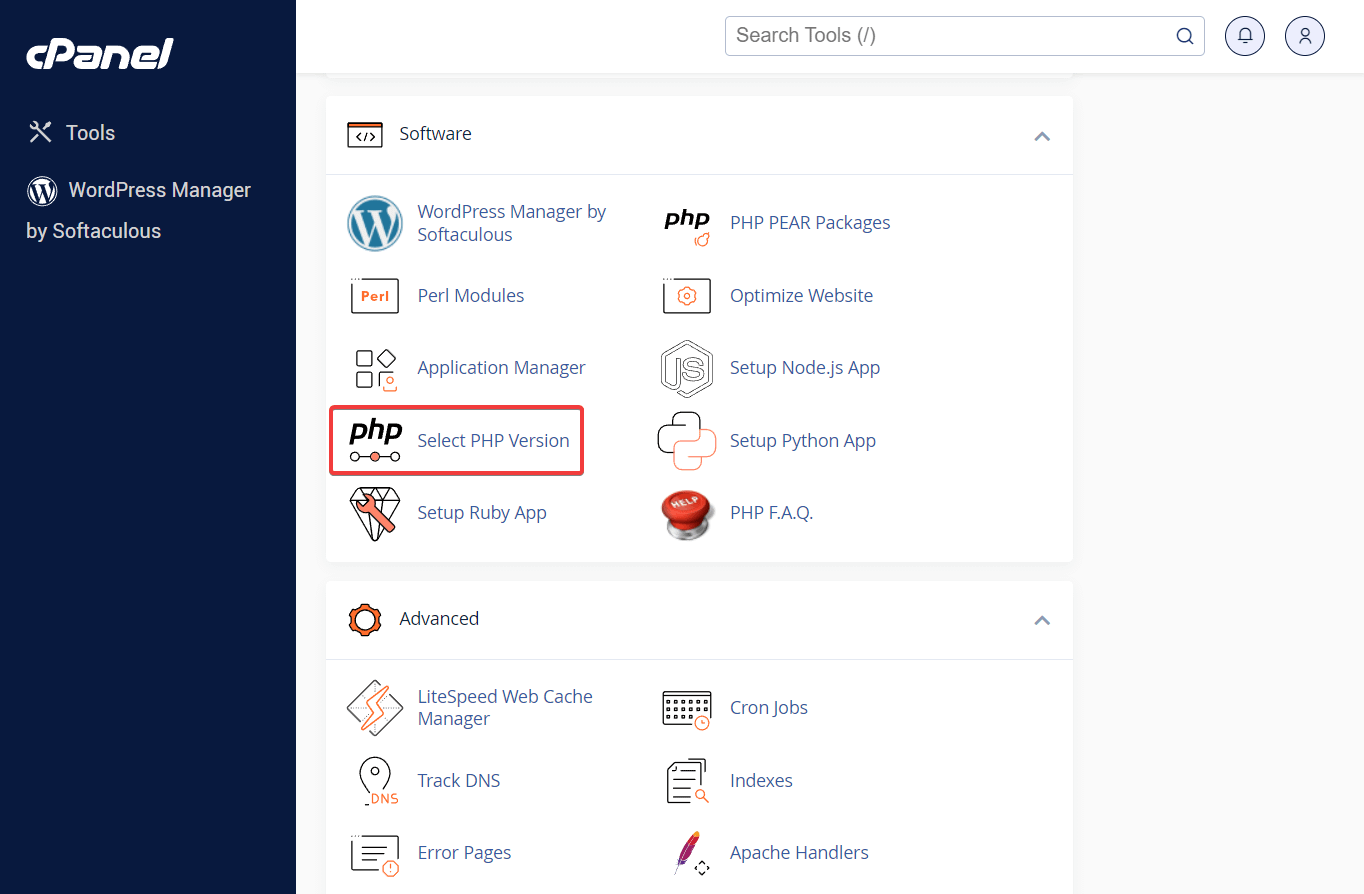
Next, enter PHP Options or Options.
In there, you can change the value next to memory_limit. Simply select a value that’s one level higher than what you’ve had selected currently.

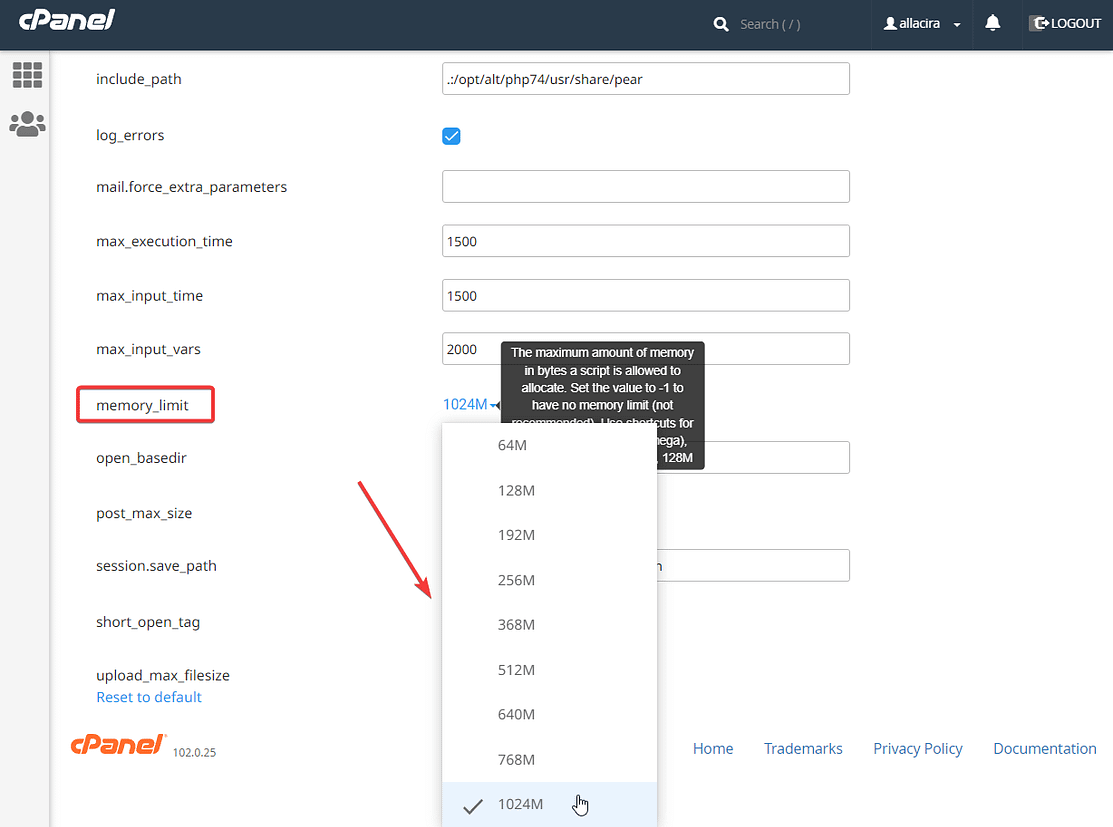
Remember to hit the Save button.
8. Seek help from your hosting provider
Nothing worked? It’s probably time to reach out to your hosting provider and seek help.
Tell them about all the steps you have already taken to remove the error. Your hosting provider should have a few more tricks up their sleeves.
Conclusion on the 500 internal server error
This error is one of the most frustrating ones you are ever going to encounter on your WordPress website.
It doesn’t tell you why it occurred, what to do with it, plus there are numerous causes that could have triggered it.
Since the exact cause of the error is always fleeting, you can try the following solutions one by one and see which one removes the error:
- Clear your browser cache
- Check the WordPress debug log
- Deactivate plugins and themes
- Re-upload core WordPress files
- Regenerate the .htaccess file
- Increase PHP memory limit
When nothing works, it’s best to seek help from your hosting provider directly.
If you have any questions about the “HTTP 500 internal server error,” let us know in the comment section below.
Free guide
4 Essential Steps to Speed Up
Your WordPress Website
Follow the simple steps in our 4-part mini series
and reduce your loading times by 50-80%. 🚀
Was this article helpful?
No
Thanks for your feedback!
Yay! 🎉 You made it to the end of the article!
Keep reading the article at Themeisle Blog. The article was originally written by Sufia Banu on 2024-05-06 06:24:07.
The article was hand-picked and curated for you by the Editorial Team of WP Archives.

