As a WordPress developer, you probably rely on several tools to manage your clients’ websites. Google products have long been a go-to for webmasters, helping with everything from Search Engine Optimization (SEO) to analytics reports. However, manually pulling information that’s spread across multiple platforms isn’t efficient.
Fortunately, there’s now a better way to compile these reports. Thanks to the new Google Site Kit plugin, tracking, monitoring, and analyzing data for your WordPress sites is easier than ever. It lets you gain meaningful insights from your favorite Google tools in a single dashboard.
In this post, we’ll explain what Google Site Kit is and how it works. Then we’ll provide you with four tips for using it as a developer. Let’s get started!
Site Kit is Google’s official plugin, which is now available for free in the WordPress Plugin Directory:
This all-in-one tool lets you aggregate and integrates data from Google’s major products directly into your WordPress dashboard. It eliminates the need for separate plugins for each platform or to leave your site altogether to view key information.
Site Kit supports the six most popular Google tools, including:
- Search Console: Shows how sites appear in search results as well as impressions and Click-Through Rates (CTRs) for specific pages.
- Analytics: Monitors who visit your site, which pages they view, and other essential user behavior.
- AdSense: Keeps track of how your site’s ad revenue.
- PageSpeed Insights: Measures your WordPress site’s performance and suggests actions you can take to improve it.
- Tag Manager: Sets up tags on your WordPress site without requiring you to edit any code.
- Optimize: Configures your site for A/B testing.
After you install Site Kit and connect it with these services, you’ll be able to view data from your WordPress dashboard in easy-to-understand charts. However, note that while the plugin integrates the scripts of Tag Manager and Optimize, you’ll still need to visit these platforms to manage your tags and conduct A/B testing.
How to install and set up Google Site Kit
One of the benefits of Site Kit is its ease of installation. You can get it up and running remarkably quickly. After you activate it, you’ll be prompted to authorize it with your Google Account, which you can do by clicking on the Start Setup button:

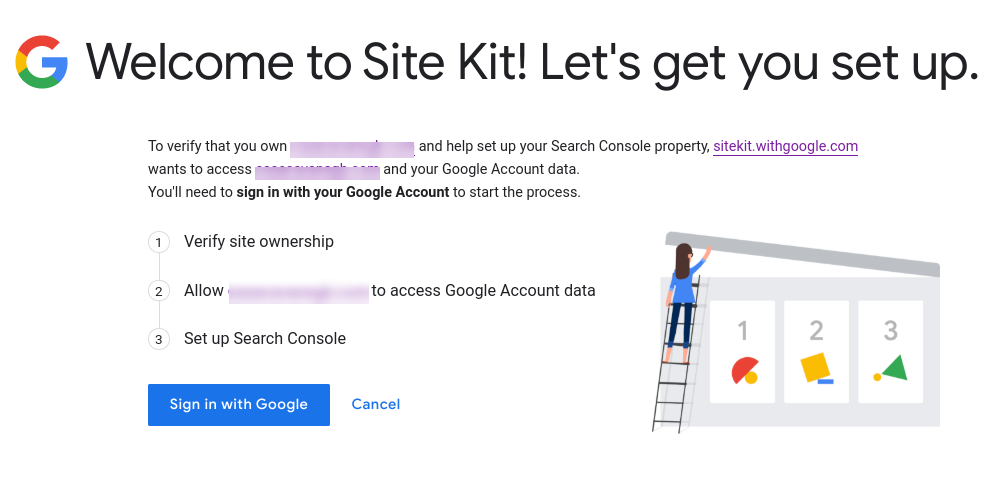
You’ll be redirected so you can sign in with your Google credentials to continue the authorization process. There will be a series of prompts you’ll need to follow to verify your ownership of your website, allow it access to Google data, and automatically set up Search Console:
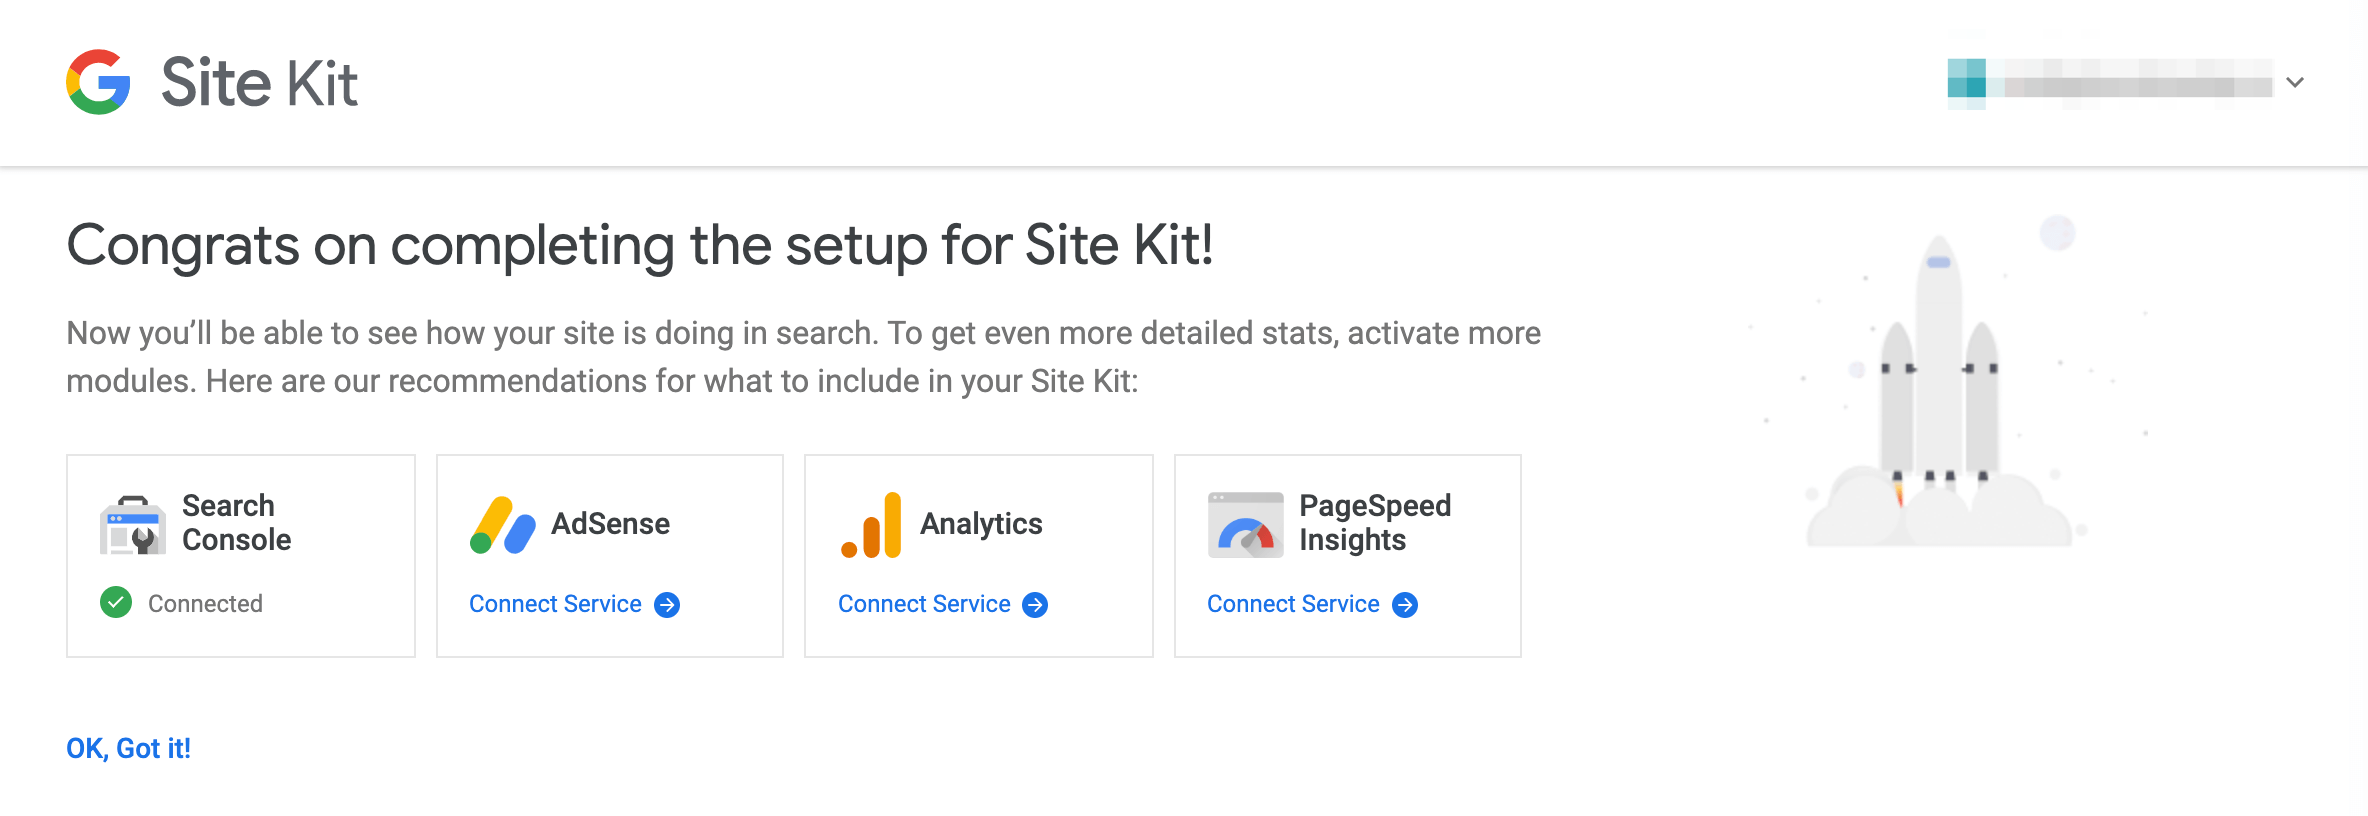
Next, you’ll be prompted to connect additional services to your site:
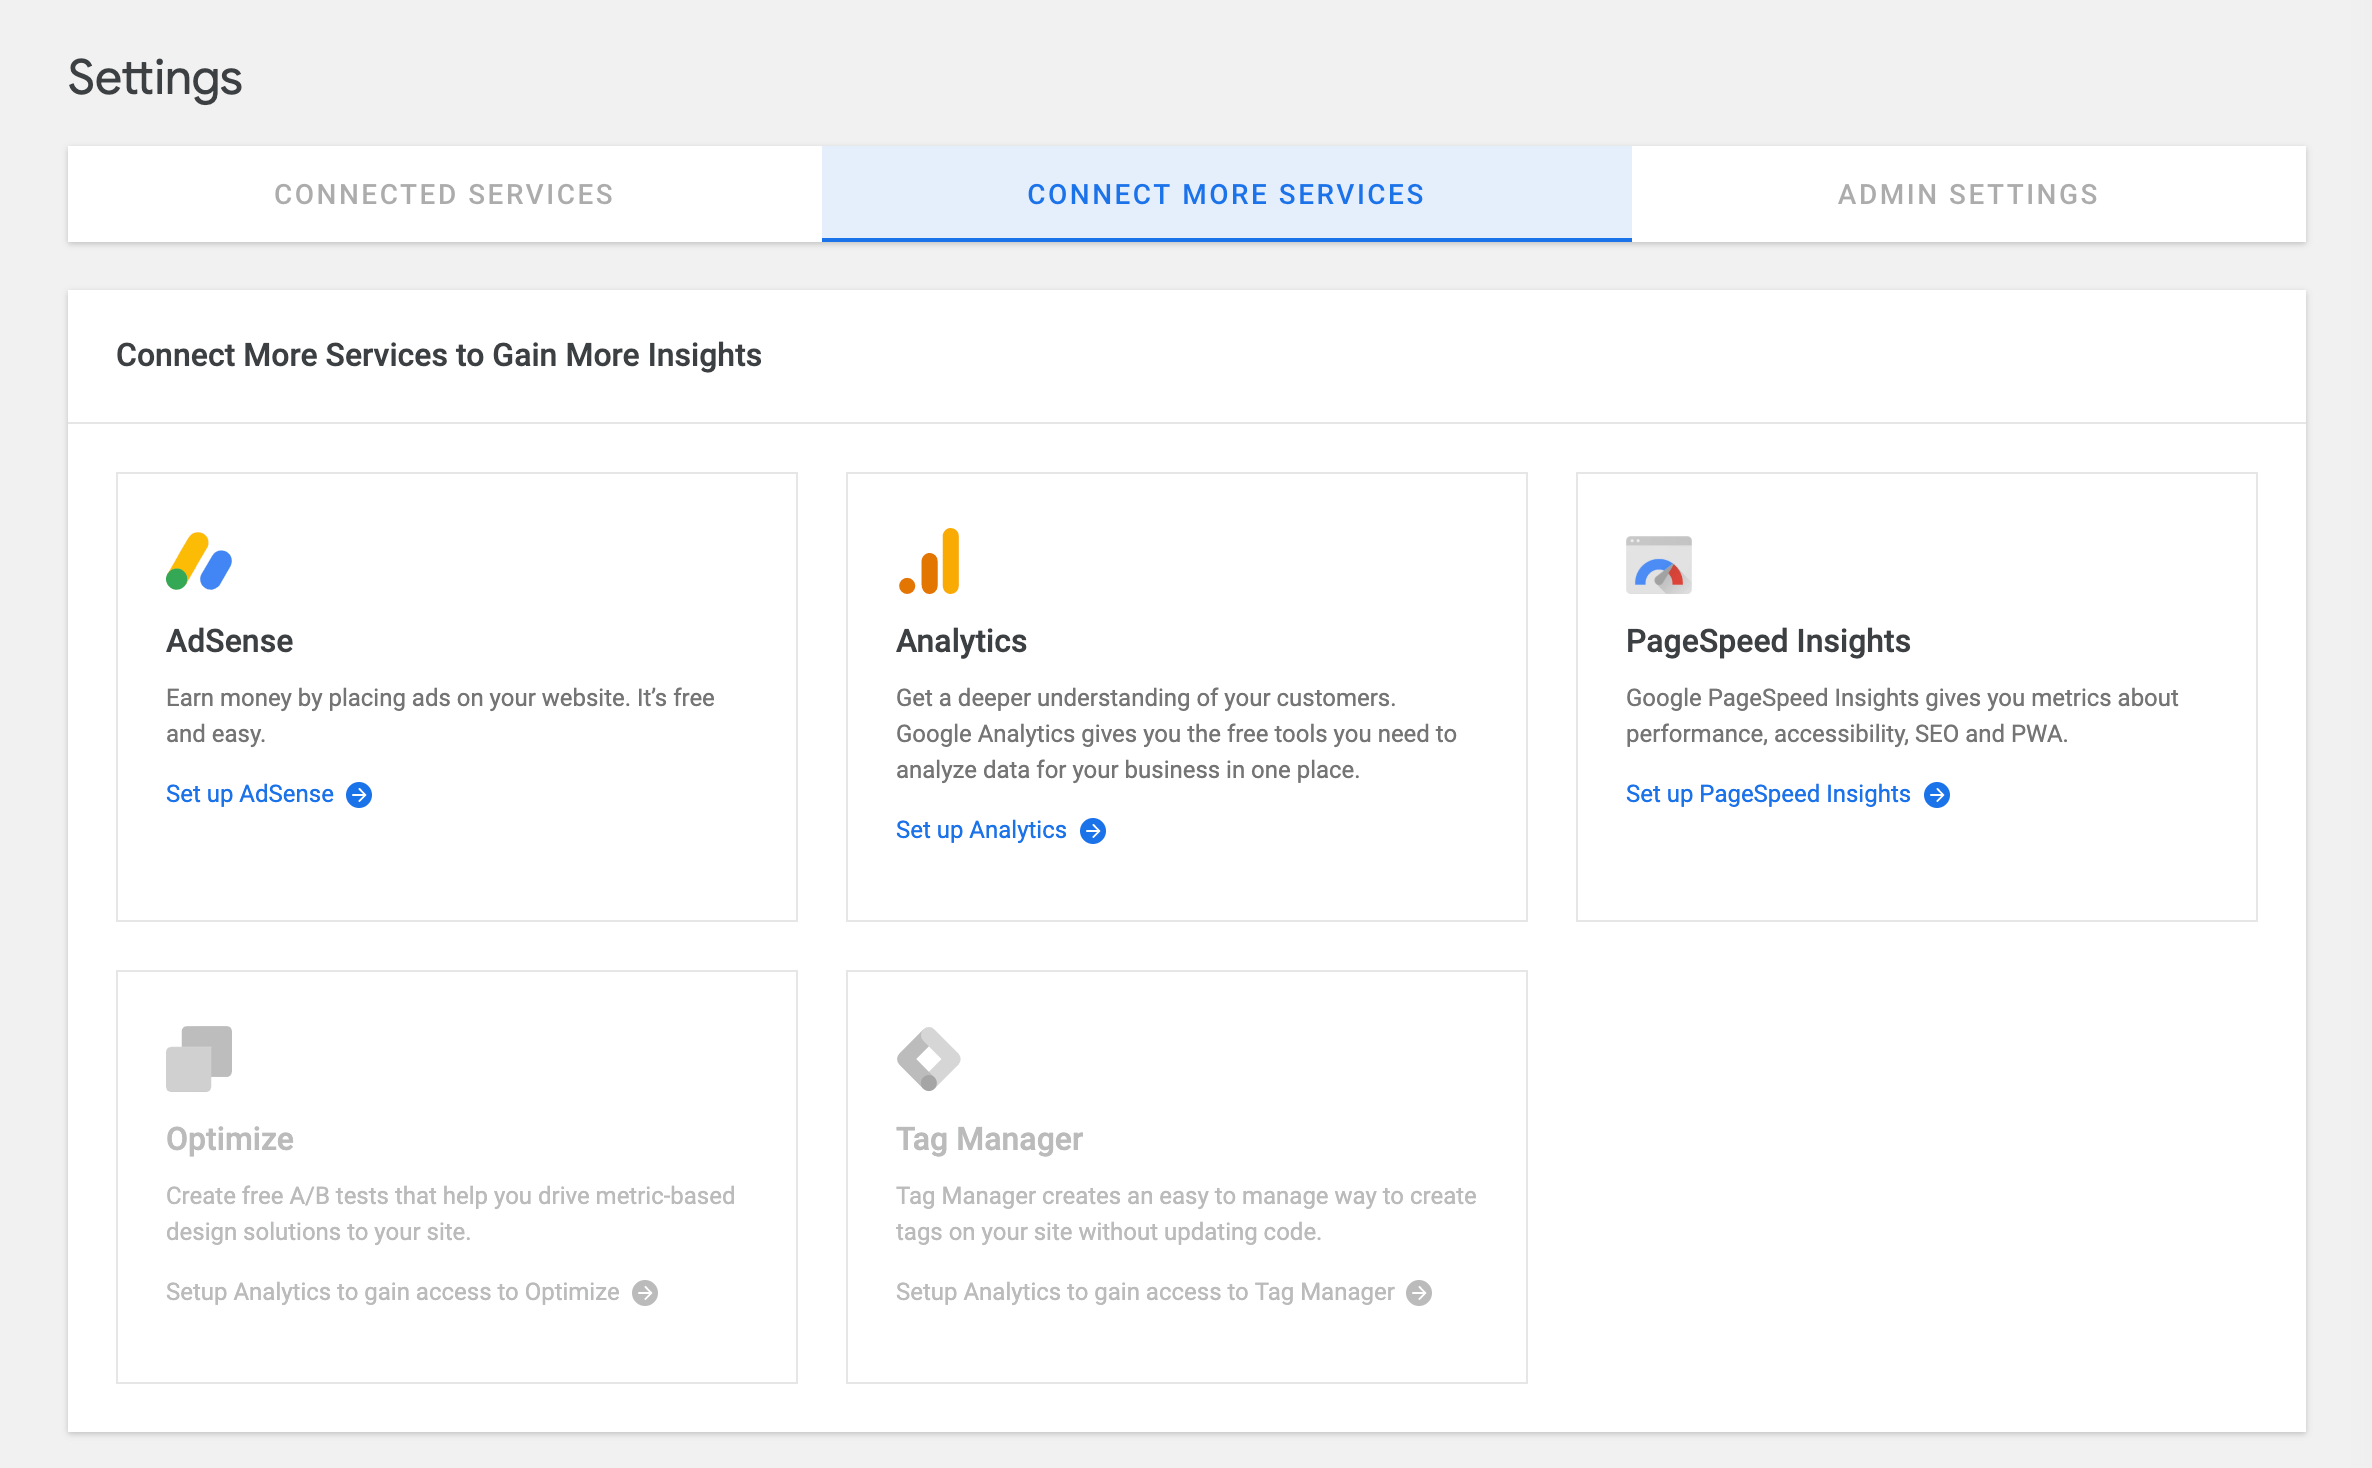
If you prefer to set them up later, you can do so by navigating to Site Kit > Settings > Connect More Services:
It may take a few minutes for the plugin to gather and display data in your dashboard. Once it does, you can see your overview reports by going to Site Kit > Dashboard:
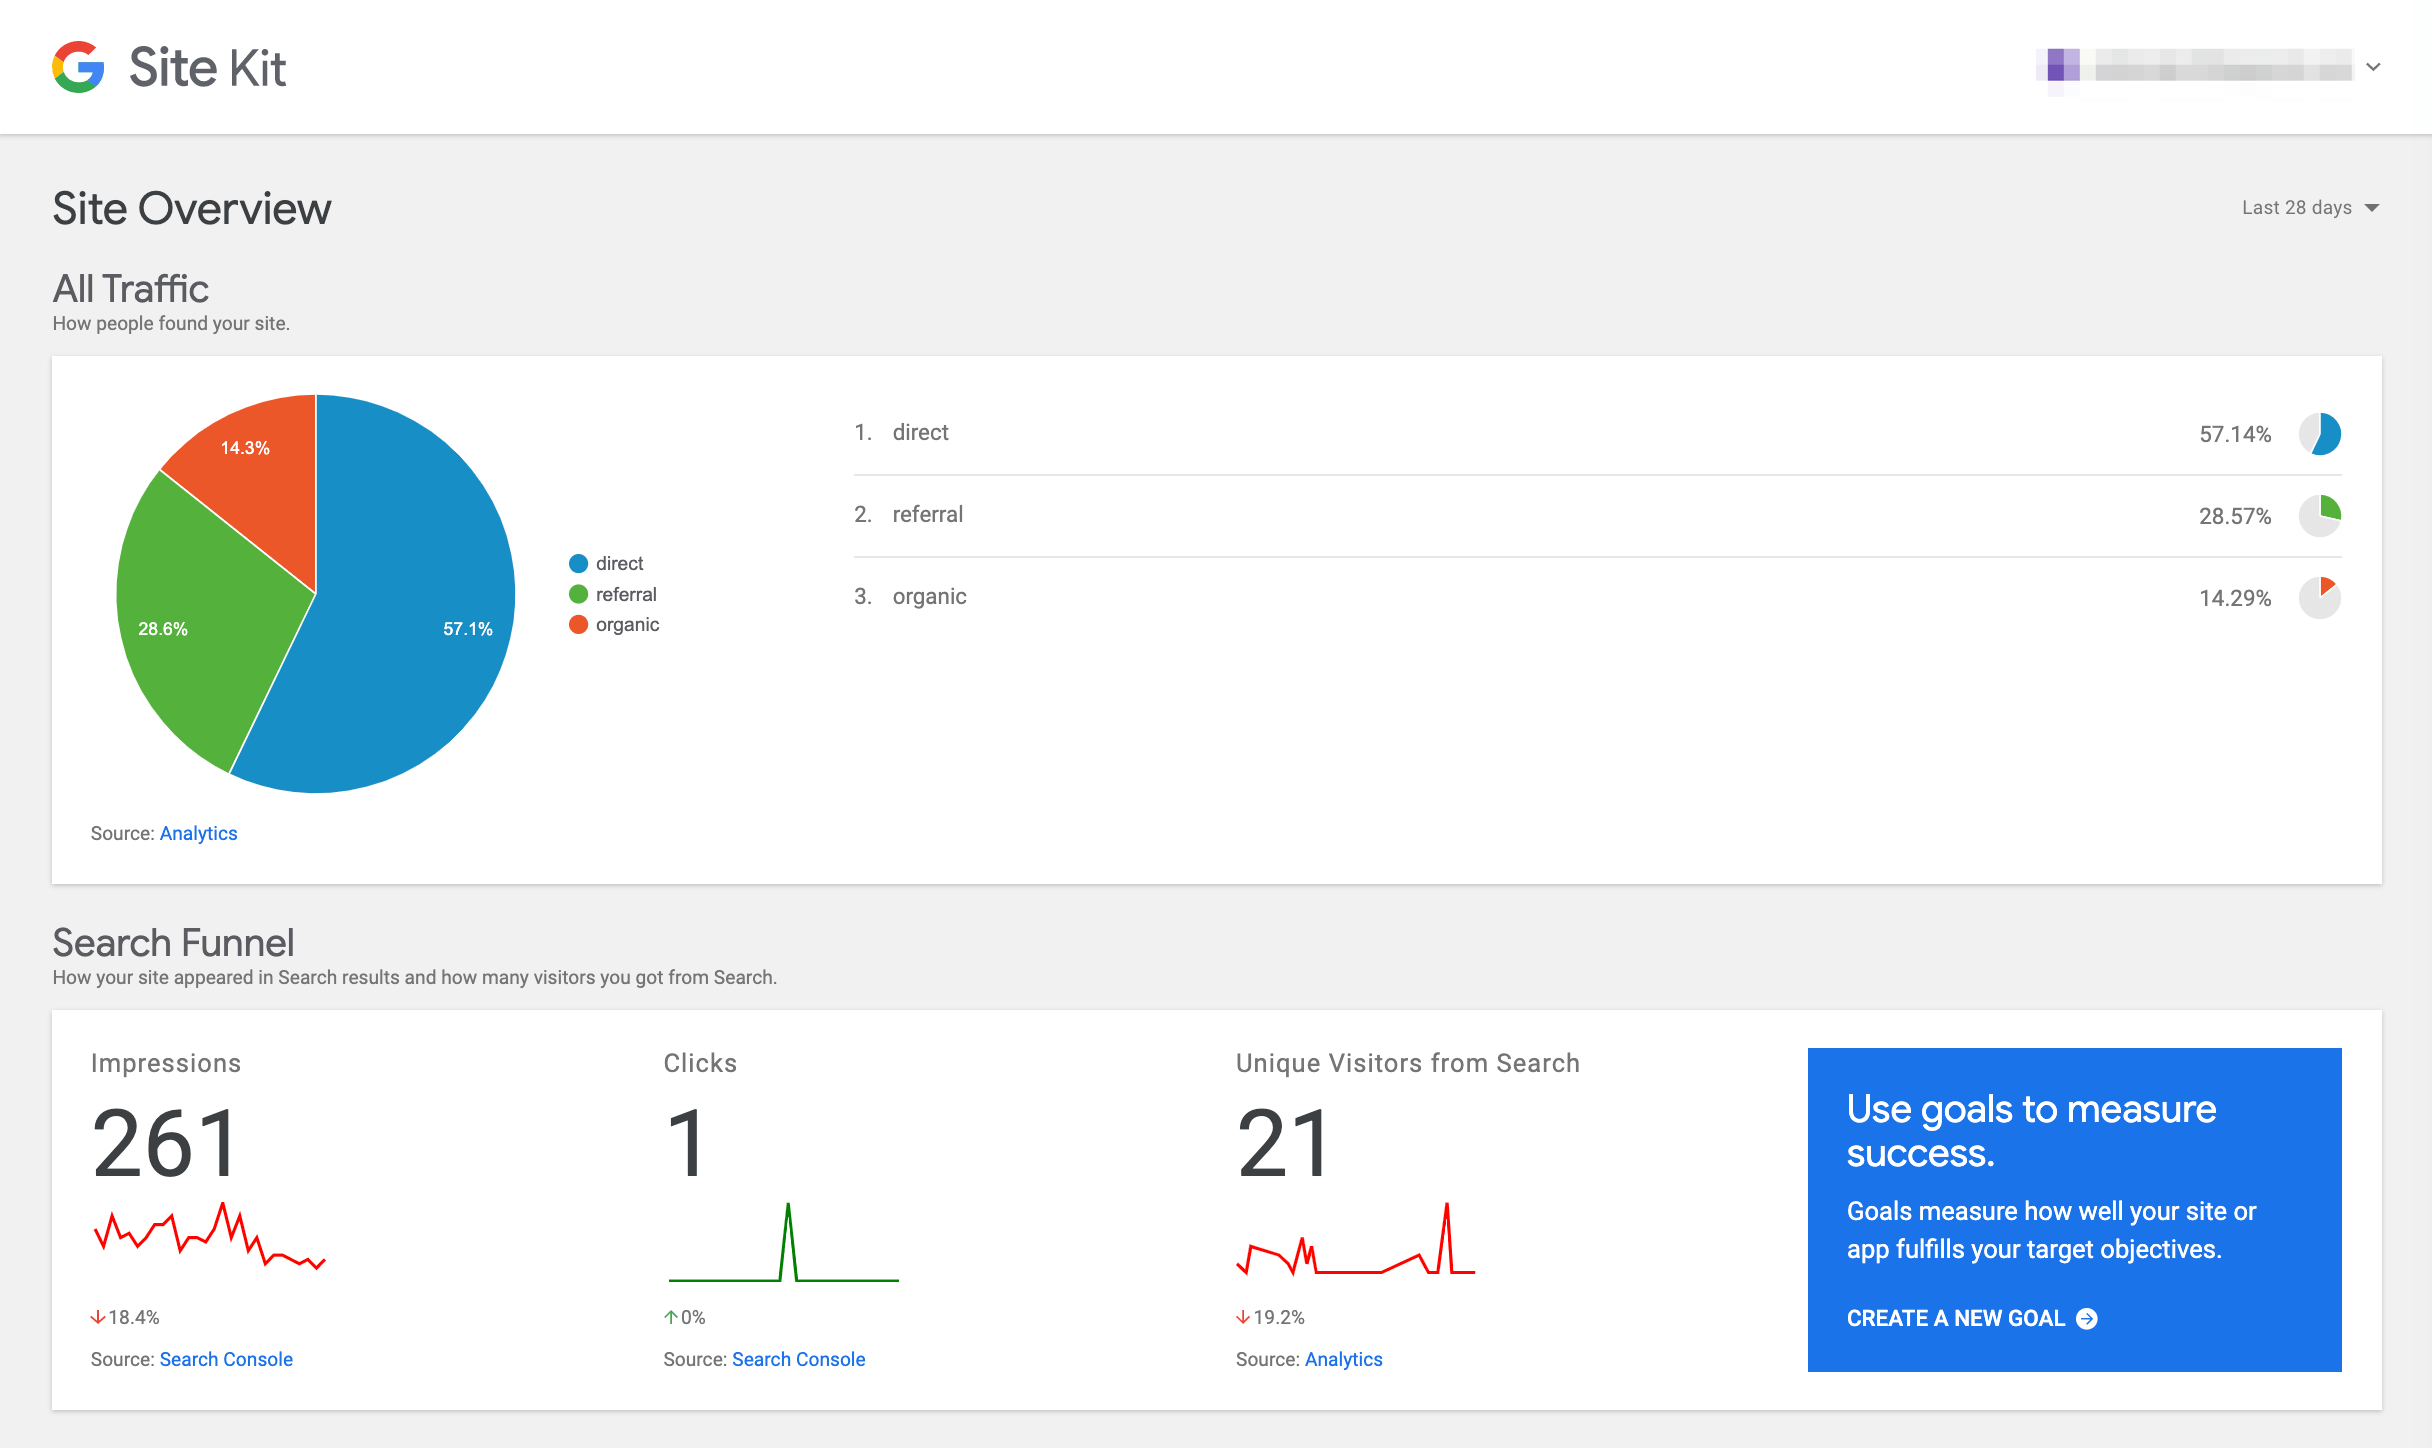
In the upper right-hand corner, you can select dates to show reports for certain timeframes. Each service has its own individual dashboard as well, which you can access by clicking on the names under Site Kit in your WordPress sidebar.
4 key tips for using Google Site Kit as a WordPress developer
There are many different ways you can use Site Kit. However, there are some key features worth pointing out that can be particularly useful for managing projects as a WordPress developer. Here are four tips for using the plugin for your client sites.
1. Use the dedicated tabs as shortcuts to full report details
The Site Kit dashboard gives you enough information to form a healthy snapshot of how your site is performing. However, there might be times when you want to dive deeper, such as when a client makes a request for more specific data.
In these instances, it helps that there are shortcuts you can take to access each Google platform. As we mentioned earlier, the tools you connect through Site Kit will have its own dedicated tab in the sidebar menu.
If you click on the tab, you’ll see a bit more information. For example, for Analytics, you’ll be able to see your Audience overview:
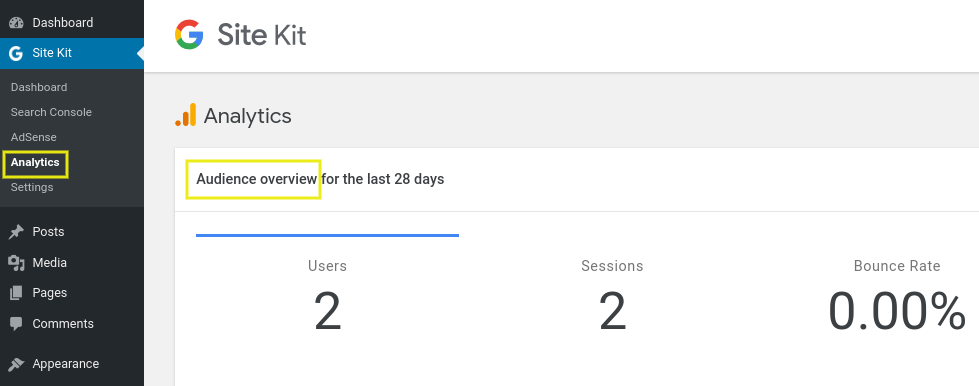
There’s also an option to See full stats in Analytics. This is a direct link that will open up Analytics in a new tab. Similarly, if you want to view a specific report in its entirety, you can click the arrow icon next to it:

When you’re managing multiple projects, these shortcuts can streamline your workflow.
2. View performance reports for specific pages from your dashboard
The Site Kit dashboard reports give you an overview of your site as a whole. However, if you’re looking for insights on a particular page or post, you can pull them up in just a few clicks via the search bar:

Just type in the title or URL associated with the page or post. Once the field populates with the one you’re looking for, click on the View Data button. You’ll then see the Detailed Page Stats.
This is another simple yet effective way to save time and improve your workflow. It makes it easier to understand the performance of individual pages as well as uncover and resolve issues impacting your site.
Site Kit also comes with an admin bar feature. This lets you view the stats of a page from the front end of your site via a toolbar, rather than using the back end. However, there have been some complaints of this feature not functioning properly, which Google seems to be working on.
3. Control who has access to Site Kit stats through user permissions and roles
As a WordPress developer, part of your job is configuring roles and permissions to keep things running smoothly. This can mean different things depending on the client and project.
You might customize the WordPress admin dashboard to make it less cluttered or minimize the chances of a client accidentally messing something up. Other times, you may want to grant site owners access to certain tools because it makes your job easier.
This may be the case when it comes to Google Site Kite reports. Sharing data with clients might help improve your workflow by letting them gather information directly rather than going through you.
Whether you’re trying to grant or restrict access, one of the draws of Site Kit is that you can manage roles and permissions to control who sees data. To view reports, users must have admin-level access. However, permissions vary by product, which Google offers more detailed guidance on.
4. Download the developer helper plugin to use Site Kit in a staging environment
If you want to use Site Kit in a staging environment, you’ll also need a production site the plugin can pull data from. You’ll also need to be the owner of this property in Search Console.
To use Site Kit in your staging environment, you’ll need to activate it separately. This means initially skipping the setup process we walked you through earlier.
Instead, after you install Google Site Kit, download the developer helper plugin. It enables you to pull data from the production site to the staging environment.
After you upload the developer plugin to your WordPress staging environment, you can find it under Site Kit > Developer Settings:
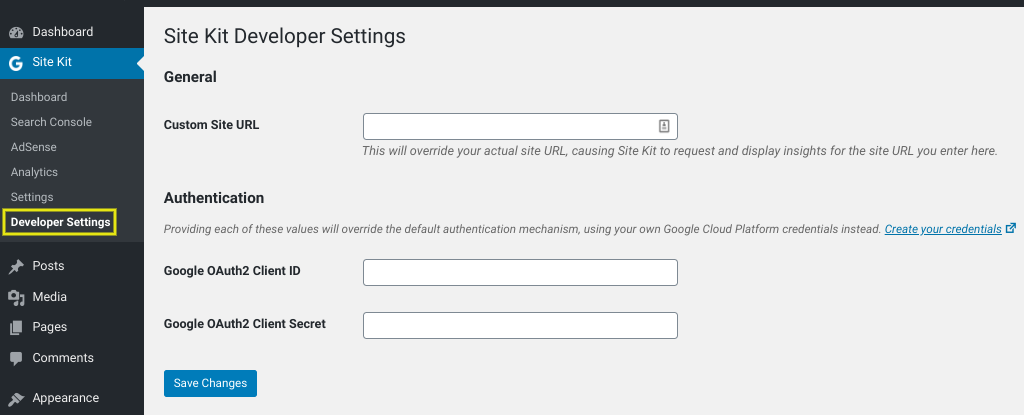
This page has three fields: Custom Site URL and the Google OAuth2 credentials Client ID and Client Secret. If you don’t already have Google Cloud Platform credentials, you can create them by clicking on the Create your credentials link.
From here, you can download your new client configuration, and copy and paste the information into the plugin’s fields:
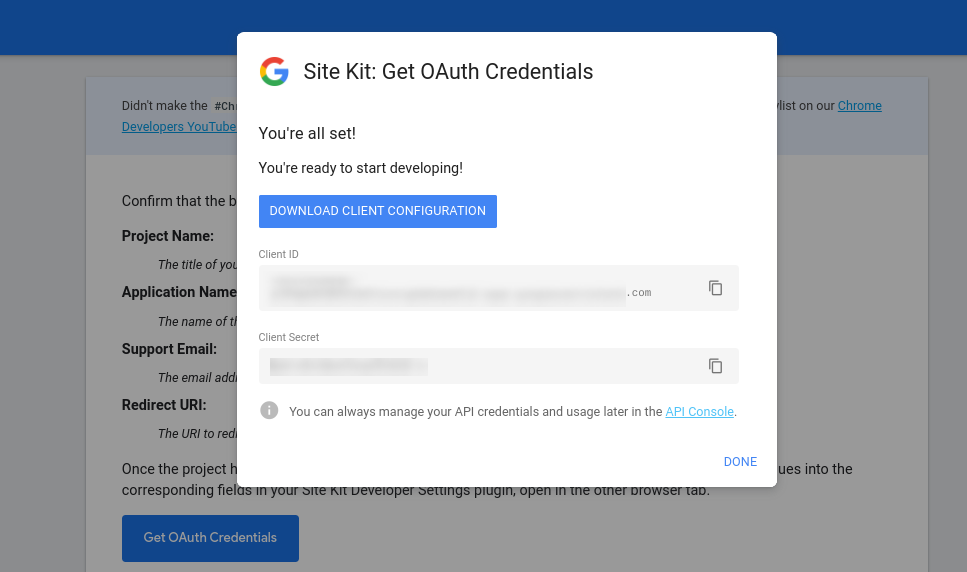
When you’re done, click on the Save Changes button. Then you can continue with the regular setup process we outlined earlier.
Conclusion
Providing your WordPress clients with the best possible service is a lot easier when you’re using tools such as Google Analytics and PageSpeed Insights. It’s even better when you can leverage these resources directly from your dashboard – which is exactly what Google Site Kit lets you do.
In this post, we discussed four key tips for using Site Kit to improve your clients’ WordPress sites:
- Use the dedicated tabs as shortcuts to report details.
- View the performance of specific pages directly from your dashboard.
- Control who has access to Site Kit stats through user permissions and roles.
- Download the developer helper plugin to use Site Kit in a staging environment
Do you have any questions about using Google Site Kit? Let us know in the comments section below!
Image Credit: Pxhere.
Keep reading the article at ManageWP. The article was originally written by Will Morris on 2020-03-10 12:00:14.
The article was hand-picked and curated for you by the Editorial Team of WP Archives.

