Need to learn how to create a contact form on WordPress? Great! We live for moments like this. It would be our absolute pleasure to teach you the easiest, most effective, method for getting a fully-functioning contact form on your website.
In this article, we’ve written a simple step-by-step tutorial on how to create a contact form on WordPress. In 4 easy steps, you’ll have a contact form up-and-running on your website in mere minutes!
Why Do You Need a Contact Form?
Before we go into the tutorial section: are you really sure you want to create a contact form on WordPress for your site? Are you still on the fence about it? If that’s the case, then let us further assure you that you’re making the right decision? Here’s why:
Contact forms LOOK great. Your website will look so much more professional and aesthetically-pleasing with a contact form in place. Not all email addresses are visually impressive, and can bring down the tone of your business; however, a well-done contact form can add a touch of class to even the smallest online business.
Plus, do you really want your email address written out on your website? Doing so is practically begging for spambots to send you junk mail. Even “legitimate” human beings can take advantage of written-out email addresses to send you messages with large attachments, signature files, email read receipts, or even a virus. A contact form, on the other hand, will safeguard your inbox.
Contact forms also enhance the user experience of your website. It’s just plain easier for your site visitors to fill out a simple form than it is form them to hunt down your email address, copy / paste it, open a separate tab with their email suite, compose an email from scratch, and so on…
Bonus: with the best WordPress form plugin, you can also utilize your contact form to increase your subscriber list! Simply add a subscription checkbox to request permission from your users to add them to your list.
The Best Way to Add a Contact Form to WordPress

If you’re going to create a contact form on WordPress, then you should use the very best plugin on the market. That’s WPForms, hands down.
WPForms will fit your budget, no matter how large or small your business is. With 4 different premium plans, you have plenty of options for how much to pay. Or, you can opt for WPForms Lite, which is “sold” at the price everyone can afford: FREE!
No matter which option you choose, you’ll be able to take advantage of WPForms’ intuitive drag and drop form builder. Ease of use is the top priority for the WPForms team, and it shows. It couldn’t be simpler to add a contact form to WordPress, especially if you also choose to utilize one of the dozens of pre-built form templates.
But easy doesn’t mean it’s not full-featured. WPForms has multiple advanced features like their best-in-class survey reports, payment forms, user registration forms, smart conditional logic, post submission forms, and so much more.
Ready to get started? Great! You’re 4 effortless steps away from having the ultimate contact form up on your WordPress website.
Step 1: Create a New Form in WordPress
Start by downloading the WPForms plugin. Then, install and activate it. Not sure how? No problem. You can hop over to our guide on how to install a WordPress plugin to get that all sorted out. We’ll wait.
All set? Perfect.
Next, go to the left-hand side of your dashboard and click on WPForms » Add New to create a contact form on WordPress.
Give your form a name and select the Simple Contact Form template.
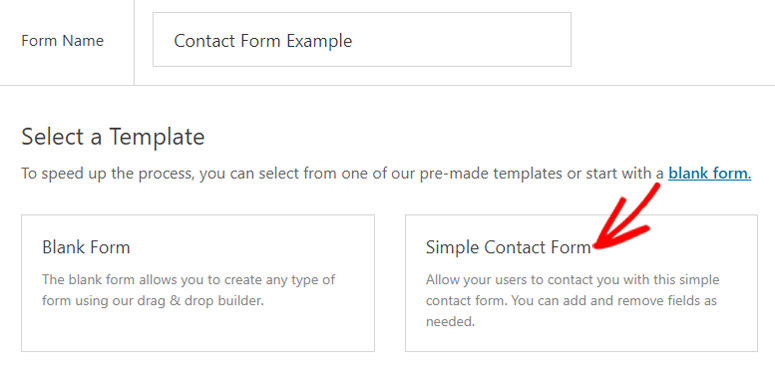
Like magic, WPForms will create a template for a simple contact form for you to play around with:
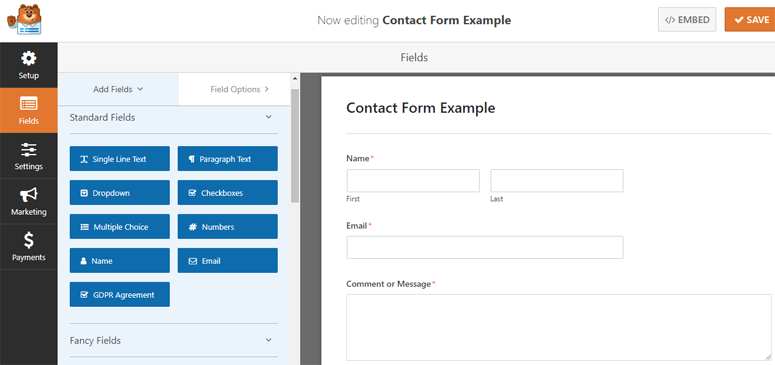
By default, the form will include the following fields:
- Name (first and last)
- Email Address
- Comment / Message
If that’s all you need, then click Save and head to the next step. If you need further customization, feel free to fiddle around with the drag and drop fields on the left-hand side.
All you need to do to add customized fields to your form is to click on them, drag them over to your form, and drop them where you want them to appear. Mess up? No problem. You can rearrange the order quickly and easily by clicking on any field and dragging it to wherever you desire.
Once you’ve got your form looking perfect, click Save.
Step 2: Configure Your Contact Form Settings
While still in the WPForms editor, click on Settings » General.
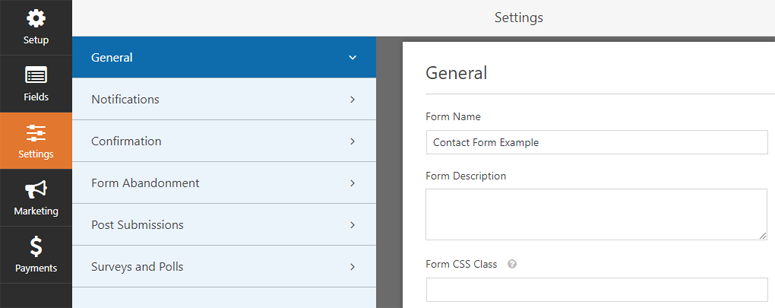
From this section, you’ll be able to:
- Rename your form.
- Add a form description.
- Change the Submit Button’s text.
- Add GDPR enhancements to keep your forms compliant with current policies.
- Enable spam prevention features to prevent spambots from submitting forms.
Once you’ve finished, click Save and head to the next step.
Related: How to Submit a Form Without Page Refresh in WordPress
Step 3: Enable Notifications for Your Contact Form
Head to Settings » Notifications from within the WPForms editor. On this page, make sure your notifications are switched to “On” from the dropdown menu.

It should be set to “On” automatically, but it never hurts to double-check. And, of course, if you prefer not to get notifications, you can opt to turn them off. However, we highly recommend keeping them enabled so you’ll stay in the loop and never miss a message.
From this page, you can also play around with features like sending your users a notification after they’ve successfully submitted a message to you. And, if you like, you can add additional branding features like custom headers to your messages.
Once you’re done, click Save.
Step 4.1 Add the Contact Form to WordPress (Gutenberg)
WPForms is a gutenberg-friendly form plugin, so it’s super easy to add a contact form to your post or page with Gutenberg editor.
Once, you’ve opened the post or page editor, add a new WPForms block by clicking the + (plus) icon in the upper left corner.
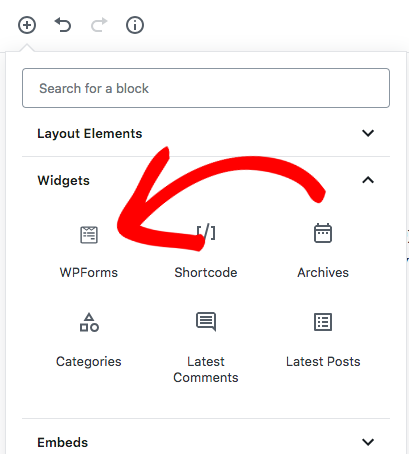
Now, you’ll be given a few different menu options. Search WPForms to locate the block and click on it.
You’ll now see the WPForms block in the editor screen. Next, go ahead and select the form you want from the Select a Form dropdown.

Now, you can see the complete form in your editor.
Step 4.2: Add the Contact Form to Your WordPress Website (Classic)
WPForms allows you to add your newly-made contact form to a post, a page, or your sidebar (or any widget-ready area).
To add it to a post or page, create a new post / page (or edit an existing one), and simply click on the Add Form button above your toolbar.

A popup menu will appear. Select the contact form you created from the dropdown menu. Then, click Add Form.
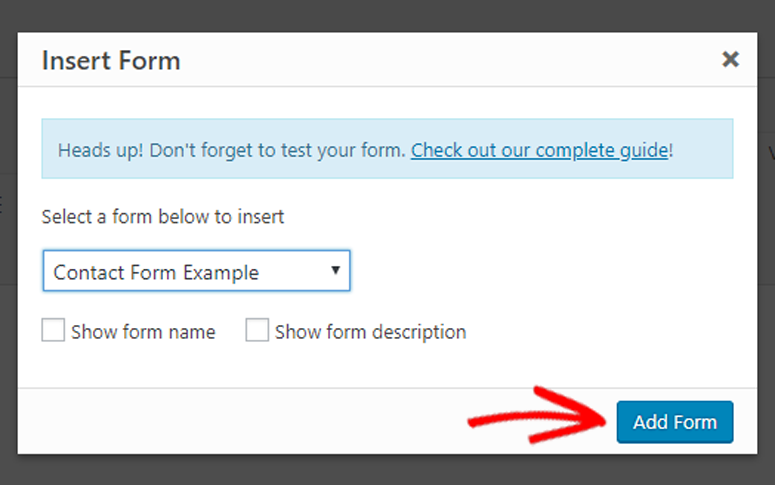
Hit Publish (or Update, if you’re editing a pre-existing post / page), and your form will appear live on your site, ready to rock and roll.
Prefer a sidebar widget? No problem.
Just go to Appearance » Widgets on your Admin dashboard and drag the WPForms widget to your sidebar area.
Select the form you made from the drop down menu in the widget’s settings. Then, click Save.
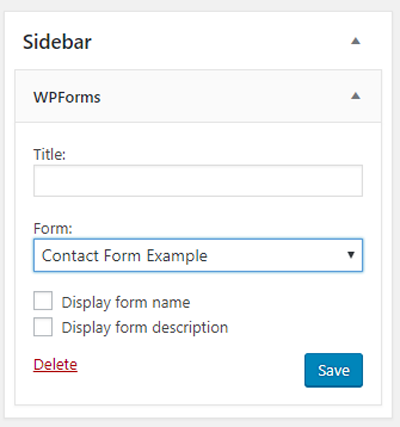
That’s it! You now have a contact form live on your website’s sidebar. Check out this guide on how to create an AMP form in WordPress.
We hope this article helped you create a contact form on WordPress. If you enjoyed this tutorial, you might also like our step-by-step guide on how to easily create a survey in WordPress.
Keep reading the article at IsItWP – Free WordPress Theme Detector. The article was originally written by Editorial Team on 2020-02-07 03:00:17.
The article was hand-picked and curated for you by the Editorial Team of WP Archives.

