A cache is an essential component of a web server. With applications like Magento, cache plays an essential role in application performance because it drastically reduces the load on the application and speeds up page response. As a result, the user experience improves significantly.
When it comes to Magento 2, Varnish is a popular choice. Magento 2 Varnish is a proven combination and increases site performance significantly. With previous versions of Magento, you need to install extensions such as “Phoenix Page Cache” or “Turpentine Varnish Cache” for integrating Varnish with Magento. With Magento 2, Varnish is integrated by default and requires minor configuration changes to make it work with your store.
What is Varnish Cache & How Does Magento Varnish Work?
Varnish cache helps boost up the speed of web applications. Technically, the proper term for Vanish is an HTTP accelerator, designed to accelerate content-heavy dynamic pages in order to improve the overall performance of the Magento 2 stores.
Basically, Magento Varnish builds fragments files that are stored in memory. This helps Varnish eliminate the time and network bandwidth consumption for upcoming requests.

Source: Magento DevDoc
While processing requests, HTTP manages all calls for CSS, HTML, JavaScript, and images. Varnish works to proxy these requests for the web server.
As the web server responds to these requests, Varnish stores the cacheable assets, and any subsequent user request is entertained by Varnish. As a result, the web server does not have to process the same requests over and over.
Note: Assets cached by Varnish can expire after a configurable interval and may be replaced by newer versions. You can also clear the cache manually by accessing the Magento Admin or by running the Magento cache: clean command via SSH.
Why Varnish Cache is Essential for Magento Stores
With Varnish integrated, Magento does not have to dedicate time and resources to serving duplicate requests. As a result, the user experience improves significantly because from the user perspective, the requests are being processed much faster and the pages load much faster in their browsers.
Have you ever wondered how Varnish Cache can help you attract more traffic and increase conversion rate.
Increase Sales
Magento 2 Varnish cache reduces the page load time and delivers content 10X faster. Here’s an interesting fact – up to 79% of customers who are dissatisfied with a website’s performance are less likely to buy from the same site again. With proper Magento 2 Varnish configuration, you have a great chance to increase your online sales.
SERP Growth
Visitors stay longer and shop more often at the websites with faster load time. This creates a positive impact on the store’s SERP ranking, resulting in more traffic and a better brand reputation. Indeed, it’s a good option to enable Magento Varnish Cache.
Flexibility
Magento Varnish Cache gives you access to Varnish Configuration Language (VCL) that allows you to customize the way Varnish handles incoming and outgoing requests.
Multi-Layer Server
You can add one or more Varnish servers to enable the high availability of a cluster processing solution. In such configurations, if the server fails to respond, the Varnish cache takes over and serves the cached assets so that the quality of the user experience remains consistent.
Requirements for Magento 2 Varnish
When you’re configuring Magento 2 Varnish, you need to check for the version compatibility factor because Magento 2 supports these Varnish versions 4.x, 5.2 or 6.2.
Follow these steps for setting up Magento 2 Varnish for your store:
- Install Varnish
- Configure Magento Varnish
- Verify operation of Varnish With Magento
Magento 2 Varnish Configuration
The process starts with a few changes in the default configuration from the Magento Admin panel so that the Magento application can use Varnish properly.
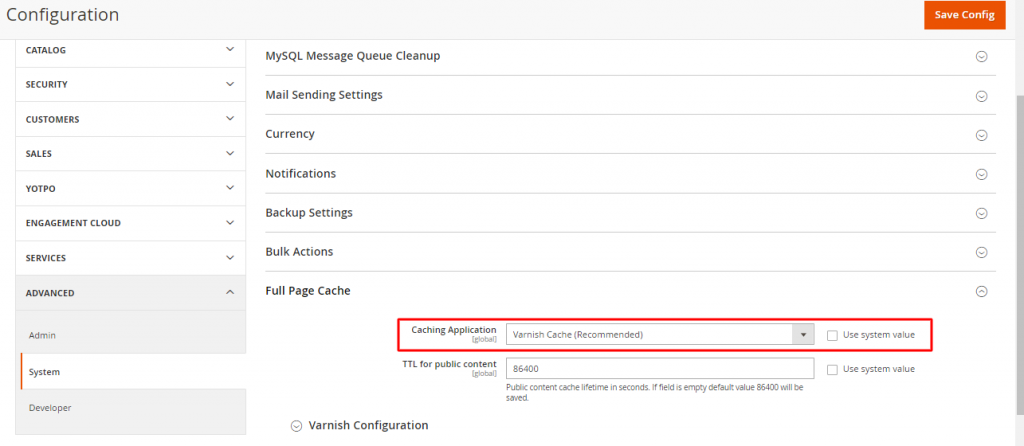
Go to STORES > Configuration > ADVANCED > System > Full Page Cache. Select Varnish Cache as a Caching Application from the list labeled Caching Application.

Change the value in TTL for public content if you want to increase (or decrease) the lifetime value of public content cache.

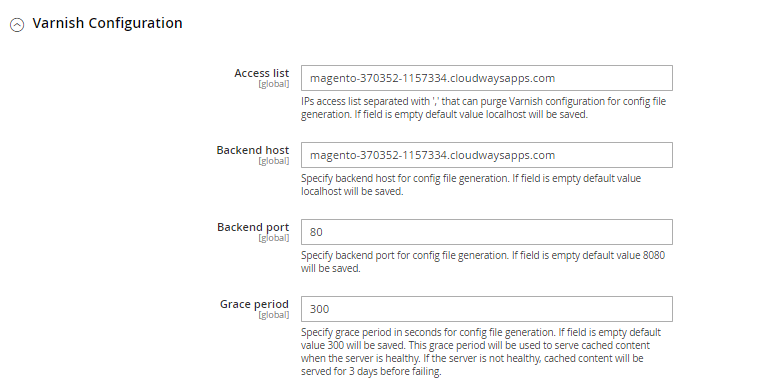
Next, expand the Varnish Configuration and enter the following details to enable advanced options.
- Define the IP or Host allowed to purge the Varnish Cache in the “Access list”. Add your application’s domain name in this field.
- Define the Backend Host (in my case, it’s a local Apache server). If you wish you leave it as localhost.
- Backend Port is the port of the Apache server. On Cloudways managed servers, Apache works behind Varnish and uses port 8081.
- Finally, set the Grace period (which determines how long Varnish can serve stale content in case the backend is not responding).
Once you are done, click the Save Config button.

If you wish, you can also activate Magento 2 Varnish through the command line interface via SSH. Use the following commands:
bin/magento config:set--scope=default--scope-code=0system/full_page_cache/caching_application 2
Configuring Varnish on Cloudways Managed Servers
At this point, you can assume that Magento Varnish is installed and working.
However, if your Magento store is hosted on Cloudways Managed Magento Hosting Platform, you don’t have much to worry about. It offers one of the most straightforward processes for enabling Varnish for Magento 2 stores.
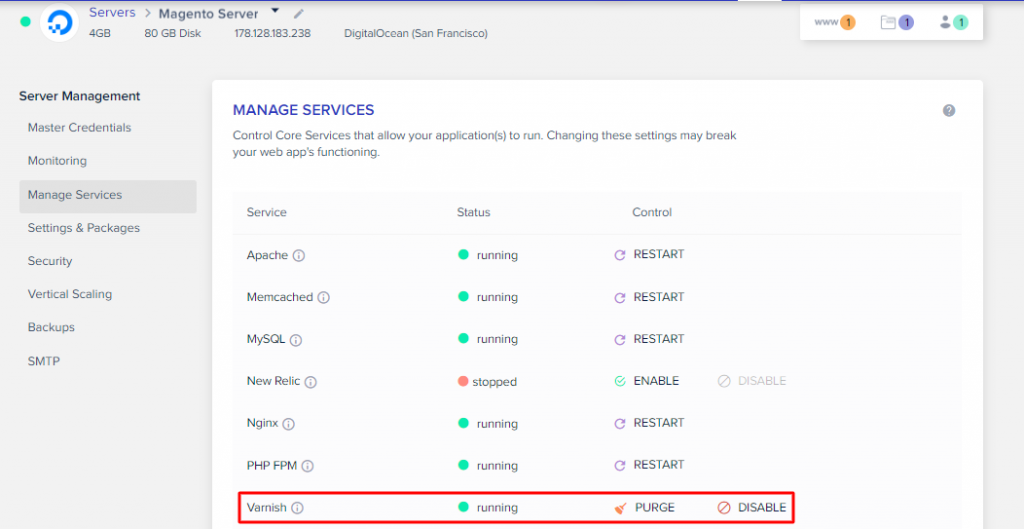
To check whether Varnish is enabled and operational on your Cloudways managed server, go to Server Management and click Manage Services.

Verify Varnish With Magento
At this point, Varnish is configured for your application. Note that now Varnish is connected to the Magento app. If you flush the Magento cache, the Varnish cache also gets purged automatically. Purging works parallel to Magento Cache. So if you’ll Flush Magento Cache, it will automatically purge Varnish Cache too.
When configuring Varnish, I restricted the IP addresses that can purge the Varnish cache. I would like the same list of IP addresses to be allowed to flush the Magento cache. For this use the following command. Remember to replace example.com with your application domain.
magento setup:config:set ‐‐http‐cache‐hosts="example.com"
You can check Varnish headers to confirm whether caching is working properly. Use the browser developer tools or cURL command and look for “X-Magento-Cache-Debug:” header. If you see “HIT” in the value, Varnish is working as intended. You have to enable developer mode in Magento 2 if you want to see the Debug Header. For this, add the following line in the .htaccess file:
Magento Varnish Cache FAQs
Q1. How do I know if Varnish is working?
Inspect the response headers. You can also opt for tools that check if the Varnish cache is properly operational for your site.
With Magento, you can run a command via SSH or by the admin panel to check whether Magento Varnish Cache is working or not.
Q2. Is Varnish free?
Varnish cache is an open-source project written in C. The code is available online and Varnish is free to use for all projects.
Magento Varnish Cache is available for free of cost and can be with the simple as mentioned above.
Final Thoughts
Integrating Varnish with Magento is a great optimization idea. With minimal changes, you can start using Magento 2 Varnish. Cloudways simplifies the entire process of setting up Varnish with your store.
If you think, I’ve missed a key point about the topic or you have any recommendations for improving the content, feel free to mention in the comment section below.
Boost Your Magento Store Performance by 5x Times & Maximize Your Sales
Our fastest Magento hosting can help you in growing your business revenue by 500%
Abdur Rahman
Abdur Rahman is the Magento whizz at Cloudways. He is growth ambitious, and aims to learn & share information about Ecommerce & Magento Development through practice and experimentation. He loves to travel and explore new ideas whenever he finds time. Get in touch with him at [email protected]
Keep reading the article at The Official Cloudways Blog. The article was originally written by Abdur Rahman on 2020-02-13 12:24:43.
The article was hand-picked and curated for you by the Editorial Team of WP Archives.

