Letting your customers pay in installments will surely boost the conversion rate of your WooCommerce store. However, WooCommerce doesn’t have this feature by default. So, you need to integrate WooCommerce partial payment with the help of third-party tools.
The easiest method to integrate the feature is using plugins. That will be easy, and you won’t have to take the hassle of codes and technical terms. Using ShopEngine WooCommerce builder, you can integrate the partial payment system in five simple steps.
In this article, we’ll go through the whole process.
What Is Partial Payment
When a customer buys a product from the store, they pay the product price. In contrast, partial payment allows customers to deposit a portion of the price and pay the due later while completing the final purchase.
So, once a customer deposits the partial amount of the price, she can secure the order. The feature is highly beneficial for SaaS-based services, digital product subscriptions, booking services, etc.
Why You Should Integrate Installment Payment
When you are selling high ticket products in your store, people need to have the flexibility for payment options. Because everyone won’t have the same affordability, the partial payment will give flexibility for the customers.
So, even if your products are expensive, customers will feel they can afford the price. They will book the product by giving a certain amount and complete the entire process later, rocket boosting the sale for the store.
How You Can Integrate the Partial Payment Option
You can effortlessly integrate installment payment using Elementor and ShopEngine. ShopEngine is an Elementor Addons plugin that is dedicatedly designed only for designing WooCommerce stores. It doesn’t require any coding or technical knowledge to use these plugins.
How Does Installment Payment Work

Partial payment or installment payment can work in two different ways. Traditionally, a customer can pay the first installment to ensure the order. So, the store owner will reserve that particular product for the customer. If the same customer pays the second installment, the store owner will ship the product.
Similarly, a store owner can also offer installment payments for cash on delivery. In this method, the customer will have to pay the first installment directly via bank transfer and pay the next installment while receiving the product.
For booking services, it will be a bit different. A customer can book a service, room, dinner with a partial payment and then complete the next installment on the spot.
How to Integrate Partial Payment – Steps to Follow
Here are the steps you need to follow while adding the partial payment option to your WooCommerce store.
Step 1: Install Elementor and ShopEngine
In the beginning, install the essential plugins.
First, install the Elementor WordPress plugin and then install ShopEngine.
Step 2: Enable Partial Payment Module In ShopEngine
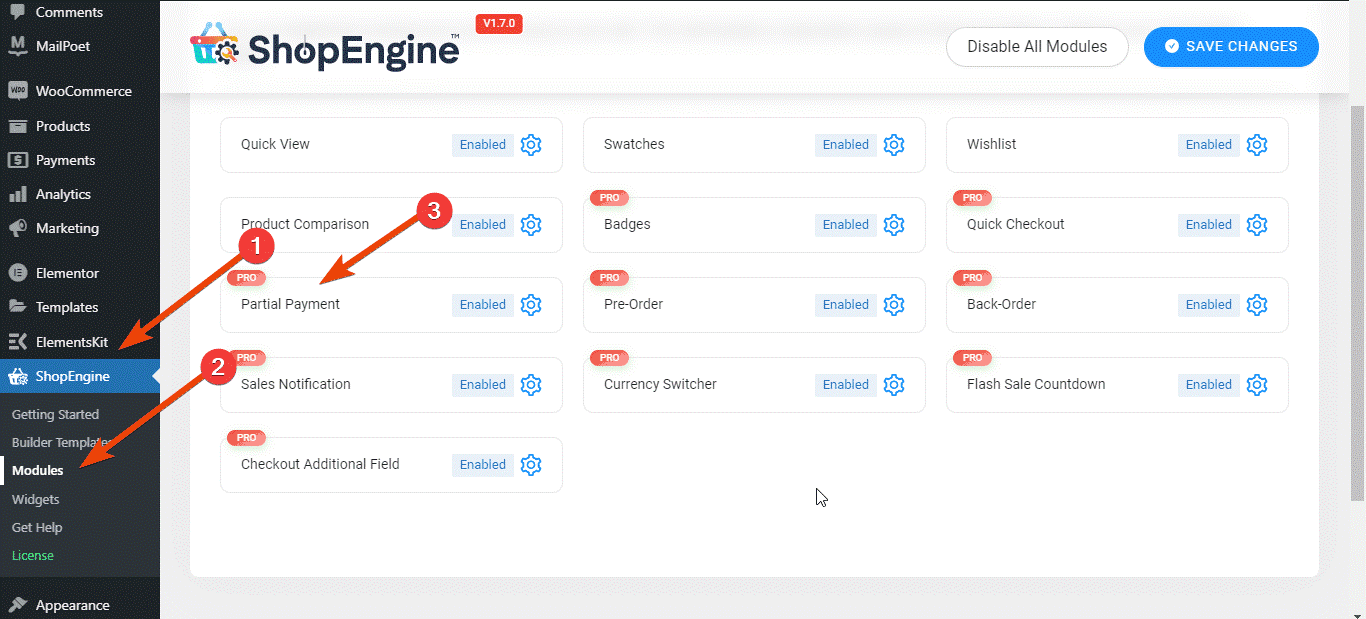
Now that you have installed ShopEngine on your WooCommerce store, you can conveniently enable partial payment. Go to the ShopEngine plugin dashboard and go to the modules page. From the modules list, navigate to the Partial Payment module and click on it to adjust the settings for your store.
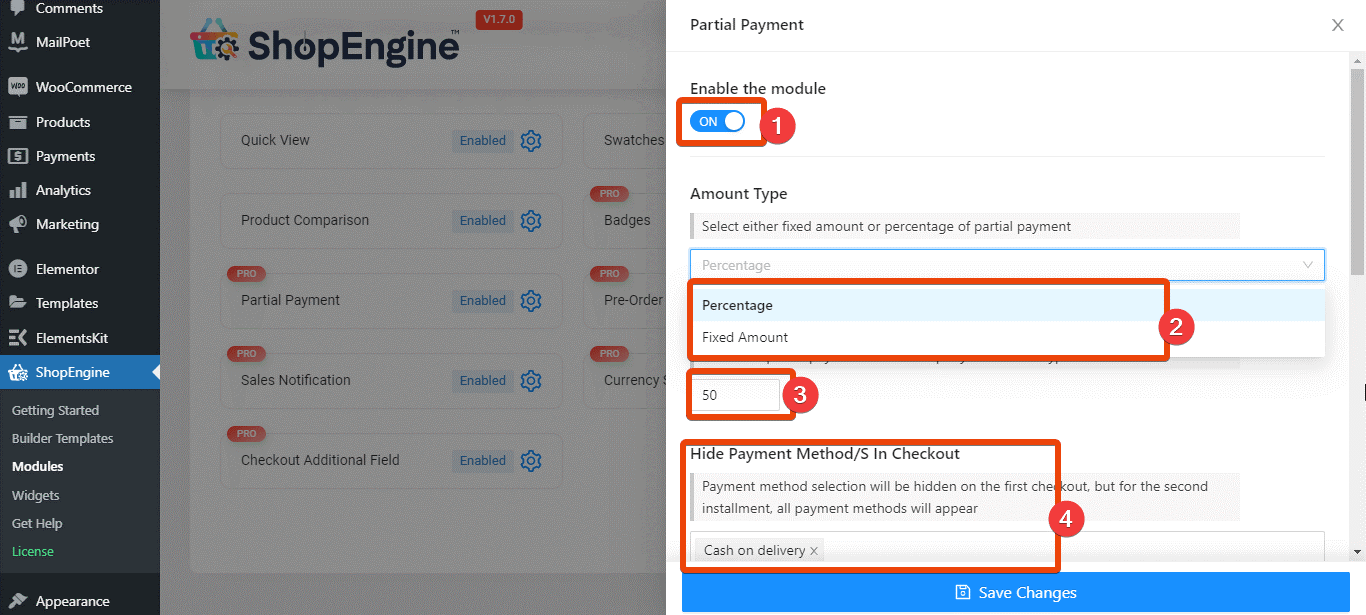
First, turn the partial payment module on. Then set the type of the partial payment. You can choose a fixed amount or a particular percentage for partial payment.
Let’s say you are offering a holiday sale and you want to set a 50% discount for all your products. Then set the percentage as 50%. ShopEngine also gives you the option to hide the partial payment for specific payment methods.
However, you can set the amount on the product page as well. There will also be other parameters, such as hiding or showing the partial payment option for a particular payment method.
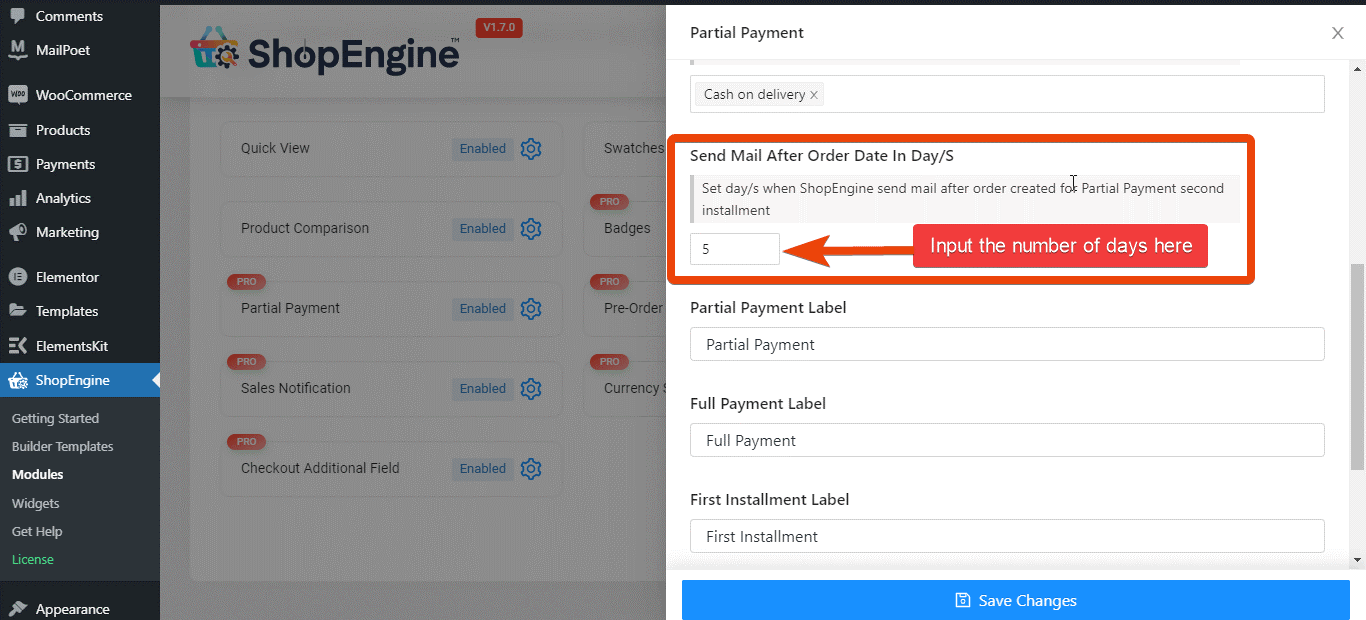
In addition, there will be default labels in the module settings, which you can change to different texts. Type the texts you want to show as the labels for the partial payment option.

Here the unique feature is the email notification system. You can set automated email notifications for the customers to remind them about the second installment. Set the frequency of the email notifications. You will get that on the module settings. Simply input the number, and that’s all.
Step 3: Edit the Product Page for Partial Payment
Once you have set the partial payment module, it is time to edit the page for a particular product. So, from the WordPress dashboard, navigate to the products section and click on it. You will see all the products. Select the specific product from the product list in which you want to integrate partial payment. Select ‘edit’ to edit the product page.
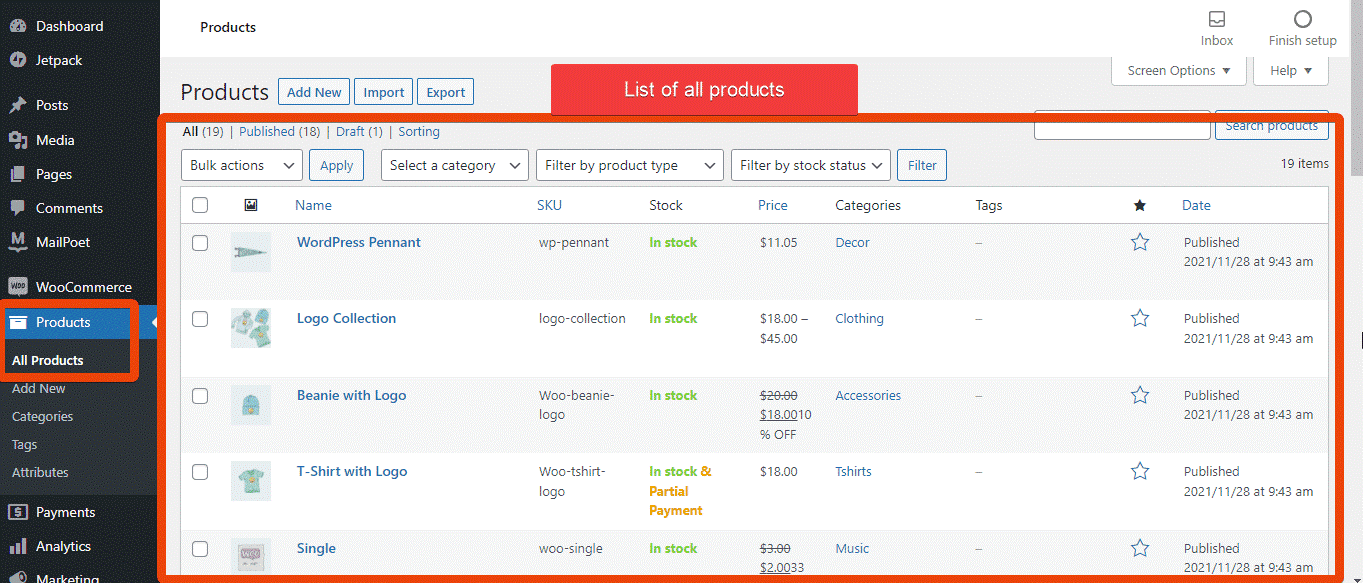
On the product page, mark the partial payment checkbox to enable it. Set the type of partial payment and the amount. Update the product page, and partial payment will be allowed for that product. If you visit the store and land on the particular product page, you will see two options – Partial Payment and Full Payment.
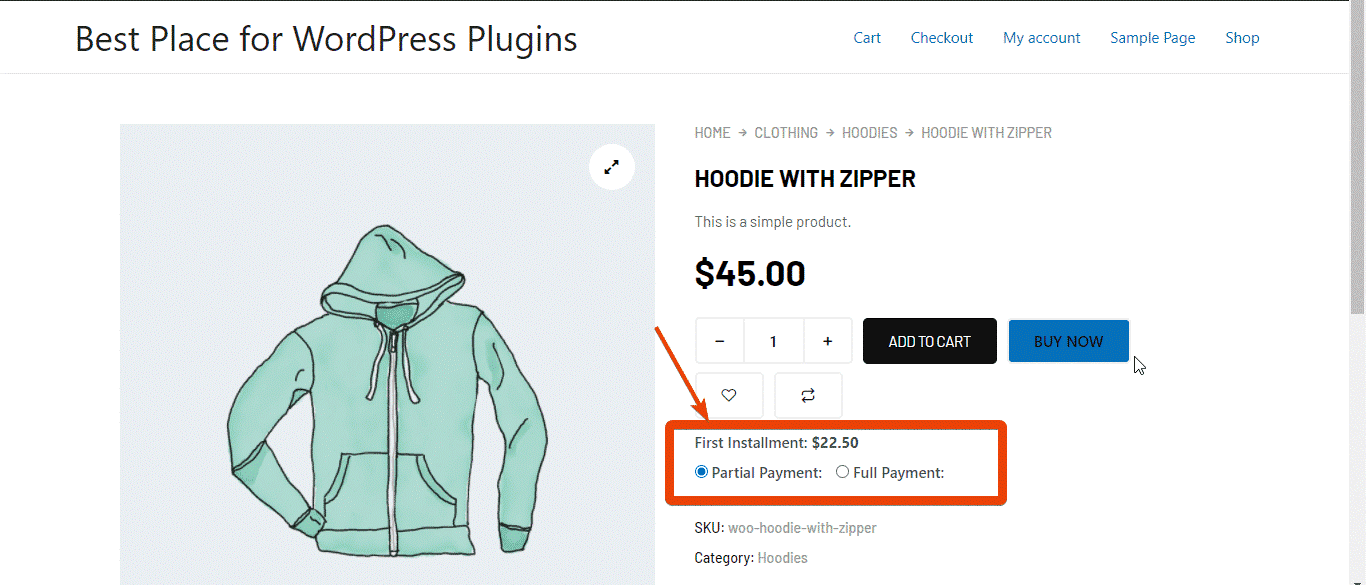
So, users can choose how to pay for that specific product. In the same way, integrate WooCommerce installment payment for any of the products from your store.
Step 4: Check If the Partial Payment Is Working
So, installment payment is now available for your chosen product. Go to the product page to know if it is working correctly. Go to your store and make a demo order yourself for that product to check if everything is working flawlessly.
First, go to the product page. Choose the partial payment option from the payment options. Add the product to the cart and go to the checkout page. If you have done everything right, you will see the first installment and second installment amounts on the checkout page.
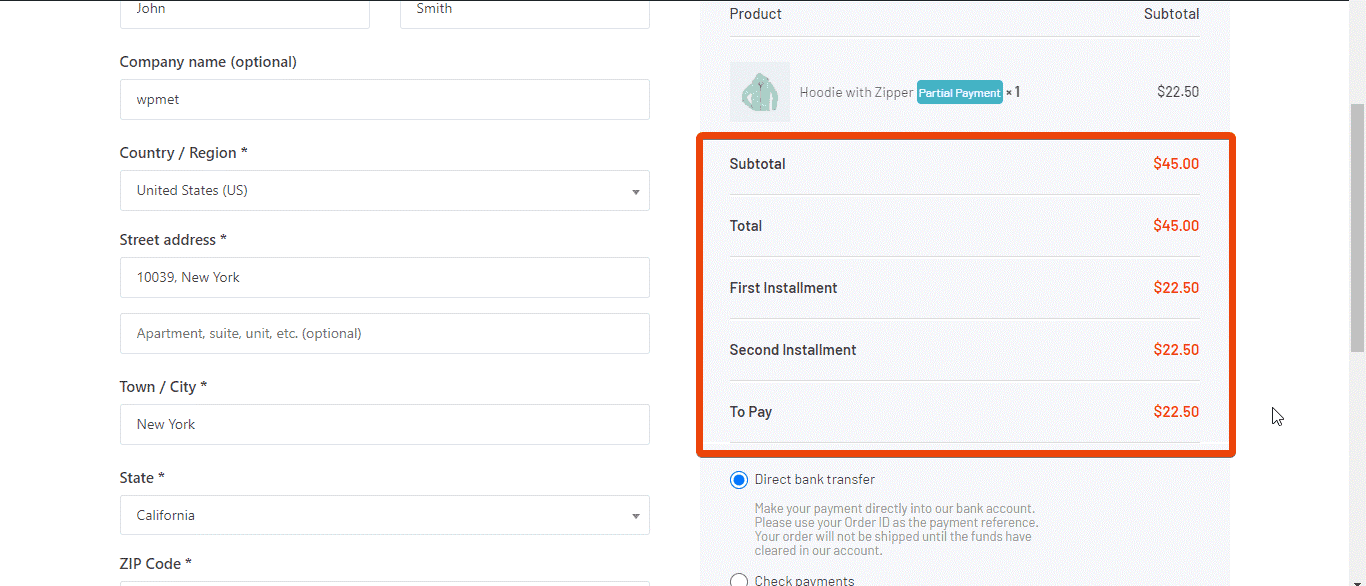
If everything seems okay, congratulations, you have successfully installed the partial payment for your WooCommerce store.
Step 5: Preview and Finalize
Everything is now done for your WooCommerce store. Update the product page, and the WooCommerce installment payment will work for your store.
Now check other modules and widgets of ShopEngine. There are different advanced features that you can add to your WooCommerce store.
Why ShopEngine
Are you wondering why we recommend ShopEngine and Elementor? Indeed, there are dedicated plugins to integrate WooCommerce installment payment. But those plugins are only for a single task.
ShopEngine is an Elementor based plugin in which you’ll get a whole WooCommerce package that includes:
| Overview | Free | Pro |
| Widgets | 40+ | 65+ |
| Modules | 4+ | 13+ |
| Templates | 5+ | 15+ |
Apart from the core features and modules, a few things that you need to bear in mind is that ShopEngine is professionally coded and regularly updatable with 24/7 technical support.
Let’s say you want to run flash sales, maintain pre-order and backorder, and similar features. If you use plugins for each of these single features, the site will be heavy and take more time to load. As a result, it will impact the site’s ranking position on search engines.
But with ShopEngine, the scenario will be the opposite. Besides partial payment, you will enjoy tons of advanced WooCommerce features like flash sales, product comparison, currency switcher, backorder, and many more. As all these features will be in the same plugin, it won’t impact the site’s loading speed and SEO factors.
Wrapping Up
Anyone can integrate WooCommerce installment payments with the above steps regardless of the store type. As ShopEngine gives enough scope for modifications, change it and check the preview.
Must use the default email feature of ShopEngine’s partial payment module to make a good connection with your customers.
![]()
![]() Latest posts by Editorial Staff (see all)
Latest posts by Editorial Staff (see all)
Where Should We Send
Your WordPress Deals & Discounts?
Subscribe to Our Newsletter and Get Your First Deal Delivered Instant to Your Email Inbox.
Thank you for subscribing.
Something went wrong.
Keep reading the article at WP Newsify. The article was originally written by Editorial Staff on 2022-01-05 10:48:10.
The article was hand-picked and curated for you by the Editorial Team of WP Archives.

