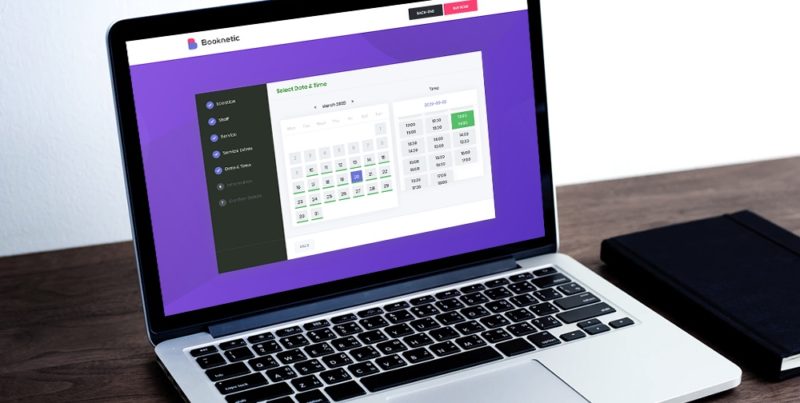
Adding a robust booking system to your WordPress site is arduous for beginners and pros alike. If you were to code a booking system from scratch, it would probably take months, if not years. And it would be an exercise in futility, especially when the wheel has already been invented, and there exist amazing plugins such as Booknetic.
Booknetic is a fantastic appointment and booking plugin for WordPress sites. It’s the perfect solution for businesses such as hotels, gyms, salons, spas, law firms, repair shops, and any other service-based business. The plugin allows your prospects to book appointments and pay easily.
Behind the scenes, Booknetic comes with an intuitive dashboard that makes managing your bookings incredibly easy. You can easily create services, add staff members, choose multiple locations, add payment gateways, and do so much more. In other words, it’s the ideal WordPress booking plugin for the beginner who doesn’t code.
And in today’s review post, we take a closer look at what makes Booknetic tick. We touch on the available features and test-drive the plugin, so you know what to expect. If that sounds great, let us dive in right away.
What is Booknetic?
So, what is Booknetic, and where did it come from? In simple terms, Booknetic is a sleek but powerful booking plugin for WordPress websites. It’s the brainchild of veteran developers FS Code (along with their popular FS Poster auto posting plugin).
The plugin was released on 2nd October 2019, meaning it’s relatively new at the time of writing. That means there is a lot of room for improvement and better features in the future. Still, Booknetic is one of the easiest scheduling plugins you’ll ever use on your booking website.
Considering we’ve reviewed many other WordPress booking plugins in the past, Booknetic doesn’t come with feature bloat, unlike some of its competitors. This means you get an easy to use booking plugin that is also super-fast.
Booknetic is a premium plugin, which means you cannot download it at WordPress.org currently. If they release a free version in the future, I’ll update the post accordingly. If you’d like to test the waters, they offer you a fantastic Booknetic demo on the official website.
Now that we know what we are working with let us discover what Booknetic has to offer in terms of features.
Booknetic Features
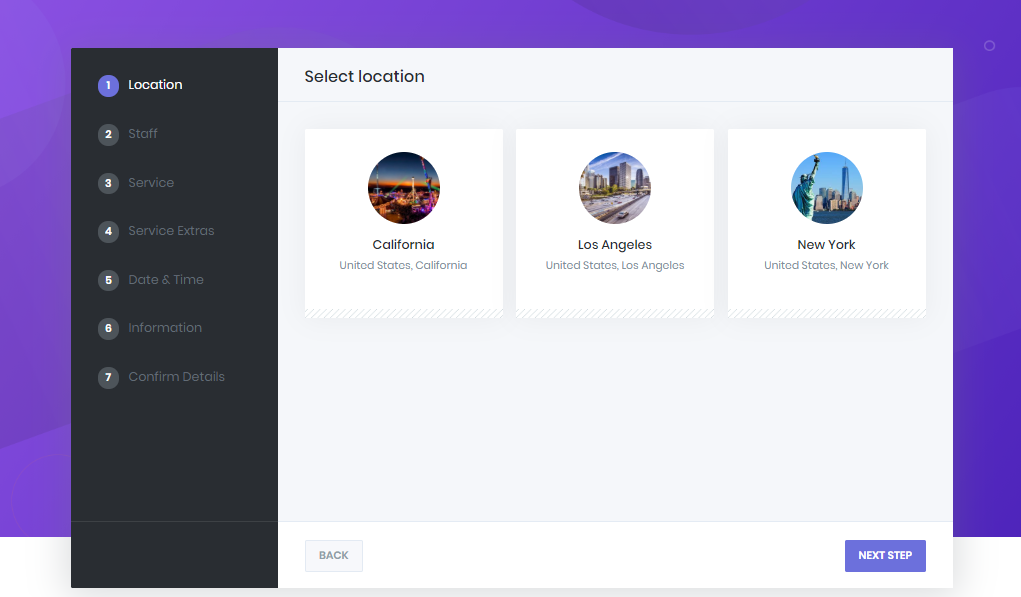
The Booknetic WordPress plugin ships with a sufficient list of tools to get a nice booking system up and running quickly. When you install Booknetic, you will be treated to a fantastic suite of features including, but not limited to:
- A mobile-ready and responsive design that means your booking website will look great on multiple devices
- Beginner-friendly – Booknetic is amazingly easy to set up and customize for any business
- A drag-and-drop form builder that allows you to add extra fields to the default booking form
- Detailed reports with actionable data to help you stay on top of business
- Customizable email and SMS notifications for your customers and staff
- Support for PayPal, Stripe, and WooCommerce Payments
- Detailed documentation and great personalized support
- Streamlined booking page that reduces bounce rates
- Fully automated – Set once and save hours
- Add unlimited staff members
- Multiple currency options
- Add unlimited services
- Unlimited categories
- Great UI all-round
- Et cetera
Testing the demo is the only way to get a good feeling of what to expect. But you know me; I installed the full version so I can test every detail to the last pixel. I can’t help it ?
Here’s what I found.
How to Install Booknetic WordPress Plugin
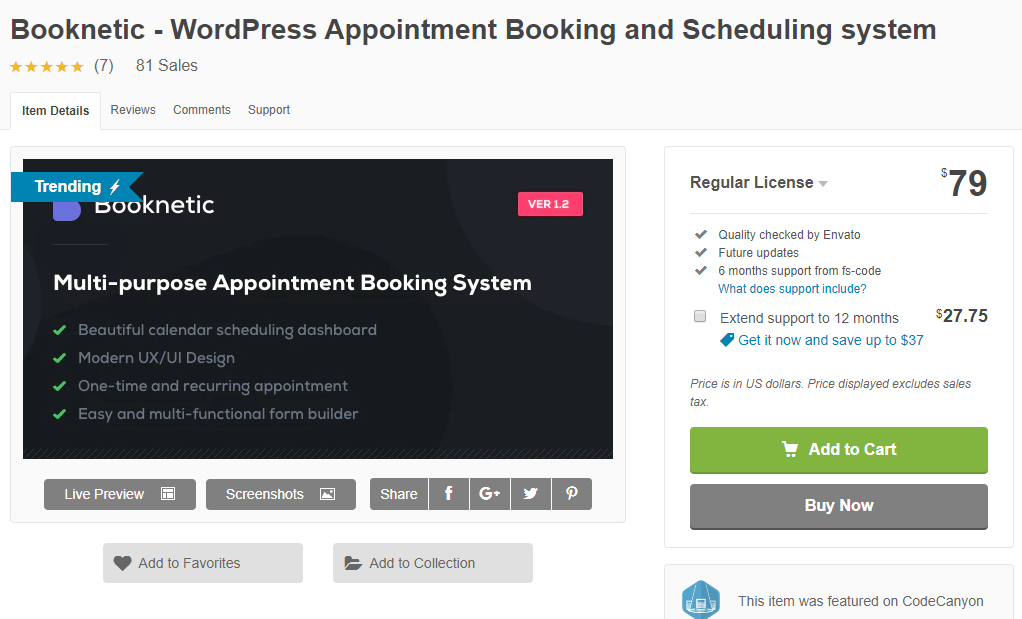
Remember, Booknetic is a premium plugin. The full version is available on Envato for a one-time price of $79 bucks. That is the Regular license that covers one WordPress site. The developers offer an Extended license at $349 for five WordPress sites. Go for the plan that works for your business.
Booknetic is trending on Envato currently and was featured on CodeCanyon. Each plan covers six months of dedicated support and lifetime updates. After purchasing Booknetic, you can download a ZIP folder from Envato with the relevant files and license. Extract the folder to your computer and locate the Booknetic ZIP file.
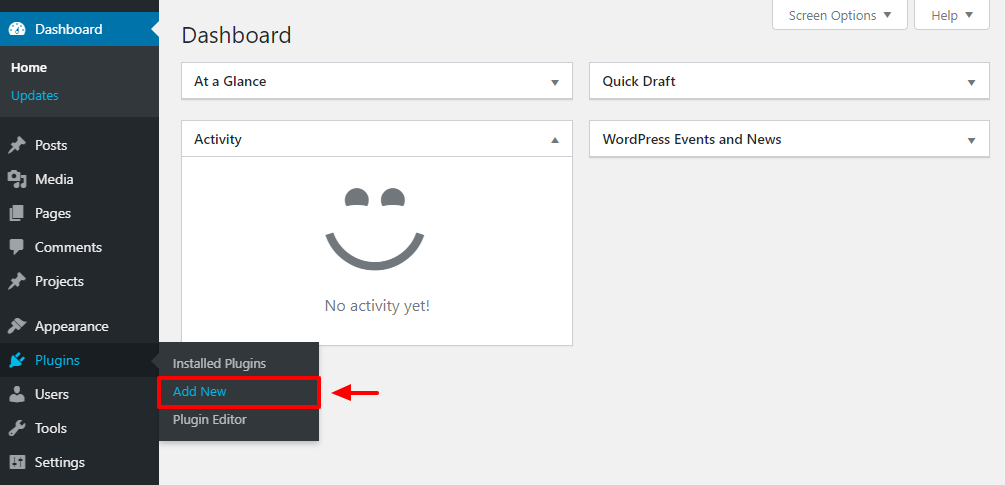
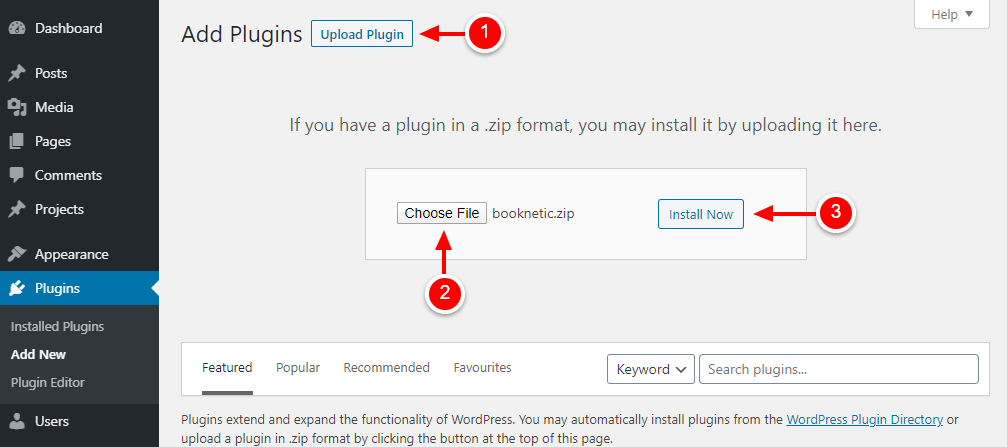
Then log in to your WordPress admin area and navigate to Plugins > Add New, as shown below.
Next, click the Upload Plugin button, choose the Booknetic ZIP file on your computer, and hit Install Now, as we highlight in the following screengrab.
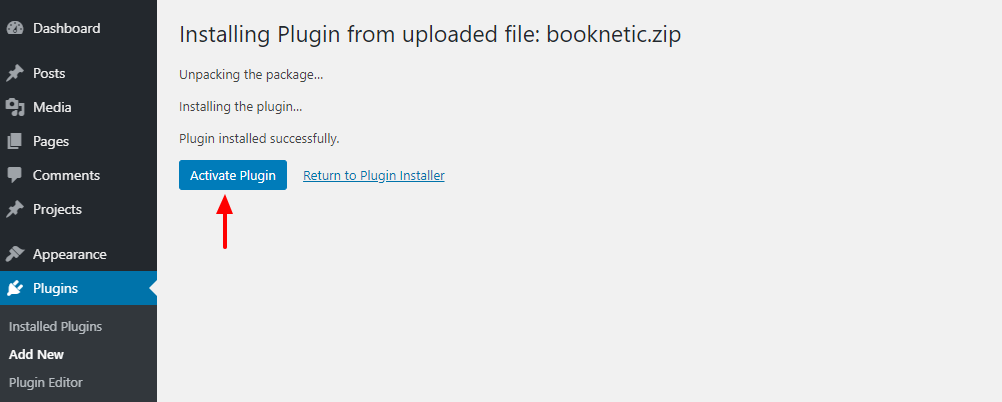
Activate the plugin:
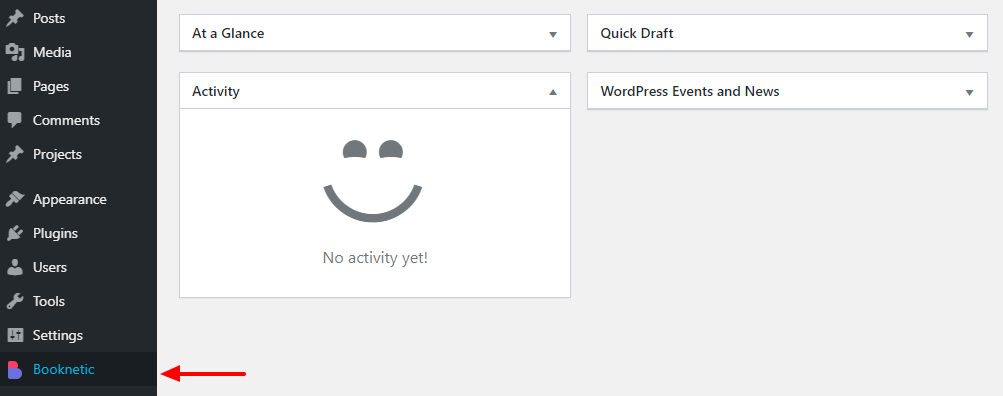
After activation, click the Booknetic item on your WordPress admin menu:
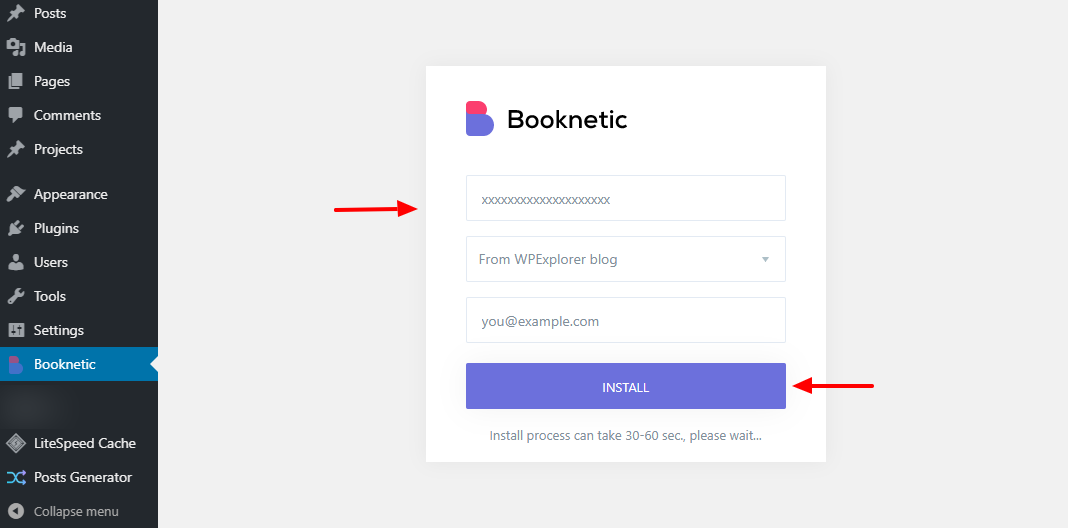
On the next screen, enter your purchase code, select how you heard about Booknetic (hint: From WPExplorer Blog), enter your email, and hit the Install button, as we detail below.
As soon as the license validates, you will be redirected to the nice Booknetic dashboard shown below.
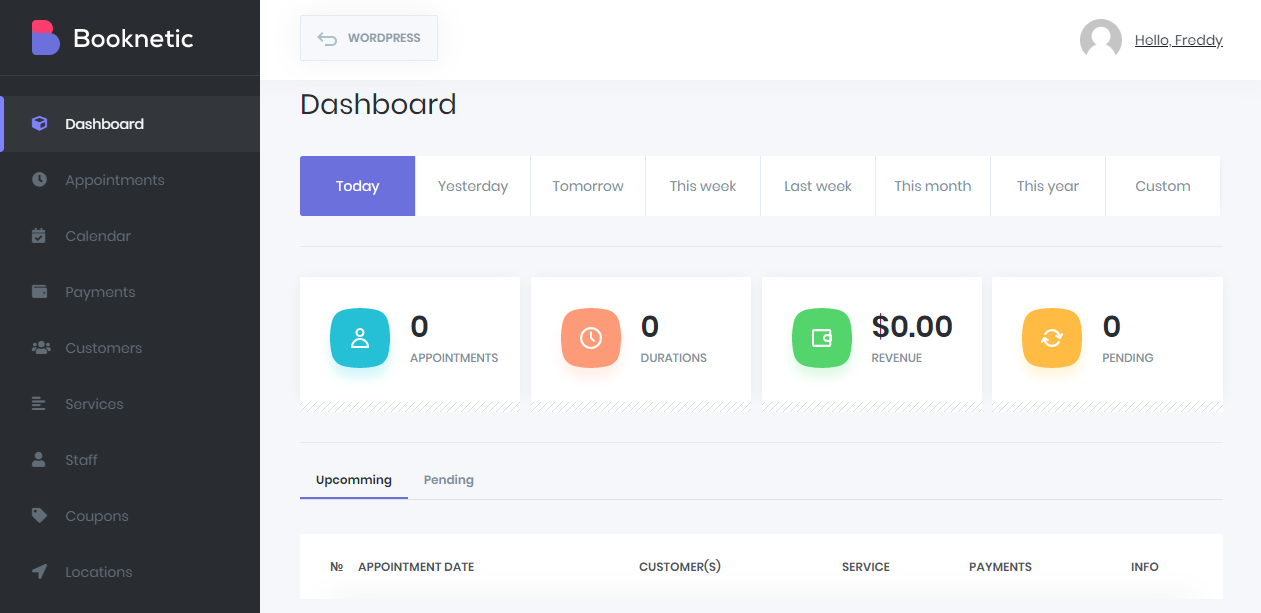
But as you can see, we have nothing going on yet. Let’s add some services, staff, locations, and generally test what Booknetic can do.
How to Configure Booknetic
If you’ve made this far, you have no time to waste. Let’s start by adding your business location, staff members, and some services.
Adding Business Location(s)
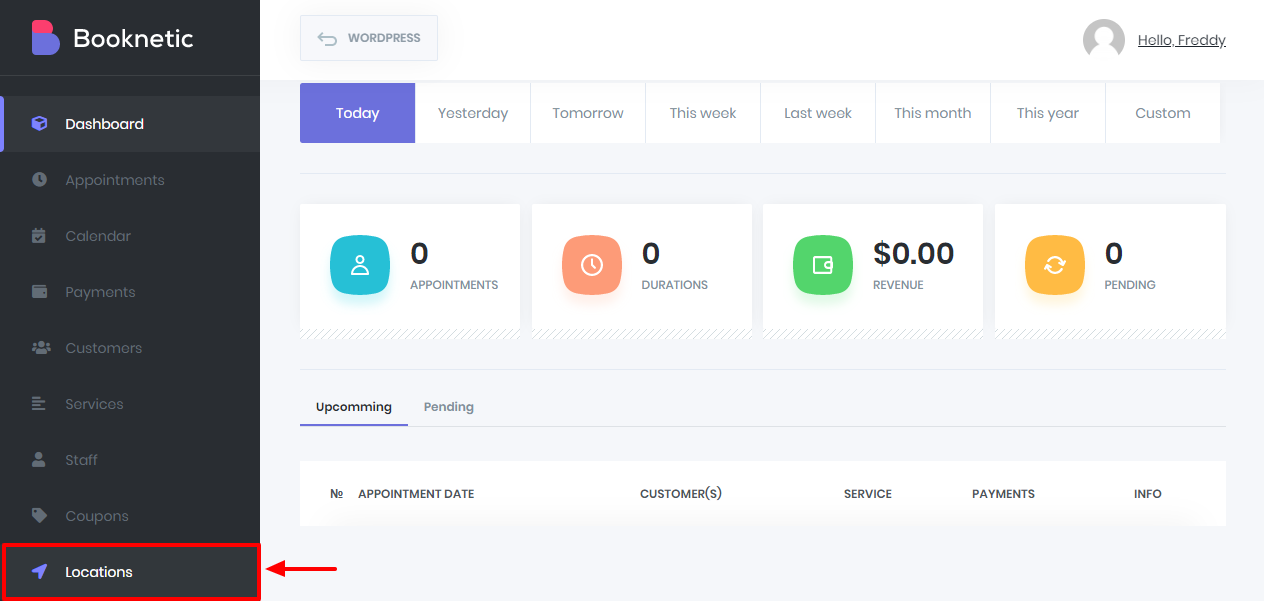
Navigate to Locations, as shown in the following image.
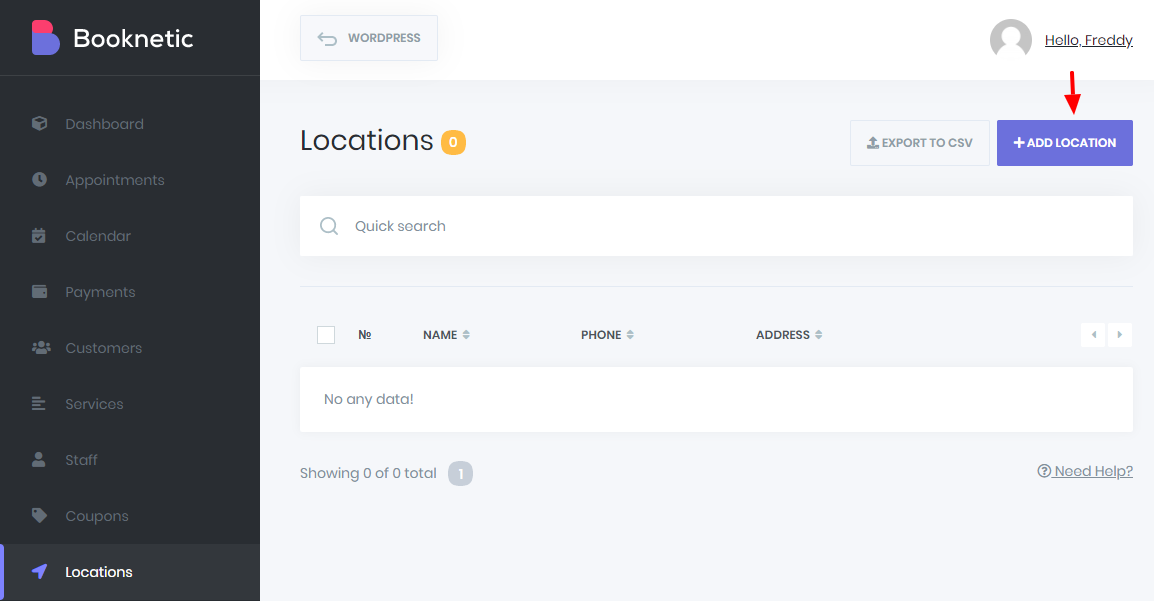
After that, click the Add Location button:
On the slide-in pop-up that appears, enter your location details and click the Add Location button, as shown below.
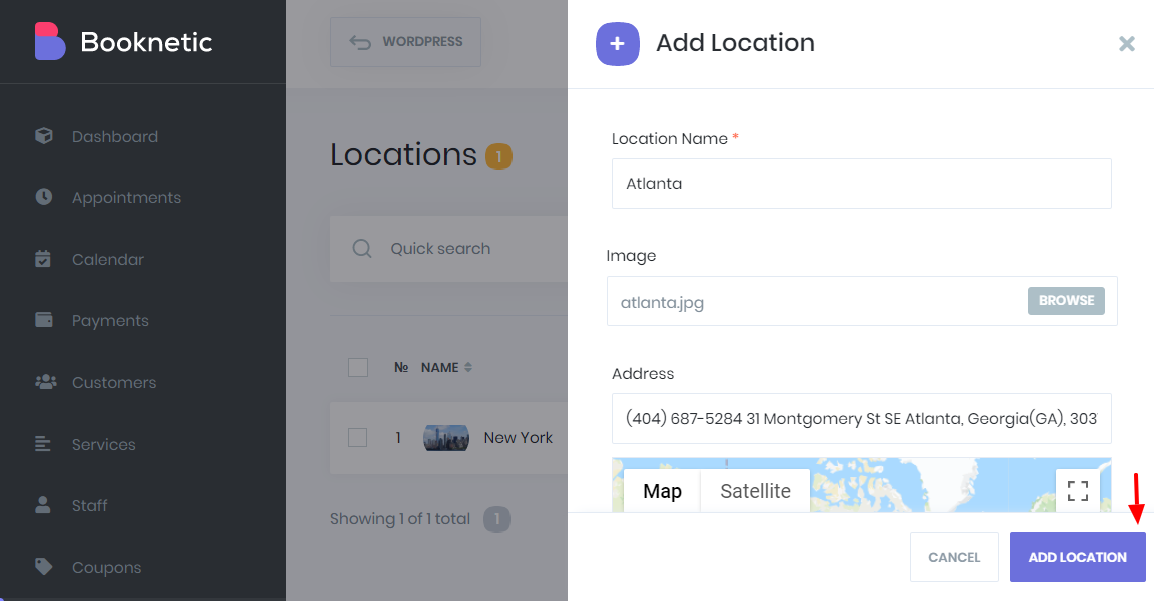
For our example gym business, I added two locations: New York and Atlanta ?

Now that we have our business locations in the system, let us add some staff members.
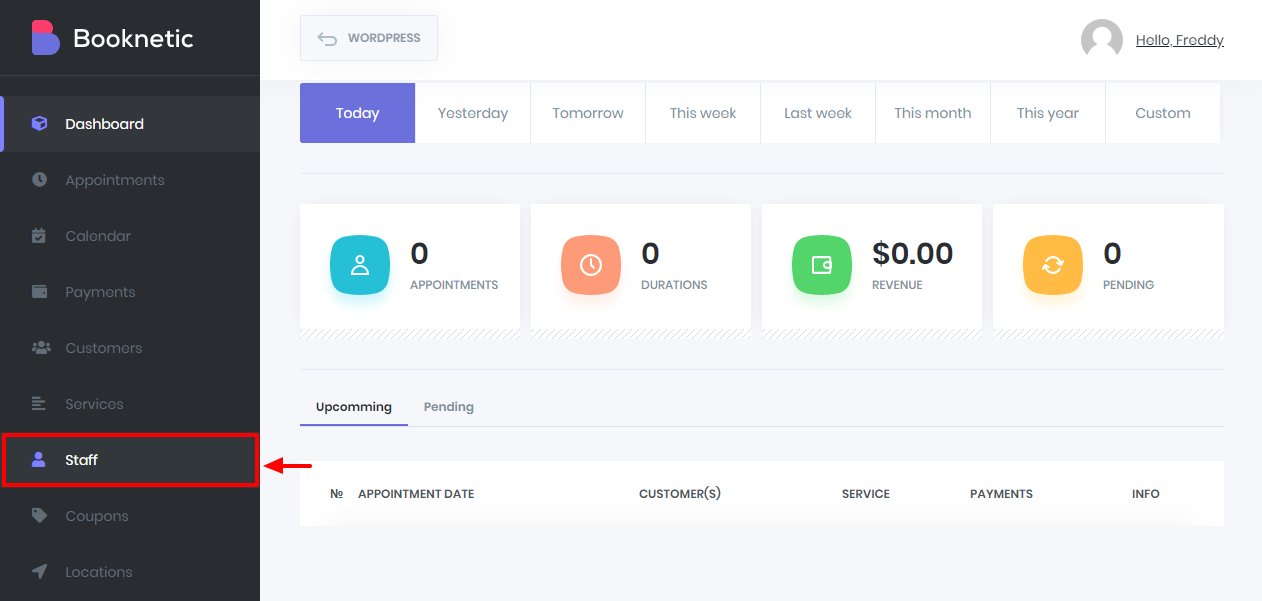
Adding Staff Members
Click the Staff tab, as shown below.
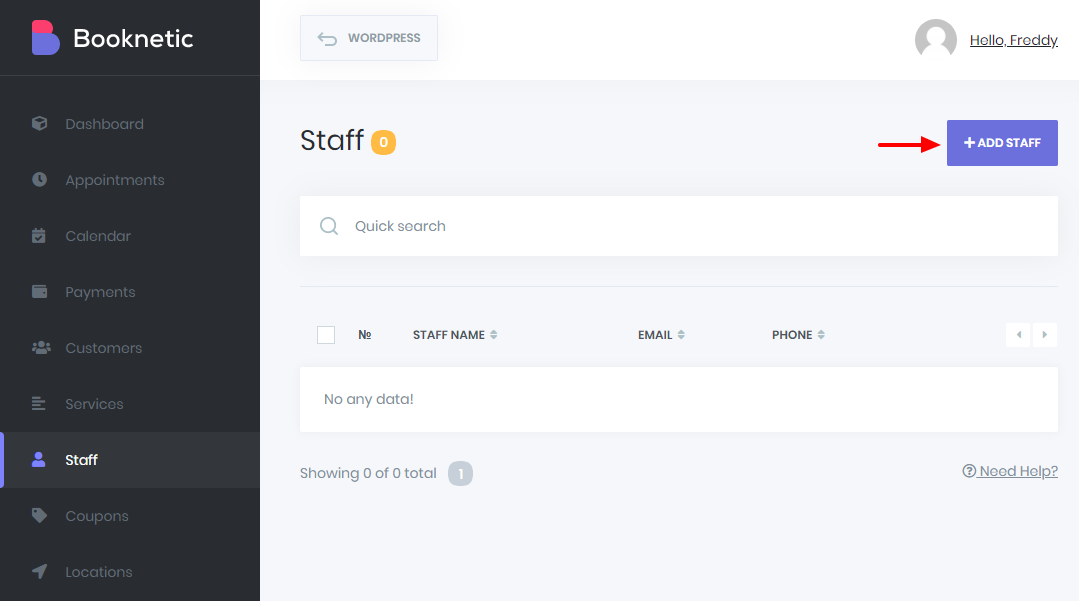
Next, hit the Add Staff button:
Enter your staff details, and hit the Add Staff button.
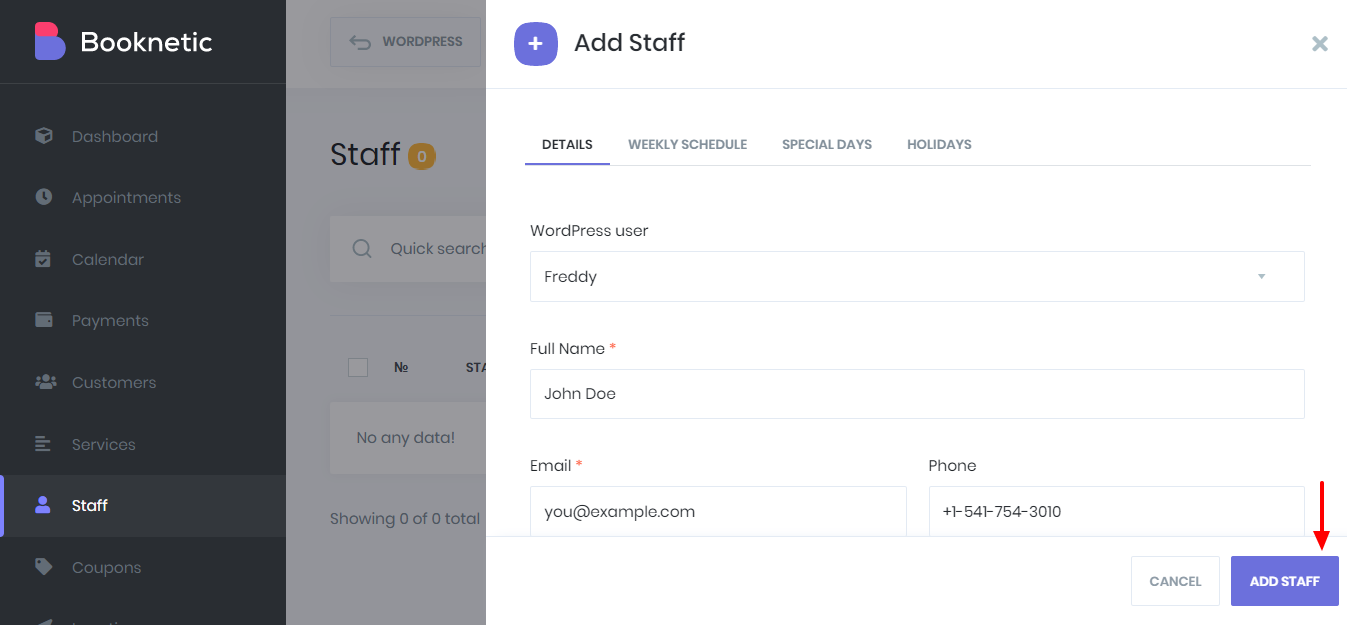
Don’t forget to set up schedules for your staff in the pop-up above. I went ahead and added two trainers for our gym.
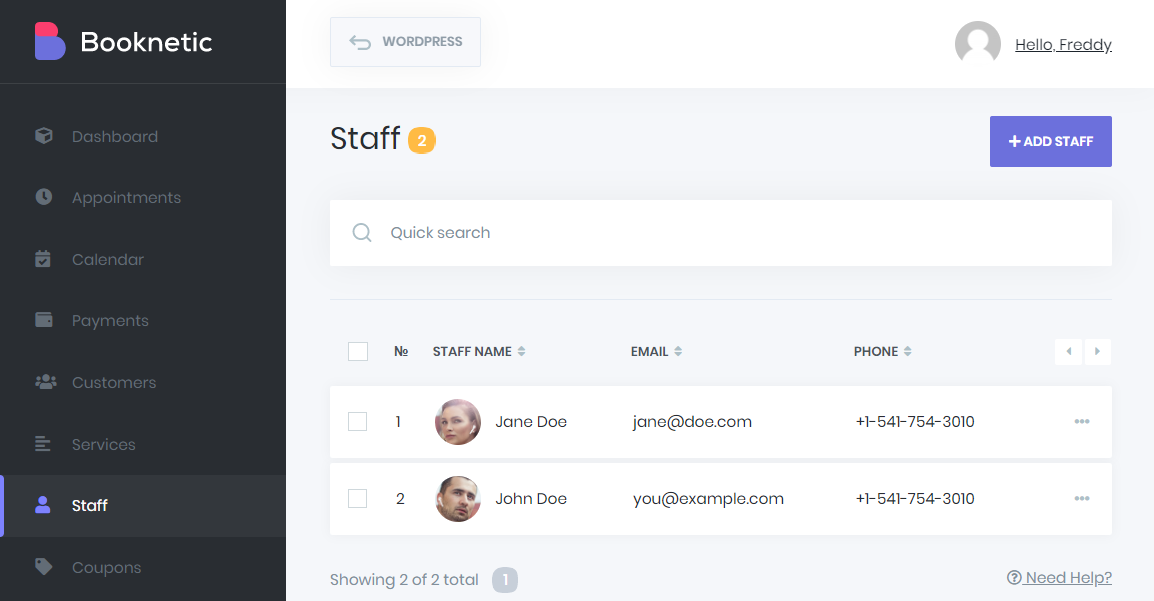
So far, so good, everything looks great. I have my locations and staff complete with schedules, special days, and holidays. Now, let us add some services.
Adding Services
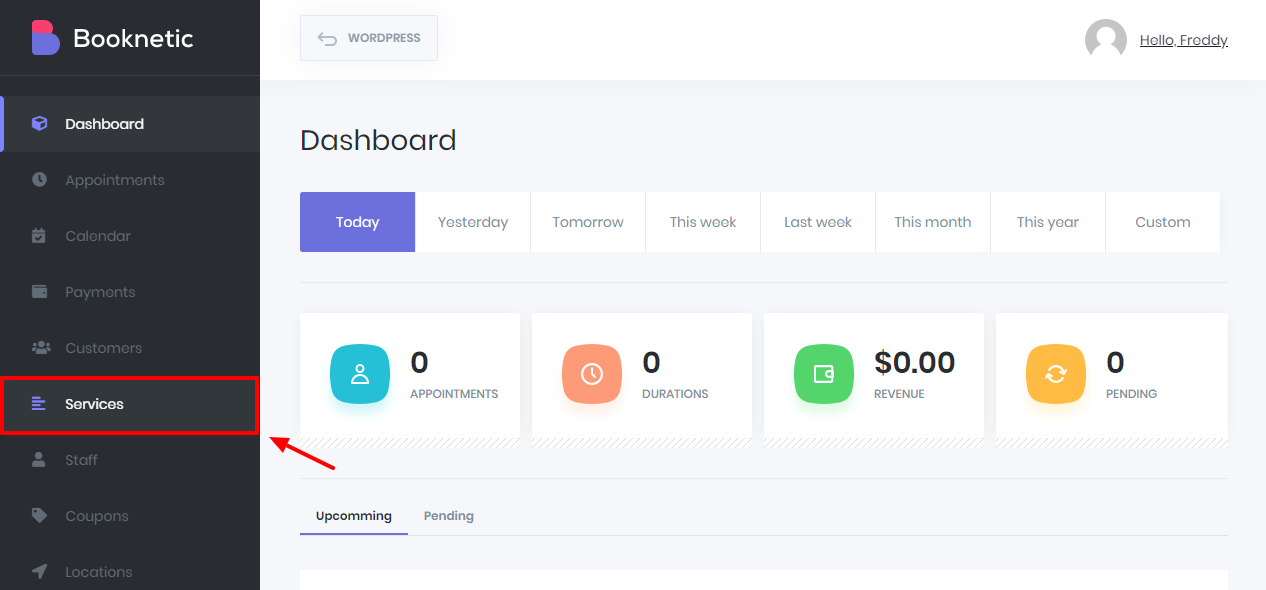
Click the Services tab, as shown below.
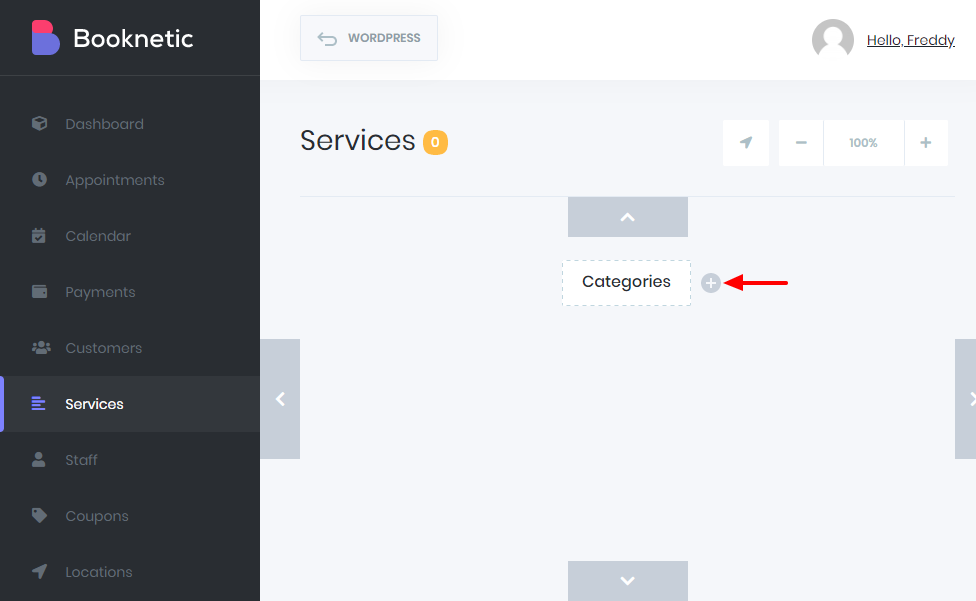
Booknetic allows you to create categories for your services. Under each category, you can add subcategories and services as per your needs. That being said, hit the plus (+) icon next to the Categories tab, as we highlight below.
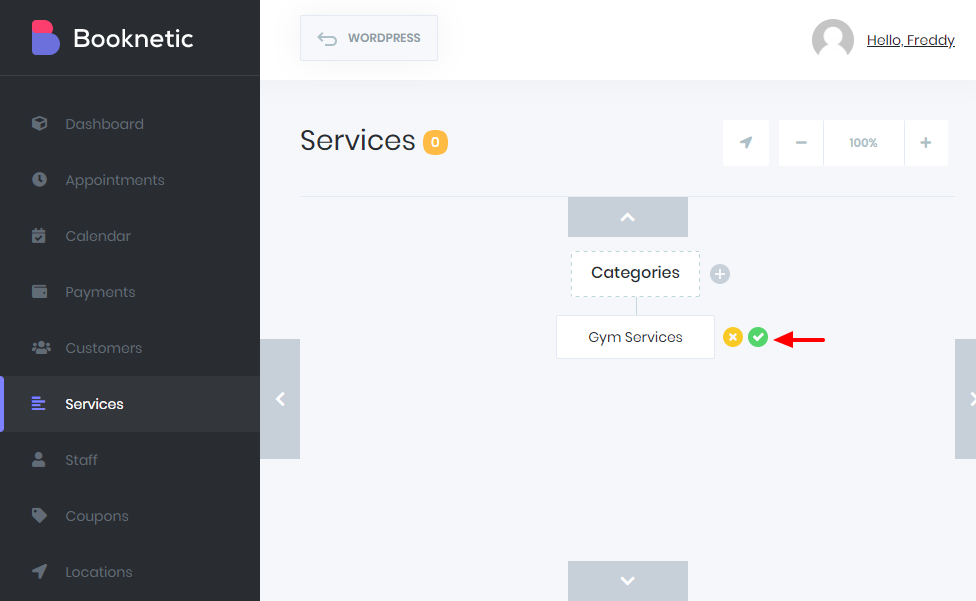
Next, enter your category name, and click the tick icon:
After that, click the plus (+) icon under your newly created category:
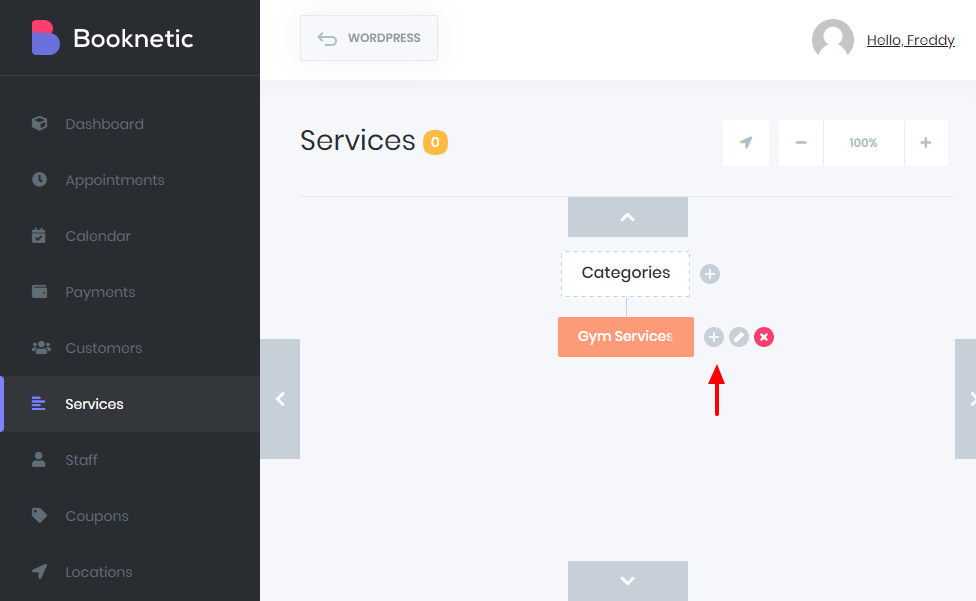
Doing so brings up a tiny box that allows you to add a category or service, as shown below.

Since I don’t need another category, I went ahead and hit the Service button, which opens a box so you can add more details:
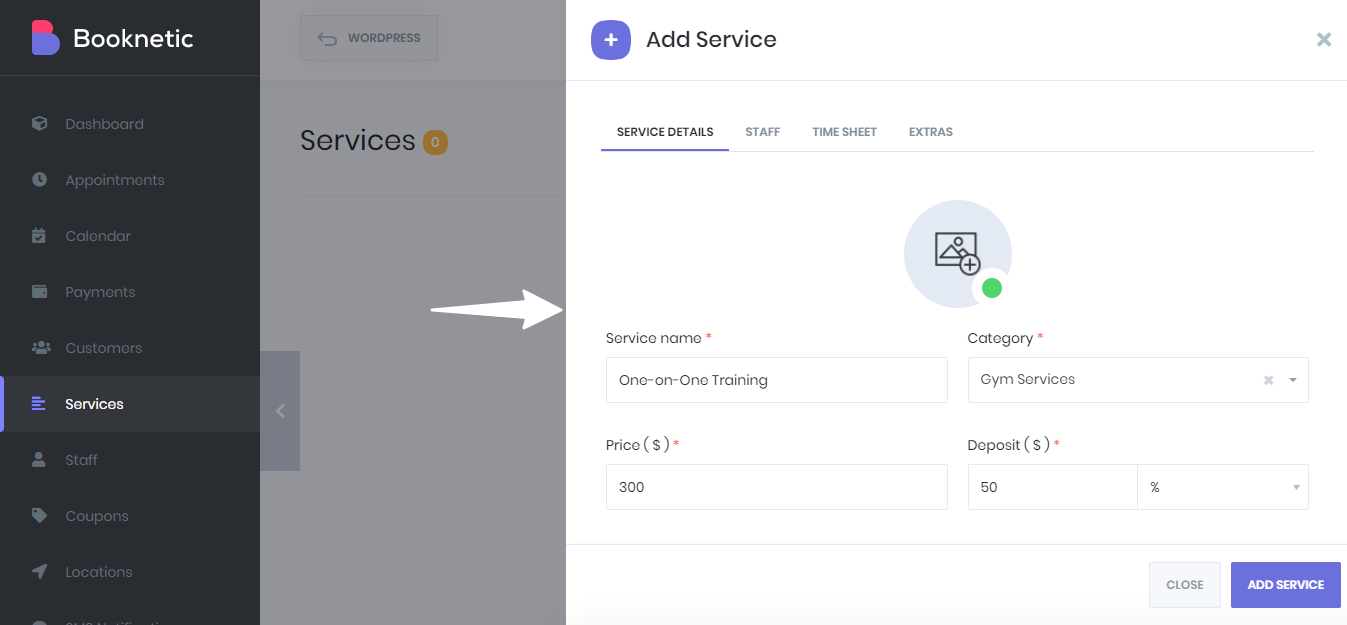
Everything is straightforward. You can add service name, price, deposit, staff, schedule, and extras easily.
For our example, I created a category named Gym Services, and below the category, I added two services, i.e., One-on-One Training and Group Training. Now, my services screen looks like this:
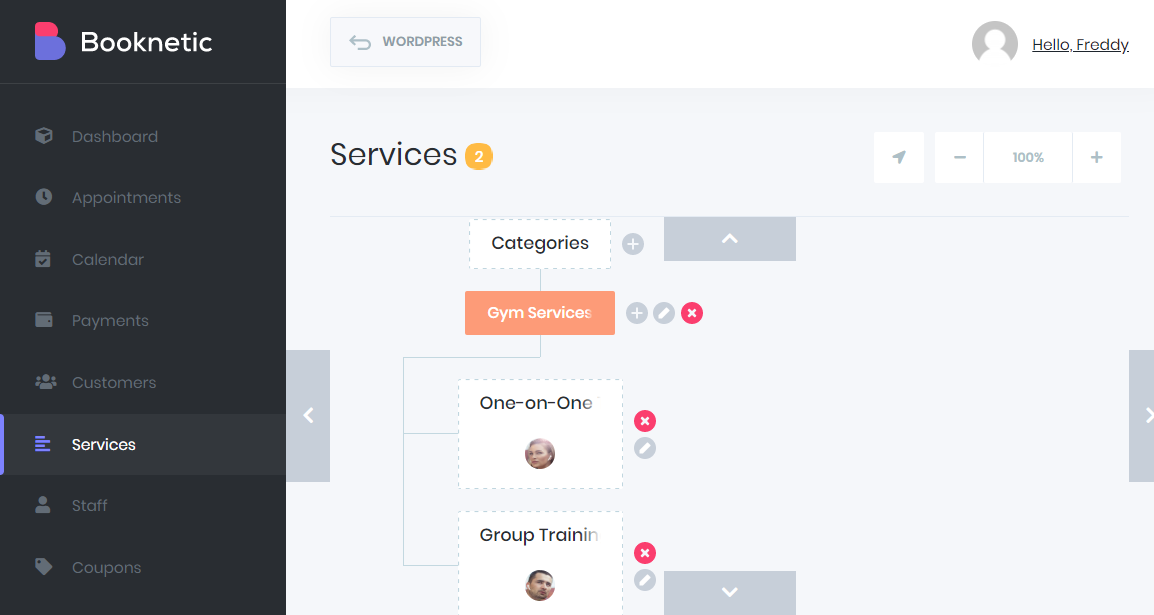
Looks great. Right?
Before anything else, it’s vital to set up your payment gateway so you can charge your clients. Booknetic supports PayPal, Stripe, and Local (on-site) payments. In other words, you have all the tools you need to collect payments.
Configuring Payment Gateways
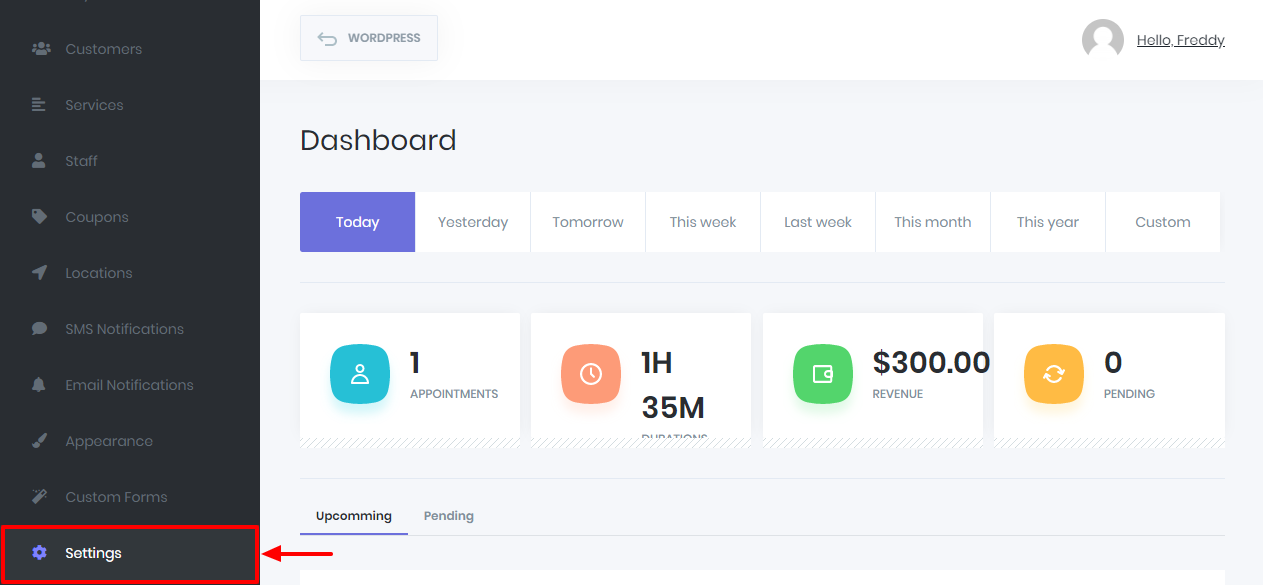
Configuring Booknetic to accept payments is easy. Navigate to the Settings tab, as shown below.
Next, click the Payment Settings tab:
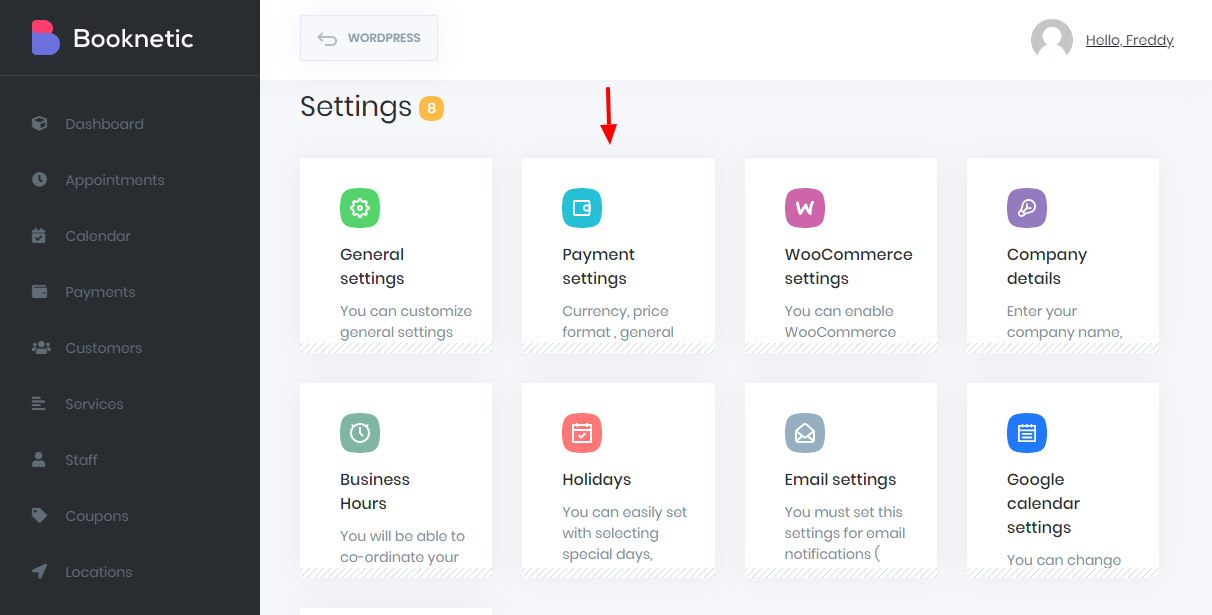
On the next screen, you can configure your payment settings easily.
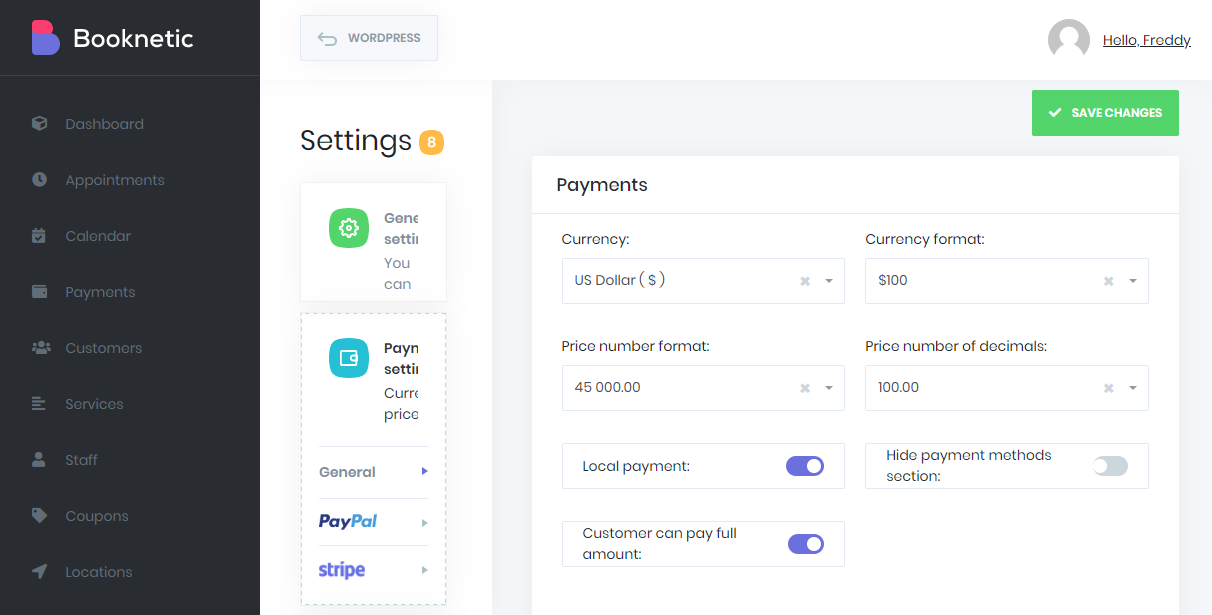
If you’re using PayPal, you will need to create an app first. The same applies if you use Stripe. Either way, it’s incredibly easy to create a payment app in PayPal or Stripe – you won’t be coding anything; just enter your business details, and the payment processors will do everything for you.
Changing Form Appearance
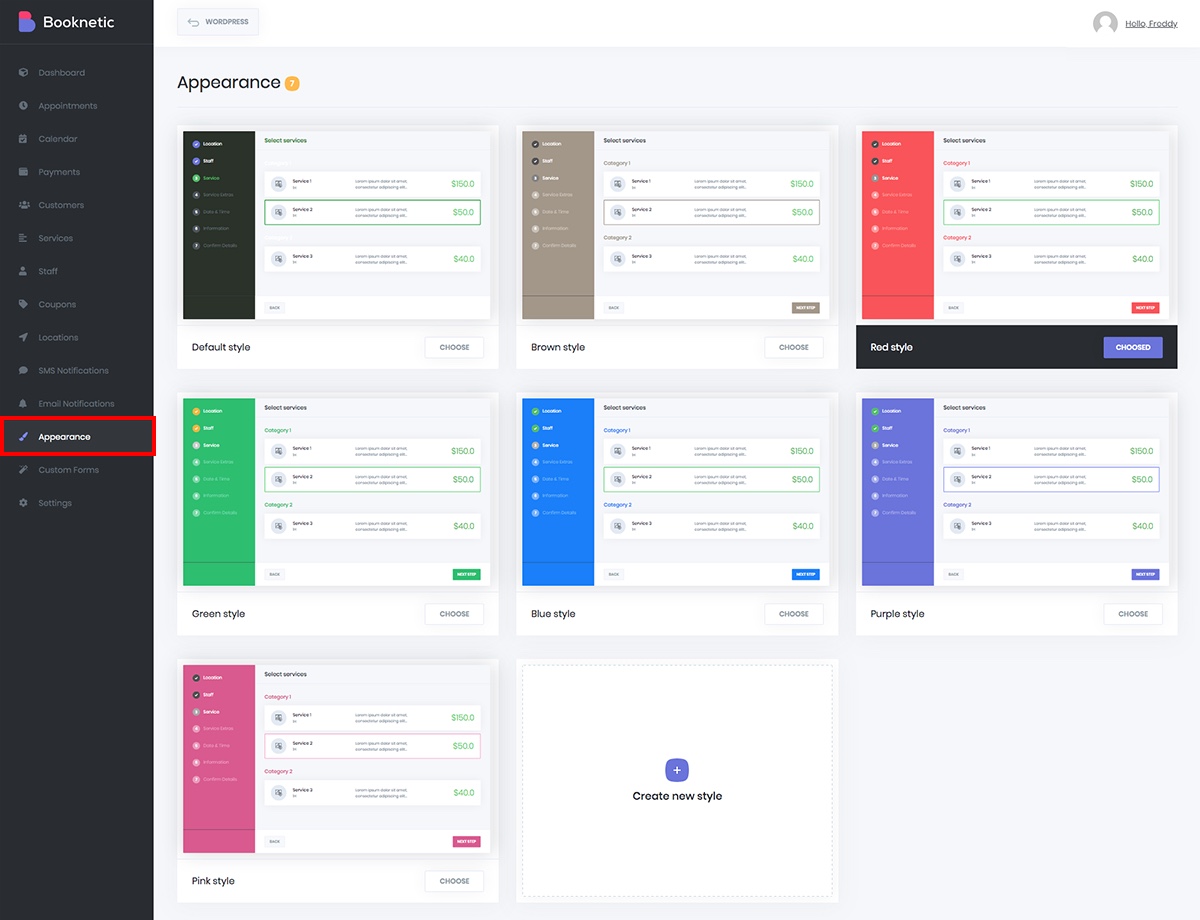
Booknetic also features built-in color options for your forms. Choose from 7 built-in color schemes to quickly change how your forms look.
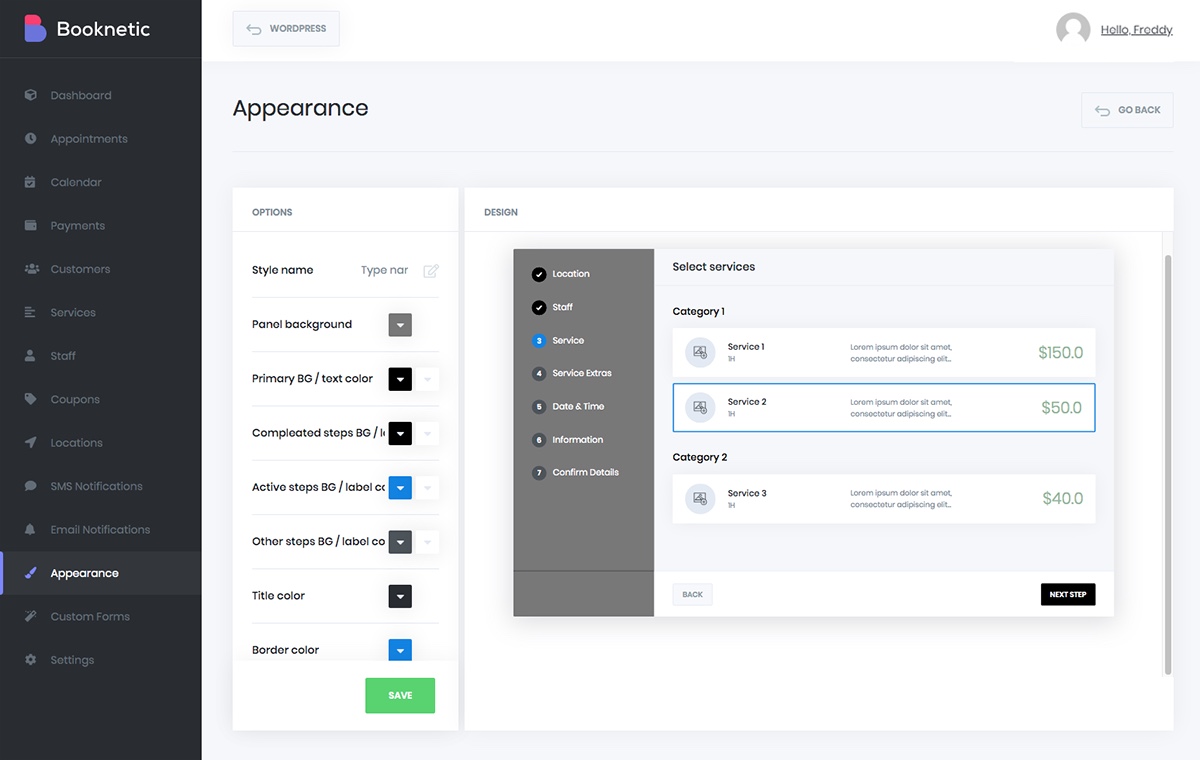
Or use the custom option to choose colors that match your branding.
Now, we have services, staff, locations, payment gateways and . However, if visitors come to your website, they won’t see your booking form. For that, we must add Booknetic to a page using a shortcode.
Displaying Booknetic Bookings
Now that we can accept payments (I sure do hope you figured out that creating apps in PayPal and Stripe is easy stuff) let us display our booking form so we can start accepting appointments and payments. Navigate to Pages > Add New, as shown below.
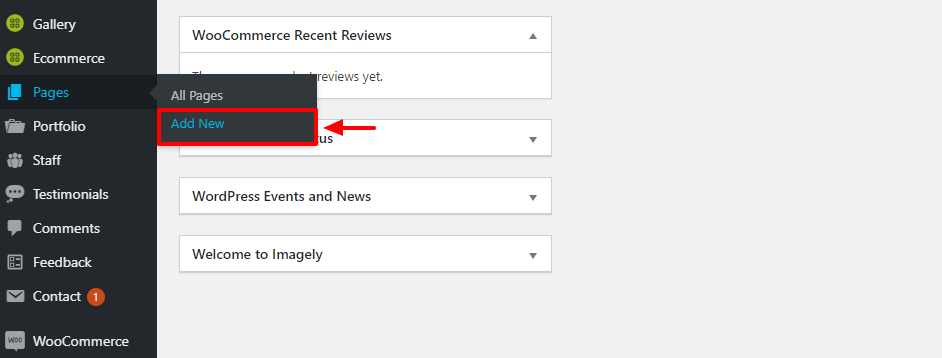
I already have Gutenberg – the new age WordPress editor. By the way, I’m also using the Twenty Sixteen theme on my test site. Next, name your page accordingly. I’m using Book Gym Services for my example. Go ahead and click the plus (+) icon in Gutenberg to add the Booknetic shortcode, as we detail below.
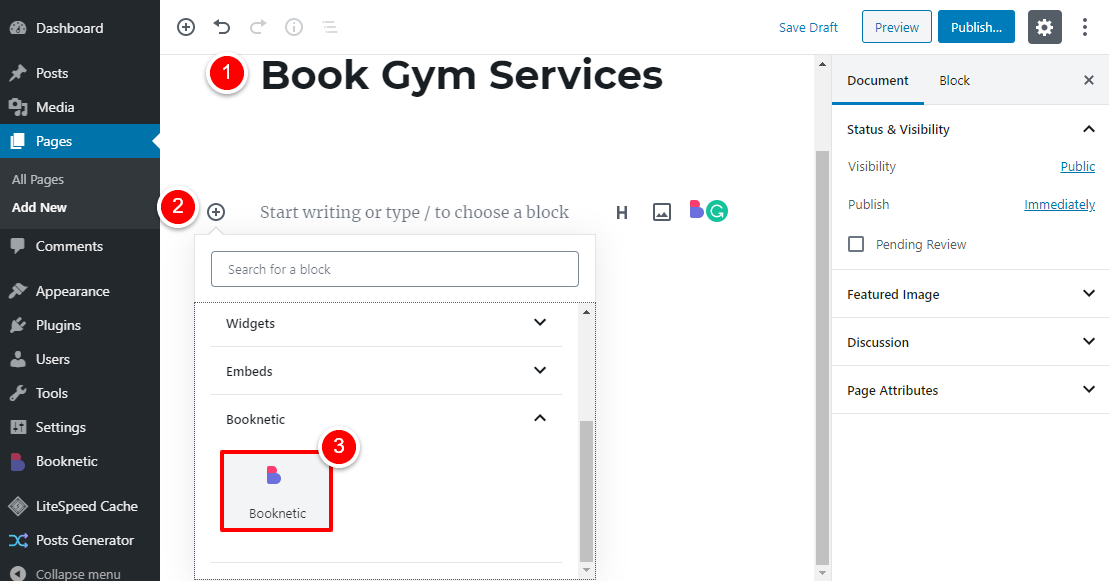
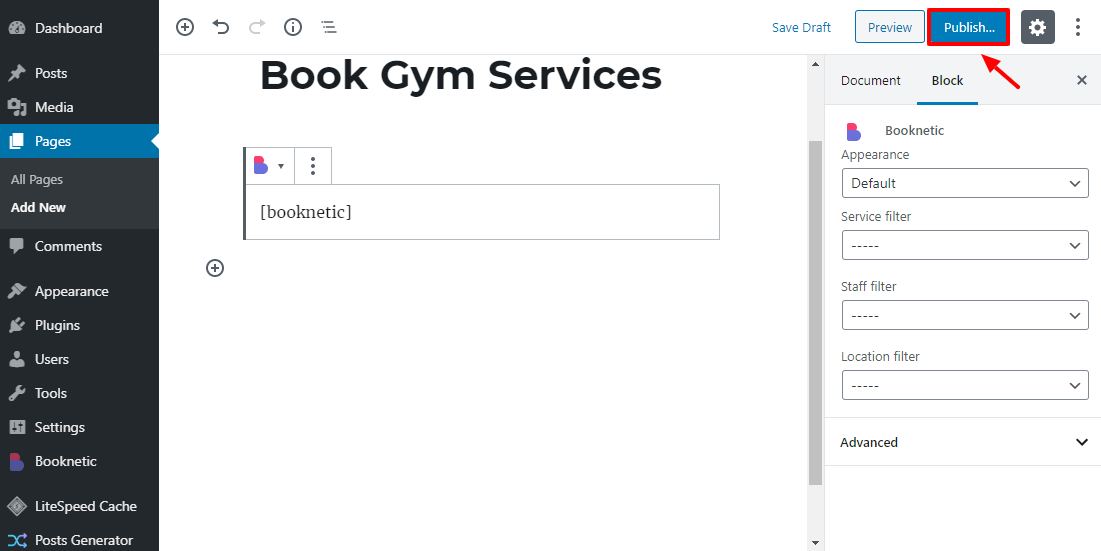
After that, configure your page attributes (full-width is best), and Publish your page.
If I view the page in the front-end, I will see this:
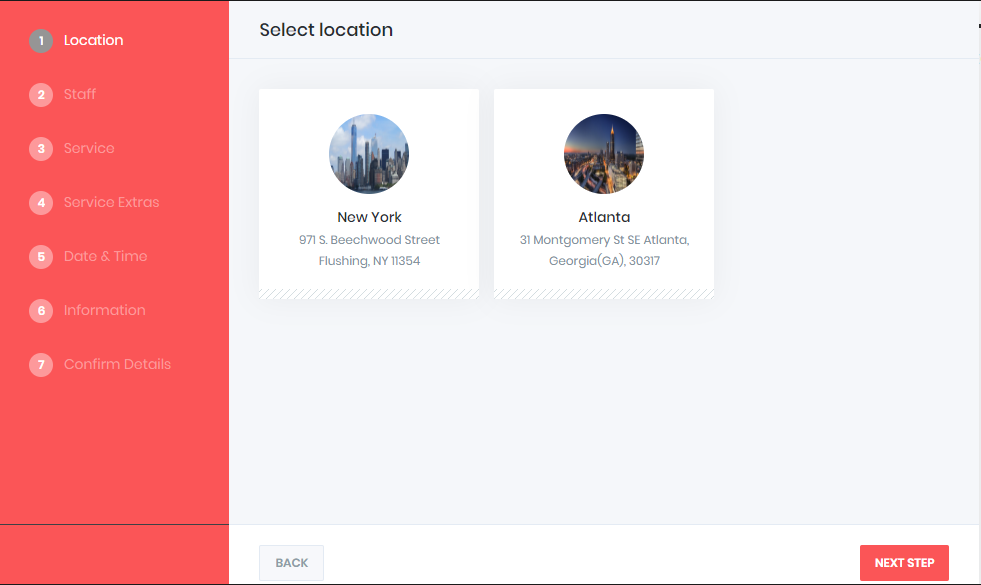
Not bad. I have two location tabs. If I click any of the locations, say I’m in New York, I will start the booking process. Booknetic will kick in and guide me through the rest of the process. I will choose my location, the staff member I like (maybe, Jane Doe ? ), schedule, and make payment.
Here’s a short video to illustrate the Booknetic booking process:
Other Features
Here now, we cover the other features of Booknetic. From the above instructions, you can create a fully-fledged booking system. In the following section, we cover the other features that help you to stay on top of things.
Calendar
The calendar screen allows you to see your daily appointments. To view the calendar, navigate to Booknetic > Calendar:

Payments
The payments screen allows you to see and edit payments from your users. To see your payments, go to Booknetic > Payments, as shown below.
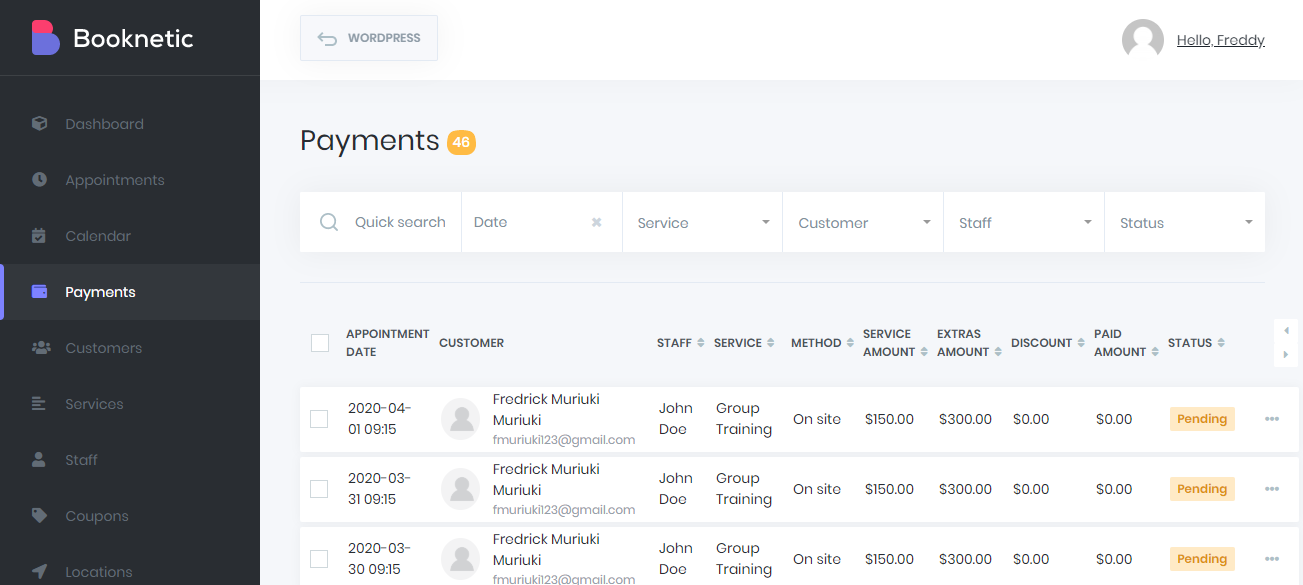
Customers
To see a list of all of your customers, go to Booknetic > Customers, as shown below.
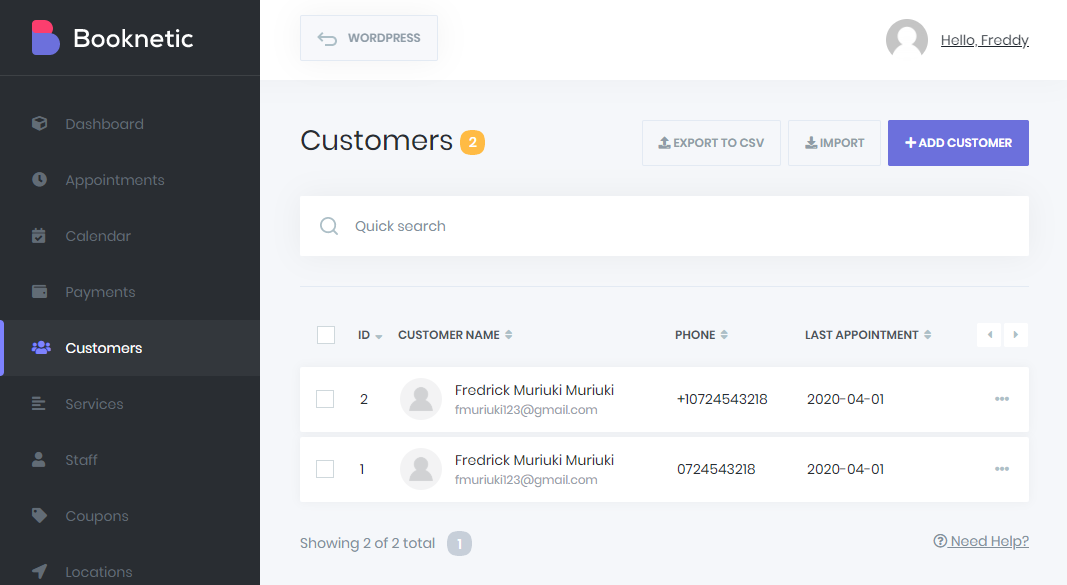
What’s next? Coupons!
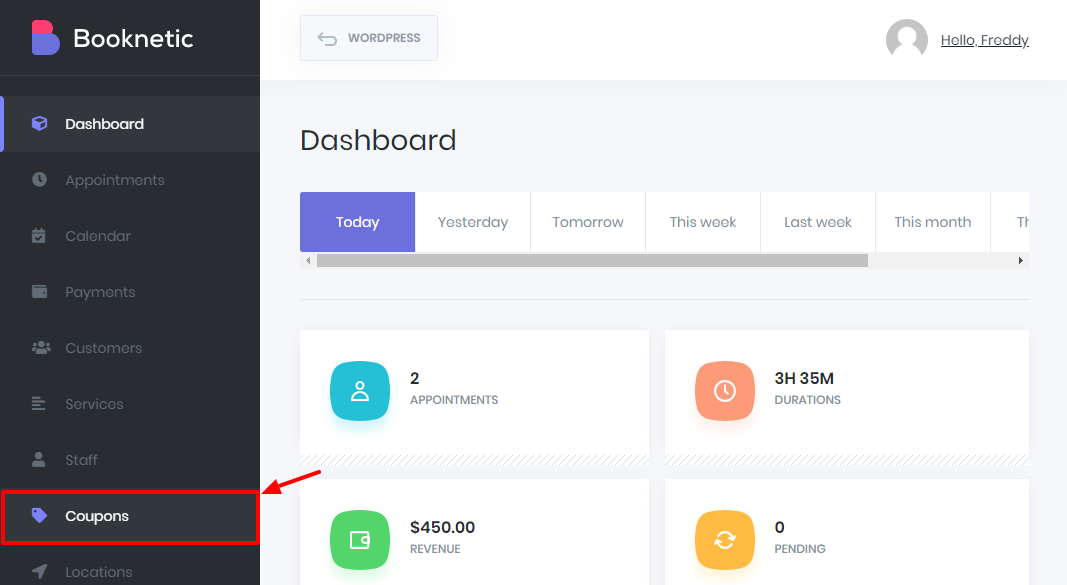
Adding Coupons
Say you want to offer discounts to your new customers because who doesn’t love a good deal? If that’s your plan, Booknetic offers you just the option. Go to Booknetic > Coupons, as shown below.
I hope you’re learning something here today.
Moving on…
Let me see. Is there anything else? Yeah, right. SMS and email notifications. Configuring both settings is easy, I will let you try and tell us what you find out. All the same, you must get configuration settings from your SMS and email provider.
Important: You must get SMS and email settings from your specific provider. If you don’t know how to, we can gladly help. For free ?
To set up notifications, go to either SMS Notifications or Email Notifications. You can create custom SMS and email notifications, which is awesome:

Custom Forms
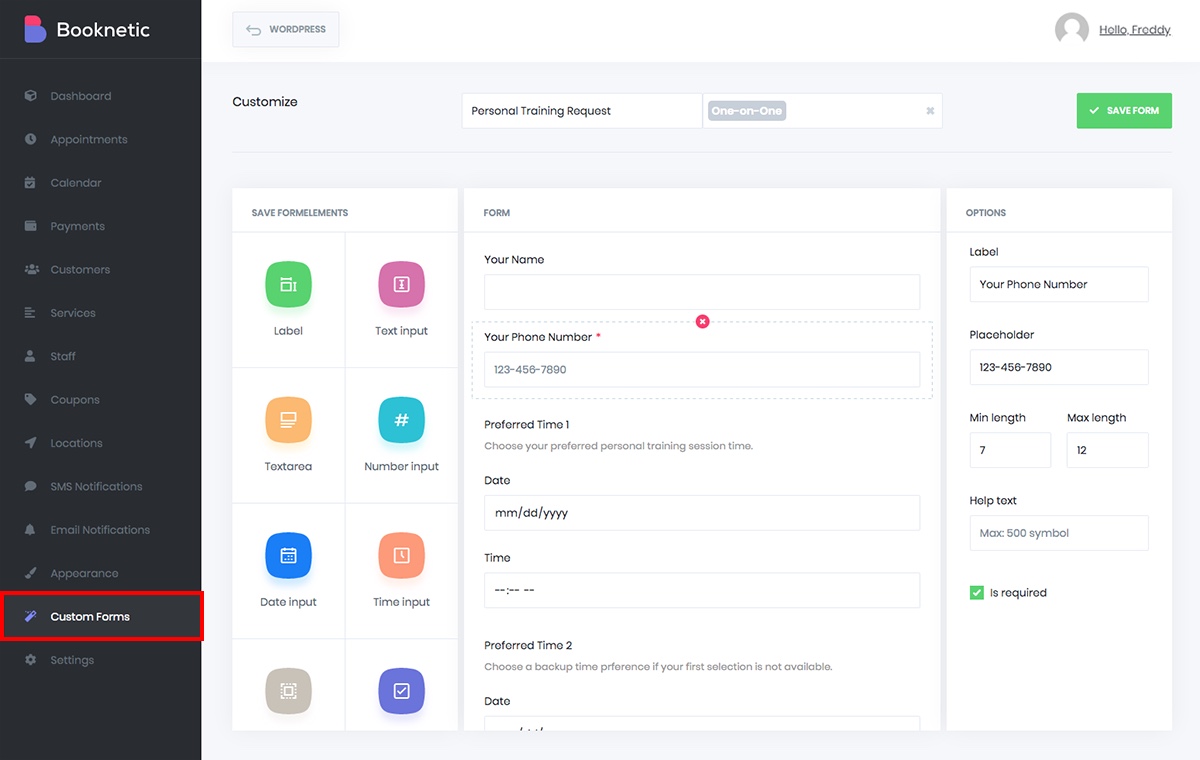
Want to build your own form? You can! With the Custom Forms section you can use the available fields to design your own general or service-specific form.
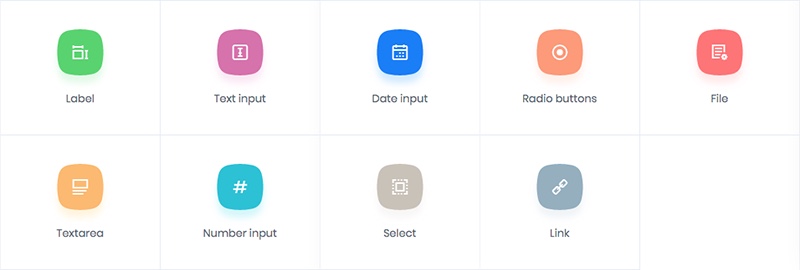
Choose from fields for labels, inputs, buttons etc. And there are also options within each for required fields, placeholder text, multiple choices (for checkboxes and radio buttons) and more.
Now, You…
If you’re looking for a WordPress booking plugin, I fully endorse Booknetic. They have the features, the support and the price is great too.
What are your views? Let us know in the comments!
Keep reading the article at WPExplorer. The article was originally written by Freddy on 2020-03-09 15:02:57.
The article was hand-picked and curated for you by the Editorial Team of WP Archives.

