Creating an impressive website design is the objective of all individuals. While building a website, everyone has to take care of multiple factors, such as – layout, format, elements, nature of elements, element style, etc. Among all these factors, the most important thing is the header element.
Generally, website designers consider headers for branding and navigation purposes. It is the main reason why everyone tries to keep the header impressive, effective, and easy to understand. Along with that, some people are interested in making the header sticky to keep it displaying on the top of the website.
A sticky header does not get affected by scrolling and other operations. It appears regularly.
In this blog post, you can get complete details about sticky headers, important aspects, methods to implement, selection of the right plugin, etc.
What Is a Sticky Header?
Some professionals also consider the header as the navigation bar. Mainly, it is used for implementing the top navigation panel or menu of a website. It has some important elements or navigation options that should appear on a website every time.
If you keep this header immovable and fixed in place, that is known as a sticky header. (In other words: a header that sticks to its place and does not disappear while scrolling).
This particular element helps the users in easy accessibility of the top and fully-featured menu when they need it. It will improve the user experience and make the website user-friendly.
Many individuals want to know how it can be possible to create a sticky header and what the resources are. There are different types of methods available for creating sticky headers, such as – coding, custom CSS, etc. If you want to choose the easiest one, the use of a plugin will be the best. WP Sticky is one of the best plugins for this purpose.
Pros and Cons of a Sticky Header
The use of the sticky header function is associated with some beneficial consequences. Here, we are discussing the benefits and drawbacks of implementing a sticky header.
Pros
Smooth Navigation
All website owners want to keep their visitors accessing multiple pages through which they can present the maximum possible amount of data in front of the users and encourage them to get converted as fast as possible. This objective can be achieved with a smooth navigation system only. A sticky header brings that smoothness and ease in website navigation.
Time-Saving
All visitors love to access websites that are easy to access and navigate. It allows them to save lots of time and access the required data quickly. With a sticky header, you can easily provide that time-saving website functionality to the users. In case you don’t have a sticky header, the users need to spend lots of time scrolling back to the top of the website to access the top menu.
Perfect Branding
Branding is the most important aspect of success in online business. All businesses want to get themselves established as a brand through which they can build a separate identity and influence the audience easily. Here, the sticky header plays a big role by presenting the brand name and logo continuously on the website.
Cons
Takes Up Space
The basic disadvantage of having a sticky header is that it covers the website frame’s space from the top. Due to this, sometimes professionals may face barriers in executing some design plans.
Problems With Small Devices

In case the sticky header is not organized properly or does not have any responsive elements, it may become a reason for problems with small devices, such as – mobile phones and tablets. This can lead to website performance-related issues.
These drawbacks can be easily overcome with some smart work and the selection of the right resources.
Key Aspects Regarding a Sticky Header
The most important factor of a sticky navigation menu is its stickiness. It means that the main source of the website’s navigation will remain on display every time. Whether the users are scrolling the window or not, the header will always appear in a fixed place.
In case you are interested in adding a sticky header to a website, you should not make any changes to the website’s code directly. It may lead to some serious and bad consequences, such as – a website crash. You can get help from other resources, like – the WP Sticky plugin, CSS customization, etc.
In the upcoming details, we will discuss both methods.
Implement a Sticky Header Using Additional CSS in WordPress

A fixed navigation panel is a trending element. All individuals try to make sure their website is designed as per the recent design trends. With the use of additional CSS code, you can make any kind of change on a website.
Many individuals start worrying after learning it includes coding. In reality, CSS styling is easier than HTML and easy to proceed with any design. People who consider coding as a problematic option can consider plugins and get the work done.
Let’s discuss how to implement or create a sticky header in WordPress by using CSS code.
Things to Do
Apply Fixed Class
Some people think the length of a page and the availability of lots of elements on the page can create problems in making a sticky header; but, it does not matter. If you pick the option of CSS styling, you have to work on a specific code and styling class only.
.navbar-fixed-top
With this particular class’s addition, you easily place the navigation menu and make changes in its appearance. To keep the navigation in a fixed place, you have to add it by applying the nav tag. After the class placement, you have to work on the positioning and other important elements. Otherwise, it starts covering the complete window and disturbs the website design.
While applying the class, you should be careful and smart. You should make sure that it is applied only once. In case you apply it more than one time, it may start affecting other website elements. Lots of sticky elements on a website will completely spoil the design and appearance.
The following are some key aspects that you should take care of during the process.
Page Body Adjustments

After the application of the fixed element class, you need to focus on the page body adjustments. It is important because now some space at the top of the window will be fixed and always covered by the header. Without proper adjustments, your page body content and some other things may not appear on the frontend due to a fixed header’s availability.
The solution for this particular thing is to push the complete body content downwards and keep the space for top content always free. This can be possible with the addition of padding at the top of the body. You can do it with the use of CSS code.
Body {
padding-top: 60px;
}
In this style code, ‘60px’ represents the blank or padding space. You can adjust the space as per the requirements or size of your sticky header.
Squishy Sticky Header
In the appearance of the first window, the size of the sticky header is big. Keeping a fixed big size header may start creating problems with scrolling and mainly with small screen devices. Here, you can implement a squishy sticky header.
With the addition of this particular element, your header will be stuck to the top always, but when the users scroll, its size will reduce and take the required space only.
This can provide more screen space for other web elements and keep the design appearing perfectly. For the squishy header’s implementation, the interested ones need to use a combination of JavaScript and CSS.
Basic CSS Elements
The complete CSS code for a sticky or fixed header with a squishy element will be:
.navbar-fixed-top {
position: fixed;
top: 0;
left: 0;
width: 100%;
background: #000000
z-index: 999;
height: 75px;
overflow: hidden;
-webkit-transition: height 0.3s;
-moz-transition: height 0.3s;
transition: height 0.3s;
}
.navbar-fixed-top.cbp-af-header-shrink {
height: 60px;
}
The first class of .navbar-fixed-top contains all elements for the first appearance at the top of the window. These are the specifications of a fixed header without scrolling. As we know, the addition of squishy elements brings some changes in the height. You can see such changes in the heights of both classes. In the first class, the height is fixed at 75px, and in the squishy mode class, it becomes 60px. This means that when a visitor scrolls the website, the header provides 15px of space more to the design.
For the working element of the squishy fixed header, you have to deal with JavaScript as well. JavaScript is useful in defining a squishy CSS class for the system.
function scrollPage() {
var sy = scroll();
If ( sy &amp’gt;= changeHeaderOn ) {
Classie.add( header, ‘cbp-af-header-shrink’ );
}
else {
classie.remove( header, ‘cbp-af-header-shrink’ );
}
didScroll = false;
}
The addition of JavaScript is useful in managing the operation of the squishy elements. If someone scrolls the website back to the top, the squishy effects will be removed automatically, and the header’s original view appears again.
A Quick Guide for Using an Alternate Method

In case you find the previous CSS method too complicated, you can choose the option of the position: sticky code method. Here is a quick guide made up of just three simple steps:
- First of all, you have to find the right style that can help you in implementing sticky elements correctly; it will be position: sticky. Along with it, you should not forget to apply the browser prefixes position: -webkit-sticky.
- Now, you have to choose the edge where you want to get the navigation panel to stick (left, right, top, or bottom).
- After doing all these things, you should not forget to add space between the sticky header and scroll area content. Try to make it at least 10px.
Here is the code for a top sticky header with a space of 10px above:
.navbar-fixed-top {
position: -webkit-sticky;
position: sticky;
top: 10px;
}
Sometimes, people forget to add space. You should not make such a big mistake. In case you don’t add any space between the sticky header and body content, it may cover the body content and damage the user experience.
Things to Take Care of
The use of CSS code is an easy method to add a sticky header element compared to other coding methods. But, it does not mean you can start working carelessly. While focusing on all these things, you need to take care of multiple factors.
Limited Browser Support
Different types of web browsers are available with different specifications and technical factors. Sometimes, the website design and elements do not work properly due to compatibility issues. You have to pick the CSS option carefully. If browser support is important, you should pick the position: fixed method. If you don’t care about browser support, you can go with the position: sticky option.
Overflow Compatibility
You have to inspect the code and other elements perfectly. Overflow is an unpredictable thing and may cause problems sometimes. Generally, the issues appear with overflow auto, scroll, or hidden.
Implement a Sticky Header Using a WordPress Plugin
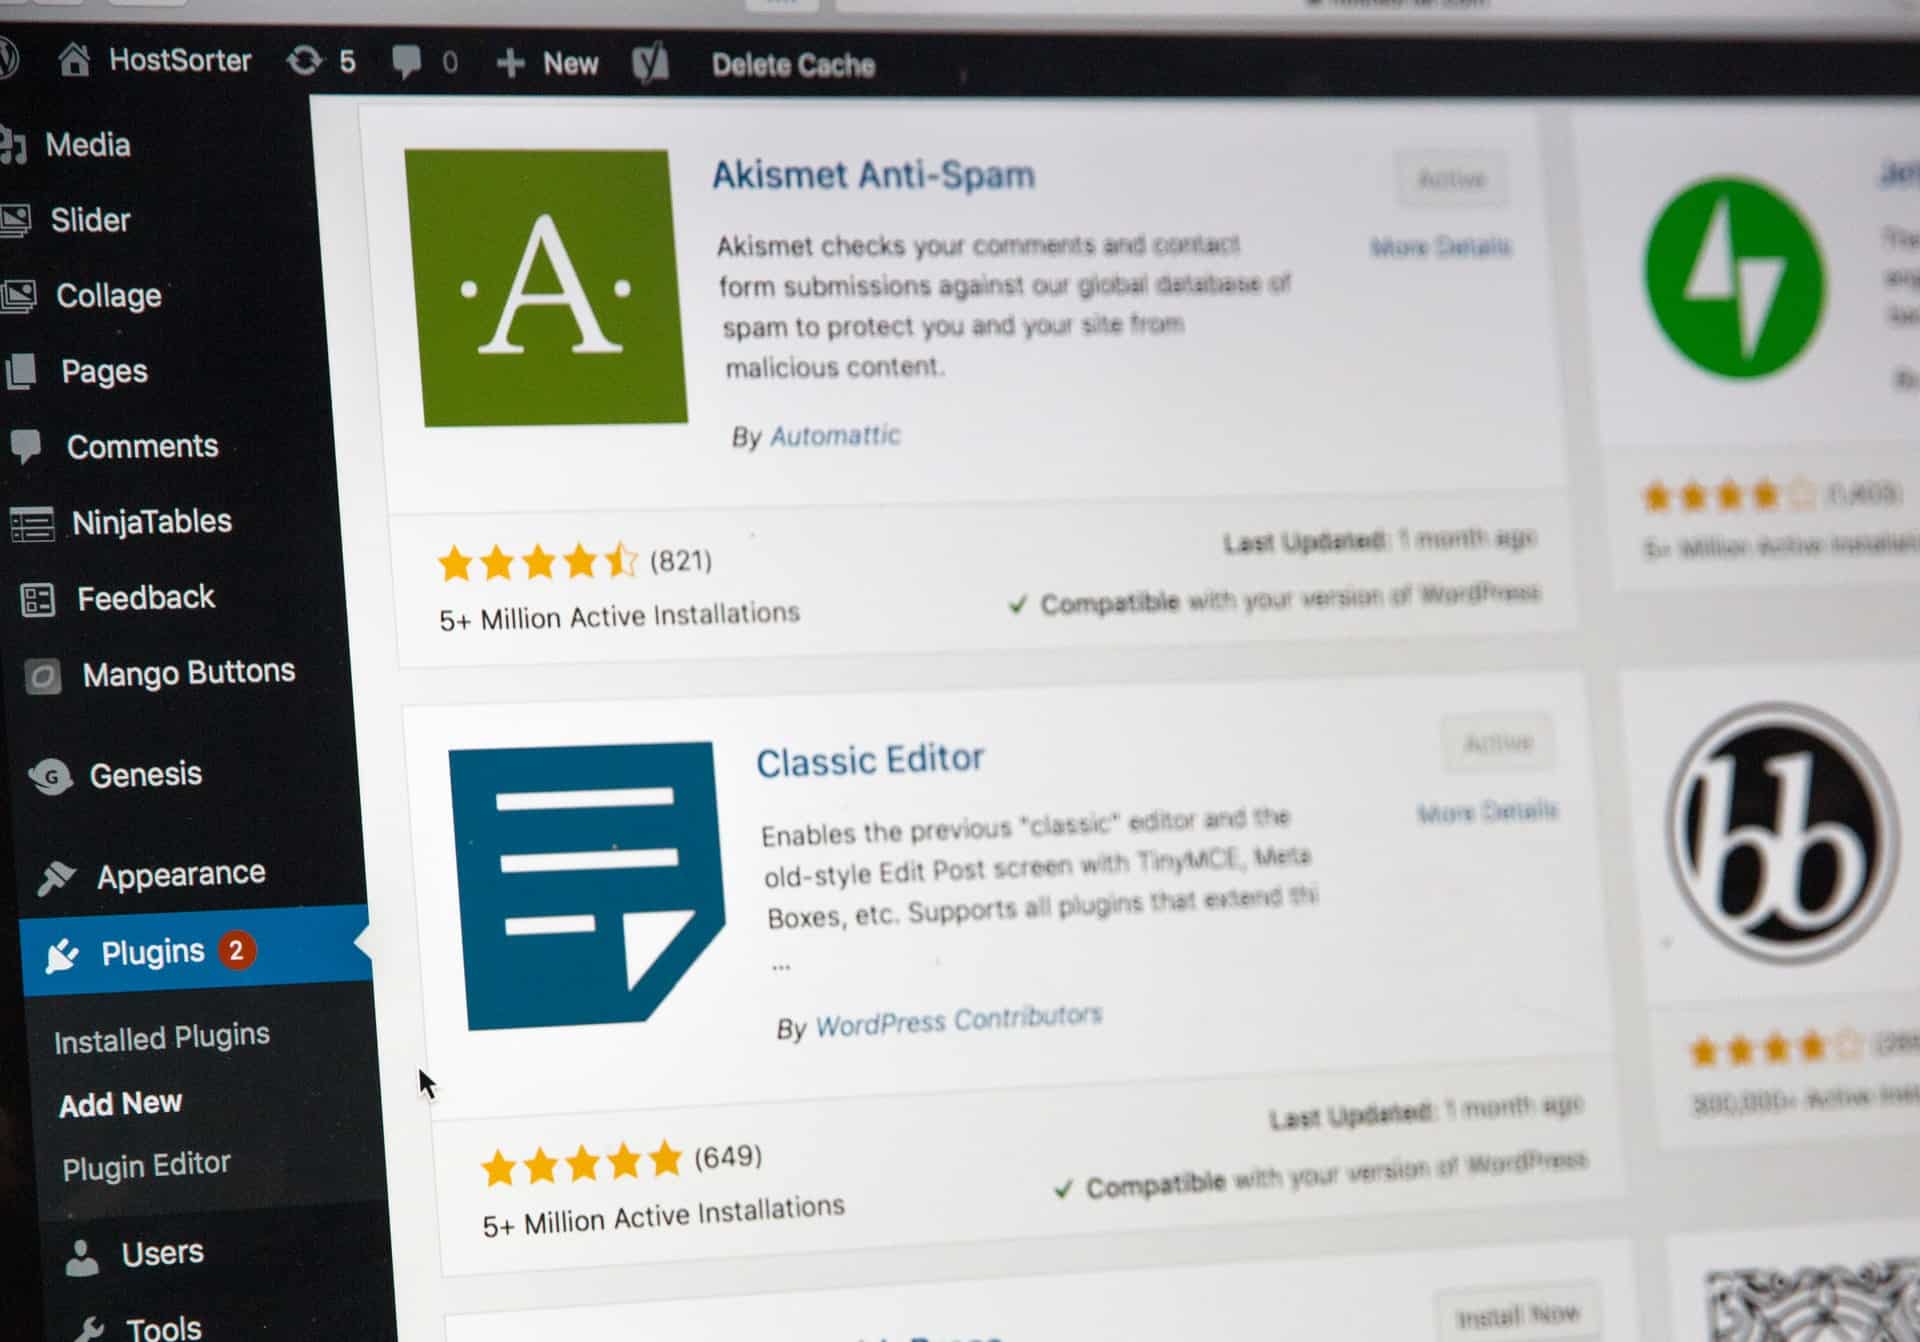
All individuals don’t want to go with the CSS options because they find them complicated. If you are also looking for the easiest and the best option, you can consider WordPress plugins. WordPress has a big plugin library, and along with it, you can find more plugins in other parts of the internet as well. Among these plugins, you can find multiple sticky header element plugins.
Plugin Selection
When it comes to choosing one plugin and starting to work on the sticky header, people get confused due to lots of options.
Description
You should read the description of all plugins. Reading the description can help you understand some vital details about the plugin, its functionality, and features. It can help you understand if you are choosing the right plugin as per the requirements or not.
Check Out the Features
All companies are developing plugins with the addition of different types of features through which they can create a separate identity. You should not forget to check out the availability of all types of features in detail. This way, you can find out if the plugin is useful and if it will serve your purpose or not.
Free or Paid

The most important factor that you have to check out is the method of services. Some tools are available for free, and some are paid. If we talk about the best ones, these are available in both versions. The use of a free plugin can serve your basic requirements. In the paid version, you can access some advanced features.
Method of Using
Another crucial factor to consider is the process of using. You should check out the process carefully. Some plugins are designed with complicated procedures. In case you don’t have technical knowledge, you should choose a plugin that is easy to use.
Customer Support
It is not certain that all users will understand everything at once. The best plugin always provides technical support through which the users can easily clear all queries.
By paying attention to these factors, you can easily find a good WordPress plugin for creating a sticky header. Along with this, you can check out the testimonials.
WP Sticky is one of the best plugins for such a purpose.
WP Sticky – Best Plugin for Creating a Sticky Header
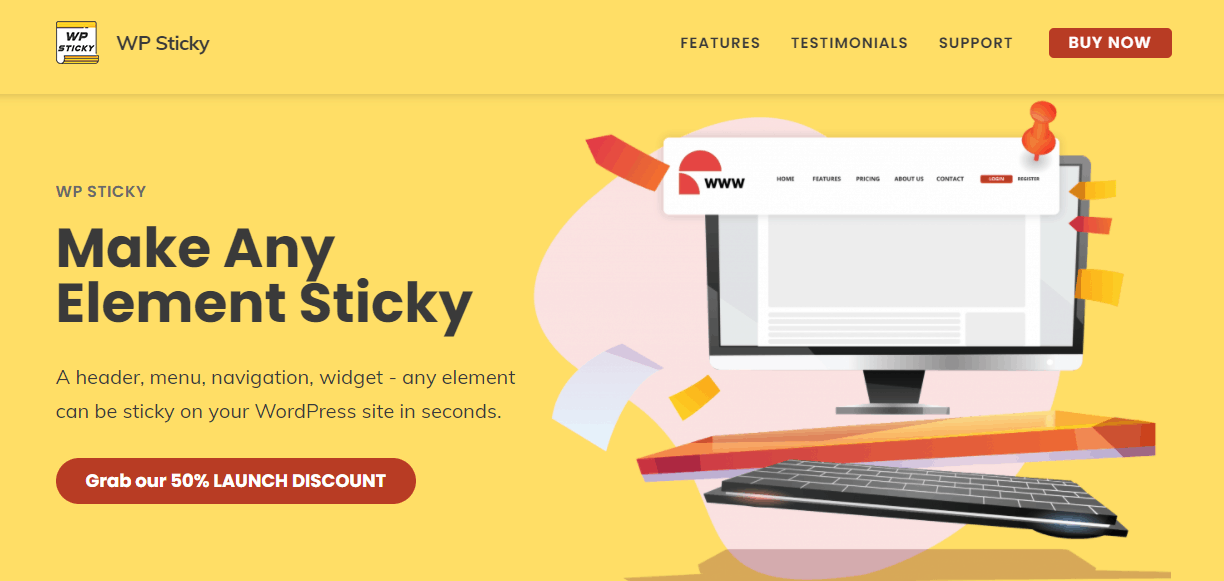
WP Sticky is a WordPress plugin developed by WebFactory Ltd. It allows the users to create sticky elements on a website. It was developed with multiple features to provide top-notch services and serve the clients’ requests properly.
Fast
The use of WP Sticky is too easy. The users who have knowledge of using the WordPress dashboard and plugins can finish the task of creating a sticky element within a few minutes only.
Pick Visually
In the case of specific editing and element classification, the selection of the correct element is very difficult. One mistake can change the website’s functionality and design. While using WP Sticky, you don’t face all these problems. It provides the feature of picking elements visually. This means you don’t need to mess with complicated website code.
Stick Anything
The services of this plugin are not limited to the top header. You can use it to apply the sticky style and class on a menu, widget, navigation, and any kind of web element.
Compatibility
WP Sticky never creates any kind of compatibility problem. You can use it with all types of page builders, themes, and plugins.
Technical Support
The plugin is available with full technical support through which professional developers will assist the users in sorting out problems quickly.
These are some key features of WP Sticky that make it different from other plugins. It was designed with the addition of a user-friendly interface. Plus, interested users have to follow only a short process to access its services.
How to Use WP Sticky for Creating a Sticky Header in WordPress?
Considering the information mentioned above, it is clear that WP Sticky is the best option to create fixed header navigation.
Check out the complete process below.
Get the Plugin
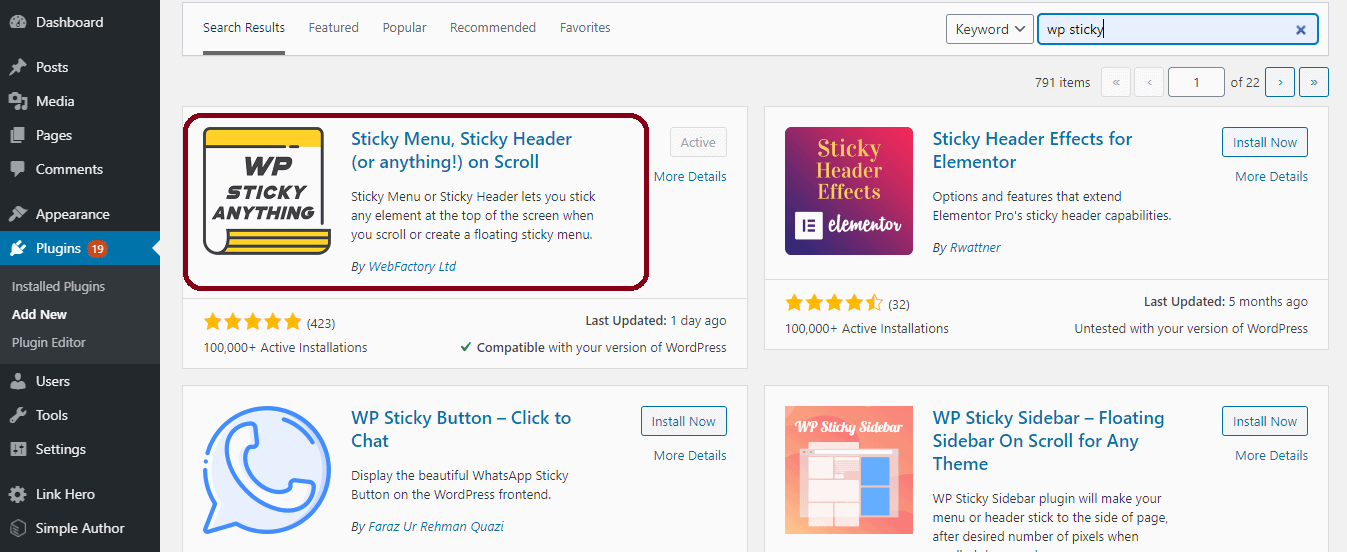
Firstly, you have to install the WP Sticky plugin. To complete this task, you should access the WordPress dashboard first. Now, you have to visit the Plugins section. In the Plugins section, you can see the “Add New” option; click it. After that, you will get access to the WordPress plugin library that has a search bar. You should use the search bar to save time and find WP Sticky quickly.
After searching for it, the tool will appear in front of you; you should click on the installation button. After the installation, you have to activate the plugin. Now, the plugin is available to make desired changes on the website.
Basic Settings
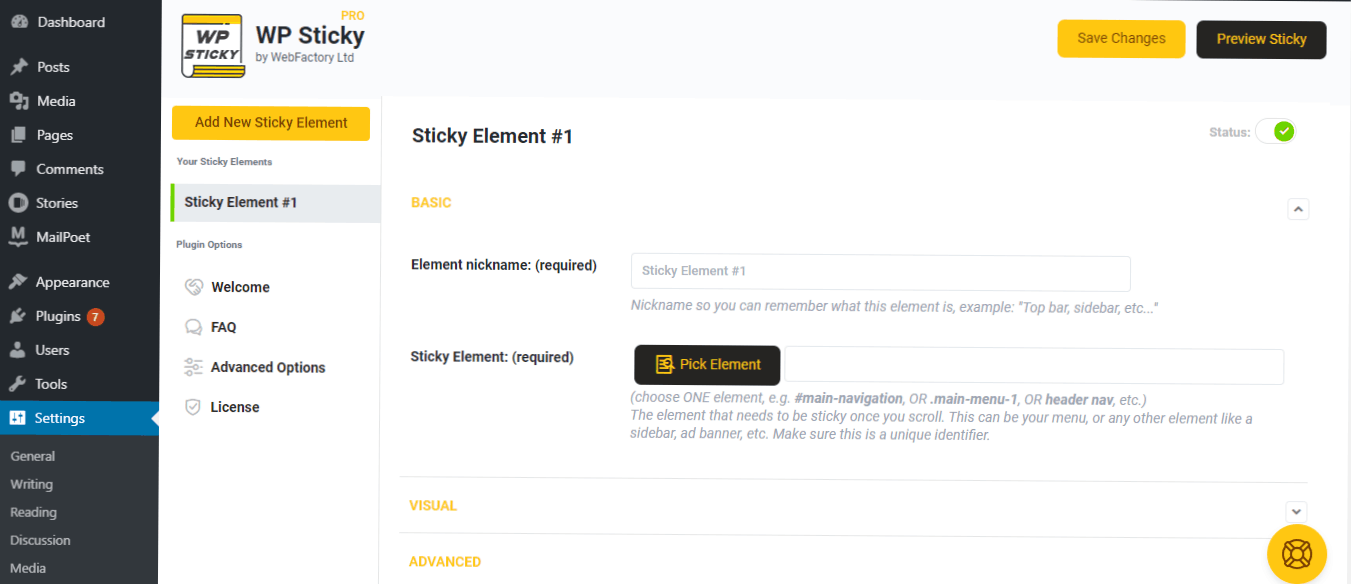
Before you start customizing the header elements and their appearance, you should complete some basic things. Firstly, provide a name for your sticky element to recognize everything easily in the future. You can name the element according to your preferences.
Pick the Element
WP Sticky is not only designed for keeping the headers fixed. You can use it to add sticky effects to any element. Thus, it becomes important to pick the element that you want to make sticky carefully. There are two major methods available for such a task:
- Unique Identifier – If your header contains anything unique that makes its identification separate and easy, you can write that particular thing. It is the easiest way.
- Visual Picker – another option that can help you choose the sticky element is the visual picker. With it, you can pick the desired element and notify the plugin. After that, the plugin will work automatically and search for the identifiers.
After selecting the element, you should focus on the visual settings for the proper appearance of your element.
Visual Options
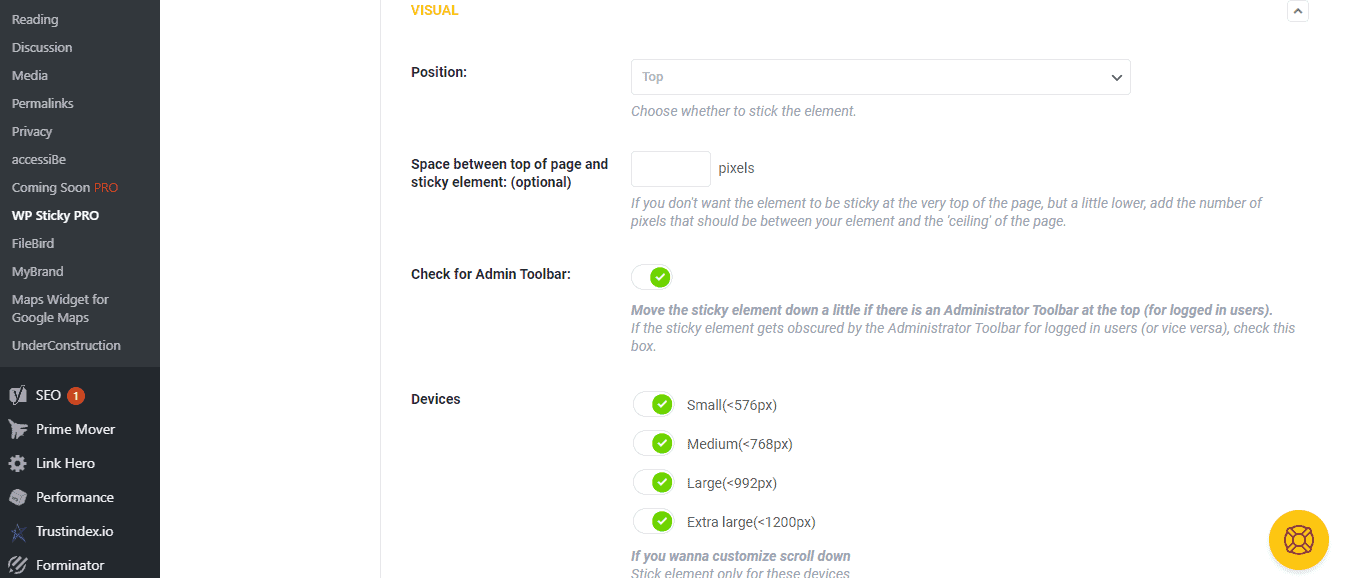
- Position – firstly, you need to pick the header’s position in which you want to fix it permanently, such as – top, bottom, right, or left of the page.
- After Scroll Settings – when you are done with the position selection, you should focus on the after scroll settings. These settings allow your header to function when the users are scrolling the website. Some people shift their headers to the bottom after a scroll.
- Additional Space – we all know it is important to add some space between the fixed header and page body content. People who don’t add space may face the loss of content in the appearance. In these conditions, the header may cover some content from the top.
- Admin Toolbar – in case you want to experience the sticky header like the users or viewers, you should enable the admin toolbar box. Here, the settings will sync with the WordPress admin toolbar. So, you don’t have to focus on any technicalities. All settings and specifications will automatically be set by WP Sticky.
- Devices – the biggest benefit of using WP Sticky is that it allows focusing on the functionalities separately according to different types of devices. You will get options related to all types of devices. You can enable the devices on which you want to apply sticky effects, such as – small (576px), medium (768px), large (992px), and extra-large (1200px).
- Effects – many users are interested in adding some specific effects to the header, such as – slide down and fade-in. WP Sticky provides you the option to enable both types of settings.
- Background – if you are interested in changing the sticky header’s background colors, you can make that possible. All you have to do is choose the desired color.
- Custom CSS – if you want to make more changes or customizations, you can add CSS code to the column. It can help you get the desired results quickly.
With all these visual options, you can customize the appearance of the top sticky header. You can also use some optional settings, like – z-index, opacity, and scroll range.
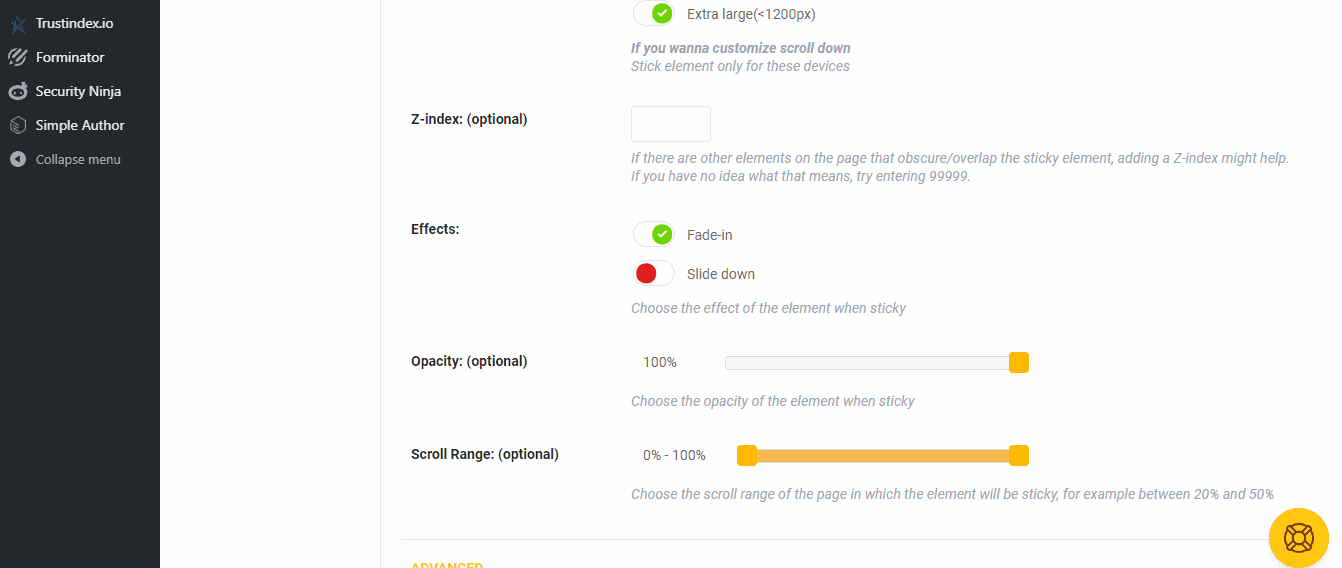
These are some major steps that can help you use the WP Sticky plugin and keep the header navigation fixed at the top. In case you face any problem while using the tool, you can access the complete plugin documentation. It is available on the official website. Along with it, you can consider WP Sticky support.
Conclusion
With the help of all these details and information, you can easily learn how to create a sticky header for a WordPress website. Before creating a sticky header, you should discuss everything with the professionals. They can tell you if it is good to implement a sticky navigation menu in your current website design or not.
Author Bio:
Ravi is CEO & founder of Webomaze Pty. Ltd. He believes in serving the industry with some unique solutions with a huge variety of services, including web design & web development, SEO Services, ECommerce Development, and so on.
![]()
![]() Latest posts by Editorial Staff (see all)
Latest posts by Editorial Staff (see all)
Where Should We Send
Your WordPress Deals & Discounts?
Subscribe to Our Newsletter and Get Your First Deal Delivered Instant to Your Email Inbox.
Thank you for subscribing.
Something went wrong.
Keep reading the article at WP Newsify. The article was originally written by Editorial Staff on 2021-03-15 02:00:41.
The article was hand-picked and curated for you by the Editorial Team of WP Archives.

