Are you looking to migrate your Wix site to WordPress? Wix is a simple drag and drop builder that allows you to create a website quickly and easily. However, it is limited in terms of features and you need to pay a hefty amount of money to add more options to your site. Instead, you can move your website to self-hosted WordPress which is highly-flexible and also offers loads of features.
In this article, we’ll show you how to properly transfer your site from Wix to WordPress.
Why Should You Move Your Site from Wix to WordPress?
Wix lets you create a website in a few minutes and it’s free to start with. It’s immensely helpful for both beginners and advanced users alike. While beginners can use the drag-and-drop builder to quickly set up and customize their websites, advanced users can add their own code and styling scripts to Wix.
Wix offers a free limited plan to build a website. The free plan is suitable for absolute beginners who don’t mind having an ugly looking URL for their website such as http://username.wixsite.com/siteaddress. As you regularly publish content with your free Wix plan, it’s easy to run out of your free storage limit. In order to keep your site alive, you’re required to buy a premium plan that offers more storage and bandwidth.
Since Wix is a hosted platform, you’re required to abide by their Terms of Service. If you’re not comfortable with their terms, then you’ll want to choose another platform instead.
A self-hosted WordPress platform, on the other hand, is free from such limitations. It’s highly flexible and provides all the features you need to create a website any way you see fit. There’s no built-in limit within the platform that stops you from adding images in WordPress, unlike Wix. Your data is fully secured and belongs to you, so no one can delete anything from your site until you want to remove it yourself.
Learn more about the differences between Wix and WordPress.
Related: How to migrate from Medium to WordPress (No downtime)
Let’s take a look at the steps to easily switch from Wix to WordPress.
- Getting Started With WordPress
- Installing WordPress on Your Web Hosting Account
- Importing Wix Content Into Your WordPress Site
- Import Wix Pages to WordPress
- Import Images From Wix to WordPress
- Set Up Permalinks in WordPress
- Redirecting From Wix to WordPress
- WordPress Best Practices to Follow After Site Migration
Step 1: Getting Started With WordPress
Wix has its own web hosting servers and the hosting cost is included in their premium plan. Their charge covers the expenses for the storage space, bandwidth, website builder, and other services that you use for creating your site. The cost continuously increases as you add the storage space.
On the other hand, WordPress software is free to download and use. All you need to do is purchase a domain name and web hosting.

We recommend you use Bluehost for hosting your WordPress website. They’re also officially recommended by WordPress.org (the core WordPress company).
Bluehost is a reliable platform to run your WordPress site, and it costs less than what you pay Wix for their premium plans every month. To save even more on initial expenses, we’ve worked out a deal with Bluehost to offer our users a free domain name, free SSL, and over 60% OFF on their WordPress hosting plans. Isn’t that exciting?
Click Here to Claim This Exclusive Bluehost Offer »
If you already have a custom domain set up for your site on Wix, then you can choose the option I have a domain name when setting up your web hosting account with Bluehost.
Step 2: Installing WordPress on Your Web Hosting Account
Once you’ve purchased a web hosting account, you can go ahead and install WordPress on it.
Since you are using Bluehost as your web host, you can use their 1-click WordPress installer tool that is available in the cPanel. It makes the installation process easy.
Here’s how you can install WordPress on your Bluehost account.
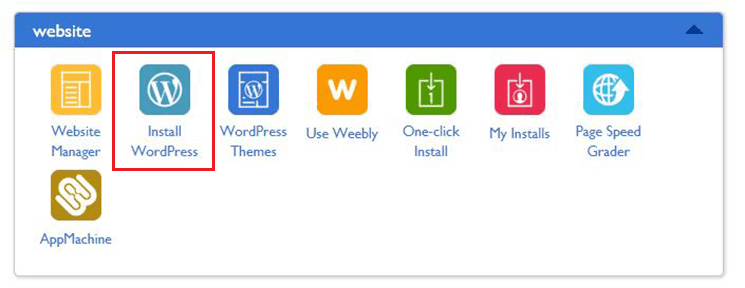
Simply choose Install WordPress in the website section of your cPanel and follow the instructions. You’ll be asked to choose a theme for your new WordPress installation.
Note: You can choose any theme for now. It can be changed after completing the WordPress installation process.

Now you can add the title and tagline for your WordPress blog. If you want to change the title or tagline later, then you can simply do it from the WordPress admin settings.
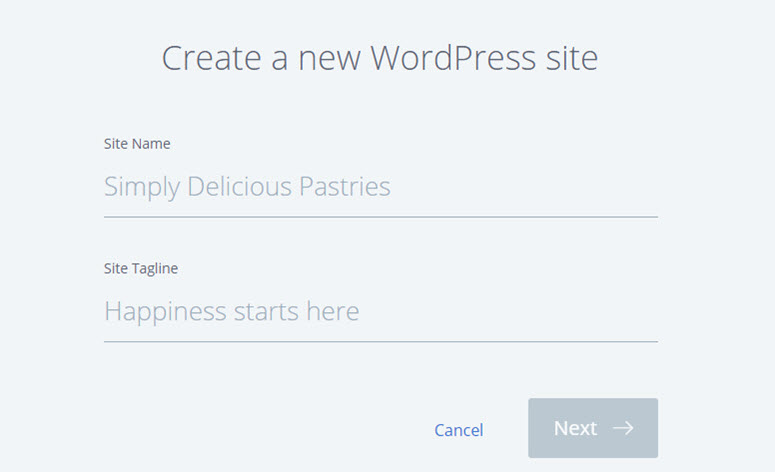
Once you are done with adding all the required details, click on the Next button. Your WordPress installation will begin and it will be ready in a few minutes.
After the installation is finished, you’ll see a screen with your login credentials for WordPress admin.
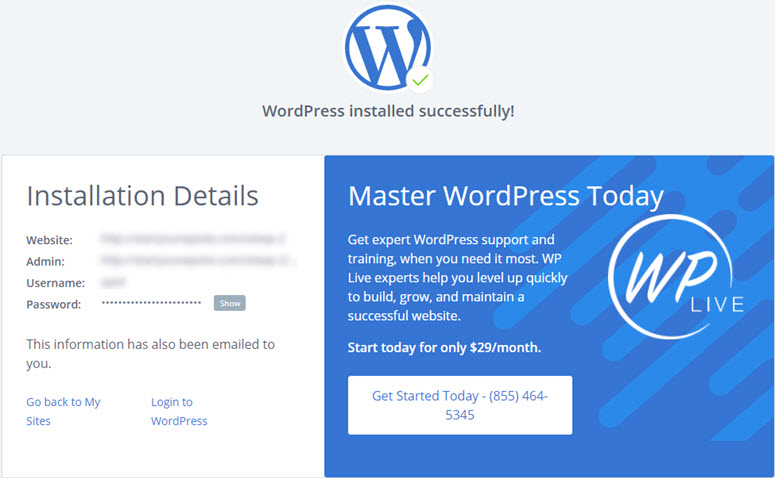
The WordPress admin URL will look like:
http://example.com/wp-admin
Go ahead and log into your WordPress admin account using the above credentials. These login details will also be sent to your email address.
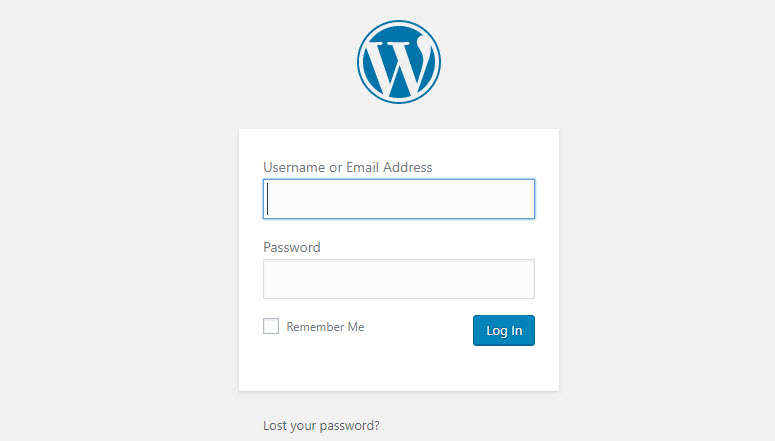
Step 3: Importing Wix Content Into Your WordPress Site
Importing content from your Wix site to WordPress is not easy. Wix doesn’t have a built-in feature to export your content to external sources.
However, you can still import your blog posts using Wix’s RSS feed to avoid manual recreation of each blog post.
The first thing you need to do is to find the Wix RSS file and download it. You can add /feed.xml after your Wix website URL and it will display the feed. If your custom domain at Wix is mywixsite.com, then the RSS feed URL will look like:
http://mywixsite.com/feed.xml
In case you are not using a custom domain, then your Wix RSS feed URL will be like username.mywixsite.com/myblog/feed.xml. Here username is your Wix username and myblog is the name your blog that you created on Wix.
Once you’ve opened the correct RSS feed URL, you’ll see a page full of code. You need to download this page on your computer. Simply right-click on the page and Save Page As to the save the file.
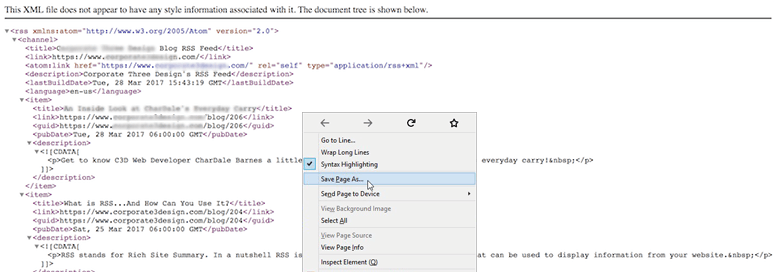
After saving the RSS file, you’ll need to log into your WordPress admin account to access the dashboard. From there, go to the Tools » Import page.
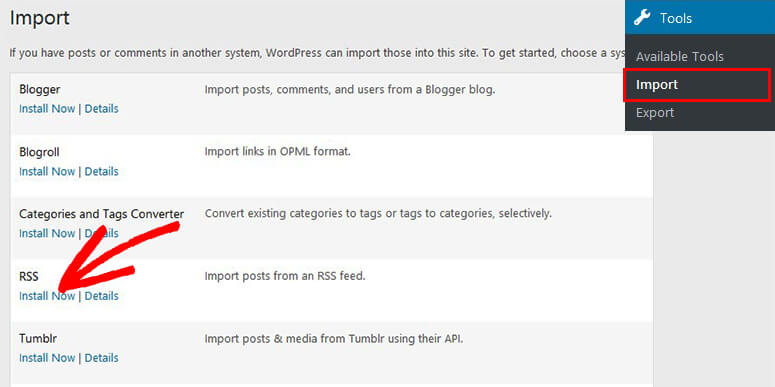
You can find a list of different importers. You need to click on the Install Now button below RSS importer tool.
Once installed, you need to run the importer and select the RSS file from your computer. Now click on the Upload file and import button.

It will take a few seconds to import all your posts from Wix to WordPress. You’ll see a success message for each post.
Step 4: Import Wix Pages to WordPress
After importing the blog posts, you can go ahead and move pages from Wix to your new WordPress site.
No built-in export tool is available to migrate pages as well. You need to recreate all the pages in WordPress.
The first thing you need to do is go to Pages » Add New in your WordPress admin area and add a title similar to a Wix page.
Now go to your Wix page and copy all the content from the editor. Then paste this content on your WordPress page in the Text editor.
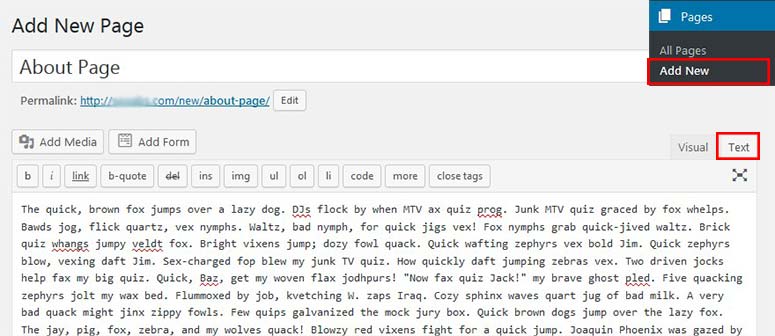
Once all the content of the Wix page is copied to your WordPress page, simply click on the Publish button to display this page on your WordPress site.
You need to repeat this process for all the pages one-by-one.
Step 5: Import Images From Wix to WordPress
Now that you’ve imported all the content from Wix to your WordPress site, you may find an issue with the images that were uploaded. When you edit any imported posts or pages, you’ll notice that the images are still hosted with Wix.
Fortunately, WordPress has a variety of plugins that you can use to import images from external sources like Wix. In our tutorial, we’ll be using the Auto Upload Images plugin for the purpose.
To import your image files safely into your newly installed WordPress site, you’ll first have to install and activate the plugin on your website. For that go to your WordPress dashboard and click on Plugins » Add New. Now using the search field look for the Auto Upload Images plugin.
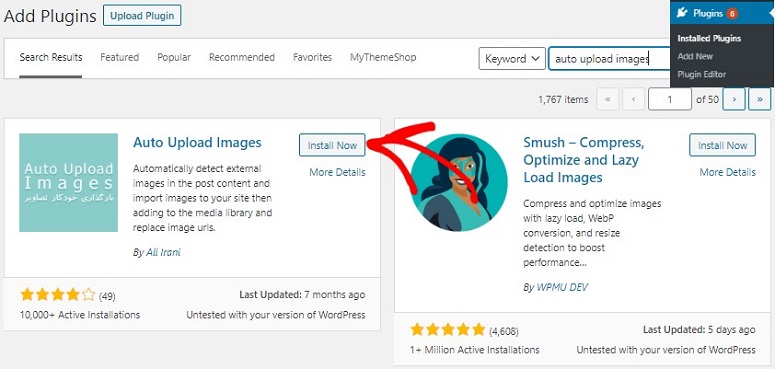
Once you locate it, hit the Install Now button followed and then activate the plugin.
After that, go to your dashboard again and update all your posts. To update your posts go to Posts » All Posts. Now check all the boxes and select Bulk Action » Edit.
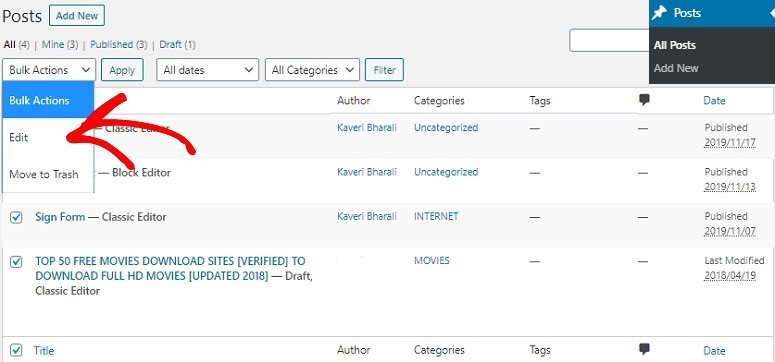
Then hit the Apply button. You’ll now see a new interface on your screen. You should now click on the Update button.
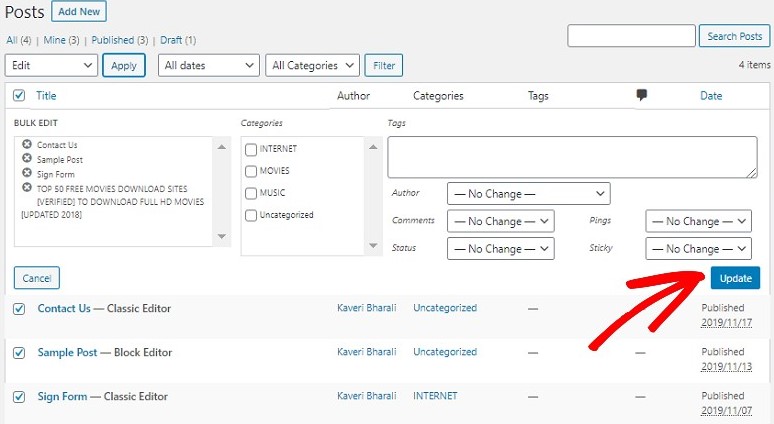
Once done the plugin will start working on your images. Repeat the same process in all your pages so you don’t miss any image.
Step 6: Set Up Permalinks in WordPress
WordPress has an amazing and flexible permalinks system that lets you create URLs the way want them to be. It’s important to make your permalinks identical in WordPress, so you don’t lose any traffic coming your way from your old Wix site.
To change your URL structure in WordPress, you need to go to the Settings » Permalinks page and select a permalink structure that suits best with your WordPress blog.
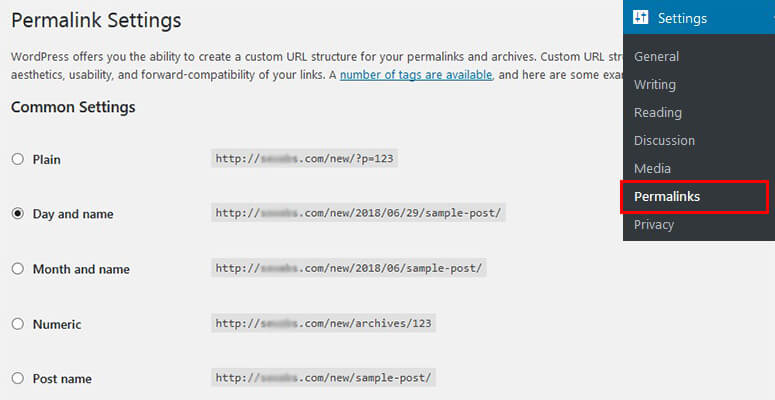
Once selected, click on the Save Changes button to see the URLs in action.
Step 7: Redirecting From Wix to WordPress
Your site is ready. Now you need to set up the redirection to keep your search rankings and traffic intact.
Note: Redirection to WordPress site can only be possible if you own a custom domain on Wix. In case you are using the Wix subdomain, then you cannot redirect users to WordPress.
To start with redirection, you need to create a new file with any text editor like Notepad and paste this code:
var hashesarr = {
"#!about-us/c1it7":"https://www.isitwp.com/about/",
"#!contact/ce54":'/contact/',
"#!random-article/c1mz":'/random-article/'
 };

for (var hash in hashesarr) {
    var patt = new RegExp(hash);
    if (window.location.hash.match(patt) !== null) {
        window.location.href = hashesarr[hash];
    }
}
This is a sample code with examples of three pages (about, contact, and random article) that are redirecting from Wix to WordPress. The first string is the URL in Wix and the second string is the URL of WordPress page where you want your visitors to be landed.
You need to manually add all the pages to redirect them from Wix to WordPress.
Once you are done, simply save this file as redirect.js and upload it in your WordPress theme’s /js/ directory using the FTP client. If there’s no /js/ directory available, then simply create one to add this file.
Next, you’ll need to go to Appearance » Editor in WordPress admin area and edit the Functions.php file. Simply paste this code at the bottom:
function wpb_wixjs () {
wp_enqueue_script( 'wixredirect', get_stylesheet_directory_uri() . '/js/redirects.js', array(), '1.0.0', true);
}
add_action('wp_enqueue_scripts', 'wpb_wixjs');
Once you are done, click on the Save Changes button. Now all your visitors from Wix will be redirected to your WordPress pages.
Your visitors may still see 404 errors on your WordPress site after the redirection. Learn how to track 404 pages and redirect them in WordPress.
WordPress Best Practices to Follow After Site Migration
Your Wix site has been successfully moved to WordPress. Now, you should follow some recommended practices to keep your site secure, improve search engine rankings, monitor spam comments, and improve performance.
We also recommend you to take a look at our expert picks for the top WordPress themes to find the best theme for your new WordPress site.
That being said, let’s take a look at the steps you should take immediately after the migration.
If you’re a WordPress user and planning to switch domains, then check out this article on moving your WordPress website to a new domain name.
Don’t miss these Wix alternatives and competitors for more choices.
We hope this article helped you move from Wix to WordPress. For more detailed steps, read how to start a WordPress website from scratch (step by step).
Keep reading the article at IsItWP – Free WordPress Theme Detector. The article was originally written by Editorial Team on 2019-12-30 05:30:28.
The article was hand-picked and curated for you by the Editorial Team of WP Archives.

